Manage users
Invite or add people to Bulk, assign their roles and site access, reset passwords, and deactivate accounts from the Users screen in Settings.
Last updated
The Users screen is where an administrator manages the people in your organization. You can invite or add people, assign their roles and site access, reset passwords, and deactivate accounts.
A few terms used throughout this page:
- A user (or user account) is one person who can sign in to Bulk in your organization.
- A role is a named bundle of permissions that decides what a person can see and do. Roles are created and configured on the User roles screen. See Manage roles and permissions.
- An entity is one site or plant, such as a fabrication plant or a warehouse. Assigning entities to a person decides which sites they can open.
Use this screen when a new team member joins, when someone changes jobs and needs a different role, when a person forgets their password, or when someone leaves and their access must be removed.
Where to find it
Open Settings, then Organization, then Users. The screen lives at /settings/organization/users. The page header reads Users with the description "Manage users, roles, and permissions for your organization."
Each row in the table shows:
| Column | What it shows |
|---|---|
| User | The person's name with their email address below it. |
| Roles | A badge for each role the person holds, or "No roles" when they have none. |
| Entities | A badge for each site the person can open, or "No entities" when they have none. |
| Status | An Active or Inactive badge. An inactive person cannot sign in. |
Right-click an account row to open its context menu. Available actions depend on your permissions, described next. Pending invitation rows do not have a context menu. The list can also contain paired time-clock device accounts.
Before you start
Opening the Users screen and each action on it are controlled by permission. What you can do depends on the roles assigned to you:
| Permission | Technical name | What it unlocks |
|---|---|---|
| View users | users.view | Open the Users screen and see the list. |
| Create users | users.create | The Add User and Bulk Create buttons. |
| Edit users | users.update | Edit a person, and Deactivate or Activate them. |
| Reset user passwords | users.reset_password | Reset Password for a person. |
| Manage user roles | users.manage_roles | Assign Roles to a person (and in bulk). |
| Manage entity user access | entities.manage_users | Assign Entities to a person (and in bulk). |
| Create invitations | invitations.create | Together with Create users, shows the Invite button and the roles you are allowed to offer. |
| View invitations | invitations.view | Pending invitation rows in the Users table. |
An action only appears when you hold its permission. If your role can edit users but cannot manage roles, for example, you will see Edit in the context menu but not Assign Roles.
Which roles can manage users
The built-in Super user role holds every permission, so a Super user can do everything on this screen. The Entity admin and Manager system roles can view, create, edit, and reset the password of users, but they do not include Manage user roles or Manage entity user access by default. They cannot change a person's roles or site access until those permissions are added to a role. To let someone assign roles or site access, grant a role the users.manage_roles and entities.manage_users permissions on the Manage roles and permissions screen.
Invite a person by email
Use an invitation when you want the person to choose their own name and password.
- Select Invite in the page header.
- Enter the person's work Email.
- Under What will they do?, select one or more roles.
- Select Send Invitation.
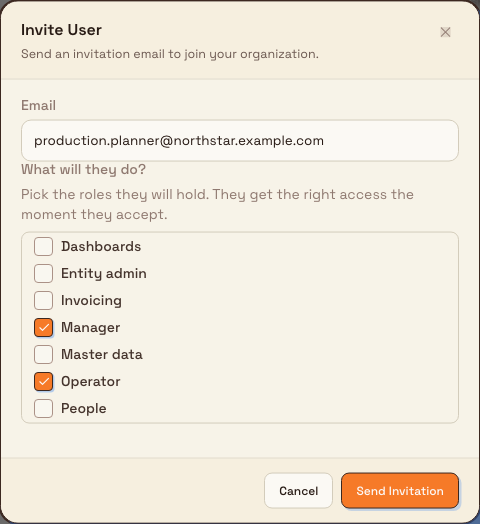
Bulk emails a link that is valid for 7 days. The link shows the organization, invited email, and selected roles. The person enters their name, chooses a password, and selects Accept invitation.
Bulk creates the account, applies the selected access, and signs the person in. For the new account, Bulk keeps one selected baseline role: Super user takes priority over Entity admin, which takes priority over Operator. Other selected roles are added alongside it. Their invitation is replaced by their user account.
Assign site access after acceptance
The Invite dialog assigns roles, but it does not ask for a site. After the person accepts, use Assign Entities on their account row to give them access to the plants where they work.
The role list only contains active, unlocked roles you are allowed to give:
- If you have Manage user roles (
users.manage_roles), you can offer any active, unlocked role in the organization. - Without that permission, you can still offer the built-in Operator and Entity admin roles, plus any other role whose permissions you already hold yourself.
- Super user is offered only to someone who can manage user roles.
If no roles are available, the invitation cannot be sent.
Add a person
- Select Add User in the top right. The Create User dialog opens.
- Enter the person's Email. Each email can belong to only one account in Bulk.
- Enter their Name (at least two characters).
- Enter a Password. It must be at least 8 characters with an uppercase letter, a lowercase letter, and a number.
- If your role can manage site access, tick the Entities the person should be able to open.
- If your role can manage roles and view the role list, tick any extra Roles the person should have. You can select more than one.
- Select Create User.
Bulk confirms with "User created" and the person appears in the table. The password you set is temporary: the person must replace it the first time they sign in. Share the starter password through a secure channel.
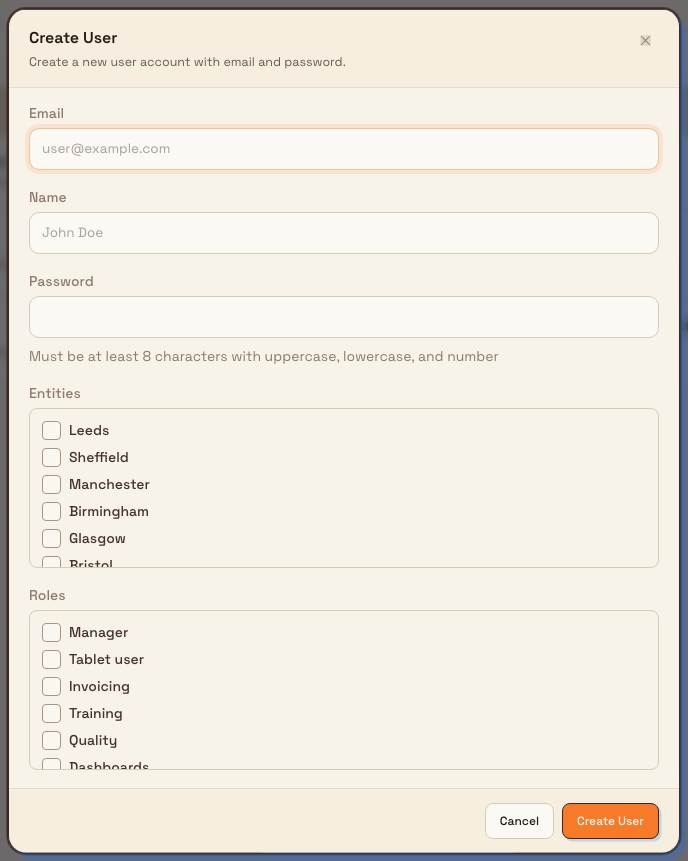
Every directly created person receives the Operator baseline automatically, so Operator is not listed in this form. Entity admin and Super user are also excluded from the creation picker. Use Assign Roles after creation when the person needs a different complete role set.
Add several people at once
When you are onboarding a group, select Bulk Create instead. A short wizard walks you through three steps:
- Add Users: paste rows from a spreadsheet or type one email per line. Two formats are accepted: an email followed by a tab and the person's name, or an email on its own (Bulk derives a name from the email).
- Assign: choose any extra roles and site access to apply to everyone in the batch. Operator is added automatically.
- Results: Bulk creates the accounts and shows which succeeded and which failed, so you can fix and retry only the problem rows.
You can create up to 100 people in a single batch.
Assign roles to a person
Roles decide what a person can do. To change someone's roles:
- On their row, right-click to open the context menu and select Assign Roles. The Assign Roles dialog opens.
- Tick the roles the person should have and untick the ones they should not.
- Select Save.
Bulk confirms with "Roles assigned". The set of roles you save replaces the person's previous roles. It is not added on top of them. A role that has been locked on the User roles screen cannot be assigned; if you try, Bulk reports that the role is locked.
Assign site access to a person
Assigning entities decides which sites a person can open from their Select an entity screen.
- On their row, right-click to open the context menu and select Assign Entities. The Assign Entities dialog opens.
- Tick the sites the person should be able to open and untick the rest.
- Select Save.
Bulk confirms with "Entities assigned". As with roles, the set you save replaces the person's previous site access. If you remove the site they currently have open, Bulk clears it and they will pick an available site next time they sign in.
Two ways a person gets site access
You can grant site access directly here with Assign Entities, or a person can ask for it themselves from a locked site tile, then you approve it on the Review access requests screen. Both routes end in the same place: the site becomes available on their Select an entity screen.
Reset a person's password
If someone is locked out, you can set a new password for them without knowing their old one:
- On their row, right-click to open the context menu and select Reset Password.
- Enter and confirm a New Password that meets the strength rule.
- Select Reset Password.
Bulk confirms with "Password reset". The person is asked to choose their own password the next time they sign in, so the value you set only needs to get them back in once.
Edit, deactivate, or reactivate a person
Right-click a person's account row to reach the rest of the controls:
- Edit opens the Edit User dialog, where you can change the person's Name, Email, and Status (Active or Inactive).
- Deactivate turns off an active account. The person can no longer sign in, and any sessions they have open are ended straight away. Deactivating does not delete the account or its history. You can bring it back at any time.
- Activate turns a deactivated account back on so the person can sign in again.
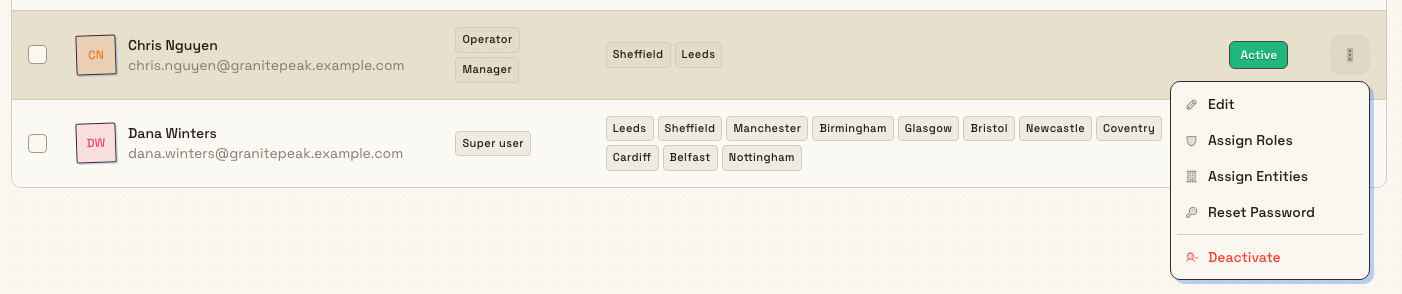
Two safeguards protect your organization from being locked out: the Deactivate item is disabled on your own row, and Bulk refuses an attempt to deactivate the organization owner.
Find people quickly
Above the table is a filter bar for narrowing a long list:
- Search by name or email filters as you type.
- Active / Inactive status tabs switch the list between people who can sign in and deactivated accounts. The list defaults to Active.
- Role shows only people who hold a chosen role.
- Entity shows only people assigned to a chosen site, or choose Unassigned to find people with no site access yet.
When nothing matches, the screen shows "No results found" with a prompt to adjust your search or filters. When your organization has no people at all, it shows "No users yet" with an Add User action.
Act on several people at once
If your role can assign roles or site access, tick the checkbox on each row you want to change (or the header checkbox to select the whole page). A bar appears at the bottom with the number selected and two actions: Assign Roles and Assign Entities. Applying either updates every selected person at once, up to 100 at a time. When a batch finishes, a results window lists each person as a success or a failure so you can see exactly who was updated.
Example: onboarding a shift in Gotham
Suppose Wayne Enterprises adds three operators to the Gotham Applied Sciences night shift. Bruce Wayne opens Settings → Organization → Users and selects Bulk Create. He supplies their emails and names, chooses site access and extra roles, then checks the results.
When an operator becomes a shift lead, Bruce right-clicks their account row, selects Assign Roles and keeps any roles they still need before saving the full new set. When someone leaves, Deactivate blocks sign-in while retaining their account history.
Expected result
After each action, Bulk shows a short confirmation and updates the table. An invitation shows Invitation sent and adds an Invited row. New roles and site access take effect when the affected person's session next loads.
User and invitation changes are recorded in your organization's Activity logs.
Limitations and feature state
Managing users is generally available. Keep these behaviors in mind:
- Assigning roles and site access needs extra permissions. Viewing, creating, editing, and resetting passwords are separate from Manage user roles and Manage entity user access. A role without those two permissions can add and edit people but cannot change their roles or which sites they can open.
- People are deactivated, not deleted. There is no control on this screen to permanently remove a person; you deactivate the account instead, which keeps its history and can be reversed.
- You cannot deactivate the owner or yourself. These safeguards keep at least one administrator able to sign in. Your own Assign Roles menu action is also disabled.
- Assigning roles or entities replaces the previous set. Each dialog saves the full list you tick, rather than adding to what was there. Re-tick anything you want to keep.
- Invitations expire after 7 days. Ask the administrator to send a new invitation if the original link expires. Pending rows have no resend or cancel action on this screen.
- Invitation sending is rate-limited. An organization can send up to 10 invitations in a day. If Bulk says too many invitations have been sent, wait for the retry time shown in the message.
- The Invite dialog does not assign sites. Grant site access with Assign Entities after the person accepts.
- Locked roles cannot be assigned. A role that has been locked on the User roles screen is unavailable until it is unlocked.
Troubleshooting
You do not see Assign Roles or Assign Entities in a person's menu. Your role is missing Manage user roles (users.manage_roles) or Manage entity user access (entities.manage_users). Ask a Super user to add the permission to your role on the Manage roles and permissions screen, then reload the page.
"A user with this email already exists" when adding someone. That email is already used by an account in Bulk. Search the list first. The person may already exist, possibly deactivated. Use another email only if it belongs to the intended new person.
The Deactivate item is unavailable on your own row. You cannot deactivate the account you are currently using. Bulk also refuses any attempt to deactivate the organization owner.
The password is rejected. Passwords must be at least 8 characters and include an uppercase letter, a lowercase letter, and a number. Adjust the value and try again.
The Invite button is missing. Your role needs both Create users (users.create) and Create invitations (invitations.create) for the button to appear.
No roles appear in the Invite dialog. Bulk only shows roles you are allowed to give. Ask a Super user to review your access, or create the account directly with Add User.
"A pending invitation already exists for this email." The person already has an unused invitation. Ask them to use the most recent email. If it has expired, send a new invitation.
Related
- Manage roles and permissions, create roles and choose what each one can do.
- Review access requests, approve people who ask for access to a site.
- Manage entities, create and configure the sites you assign to people.
- Activity logs, review a record of user, role, and access changes.
- Select an entity, how a person chooses a site once you have granted access.
- Create an account, what an invited person sees when they join.
Review activity logs
Find, filter, and inspect the organization-wide audit trail of who changed what and when across your Bulk tenant, for compliance reviews and investigations.
Review access requests
Approve or deny requests from people who need access to one of your organization's sites, and grant site access in a single click.