Beta
Use the planning board
Orient yourself on the Scheduling planning board — the drag-and-drop view where you plan job steps onto machines across a multi-day timeline — and learn how to open, read, and work it.
The planning board is the main screen of the Scheduling module. It is a drag-and-drop board where you decide which machine runs each step of a job, and when. Unplanned work waits in a list on the left; each machine has its own timeline on the right; and you place work by dragging a card from the list onto a machine's timeline.
Use the planning board when you need to turn a pile of open jobs into a concrete, time-ordered plan per machine — for example at the start of a shift, when a rush order arrives, or when a machine goes down and its work has to move elsewhere. A few terms used throughout this guide:
- A job is the work Bulk tracks for one order line. A job is made of ordered steps (also called operations) — for example cut, then weld, then finish.
- A resource is a work centre: the kind of work a step needs (such as "Laser cutting" or "Welding"). Each step is tied to one resource.
- An asset is a physical machine. A machine can host a step only when its asset type is set up to allow that step's resource.
- A run is a step once you have placed it on a machine at a specific time. Planning a step creates its run; unplanning it returns the step to the list.
Beta feature
The planning board is in beta. It appears in the sidebar under Scheduling → Planning with a Beta badge, and some controls are still being built. Behaviour and limits described here are current for this release and may change.
scheduling.planning-board-01
Before you start
To open the board you need the View job planning permission; to place or change anything you also need the Plan jobs permission. Both are scoped to the site (entity) you have selected. If you can see the board but cannot drag cards or open the right-click menu on a block, your role has view access only — ask an administrator to grant Plan jobs.
The board also needs data to plan against:
- At least one active machine with a resource allowed on its asset type. Without this the board shows an empty state (see Troubleshooting).
- Open jobs with steps in a plannable state. Only steps whose job item is still
pendingorloadedappear in the queue; once a step is in progress or completed it can no longer be re-planned.
Open the planning board
- In the left sidebar, open Scheduling.
- Select Planning (marked Beta).
The board opens full-screen at /scheduling/home with its own header, so it can use the whole width. The browser tab title starts with "Planning".
How the board is laid out
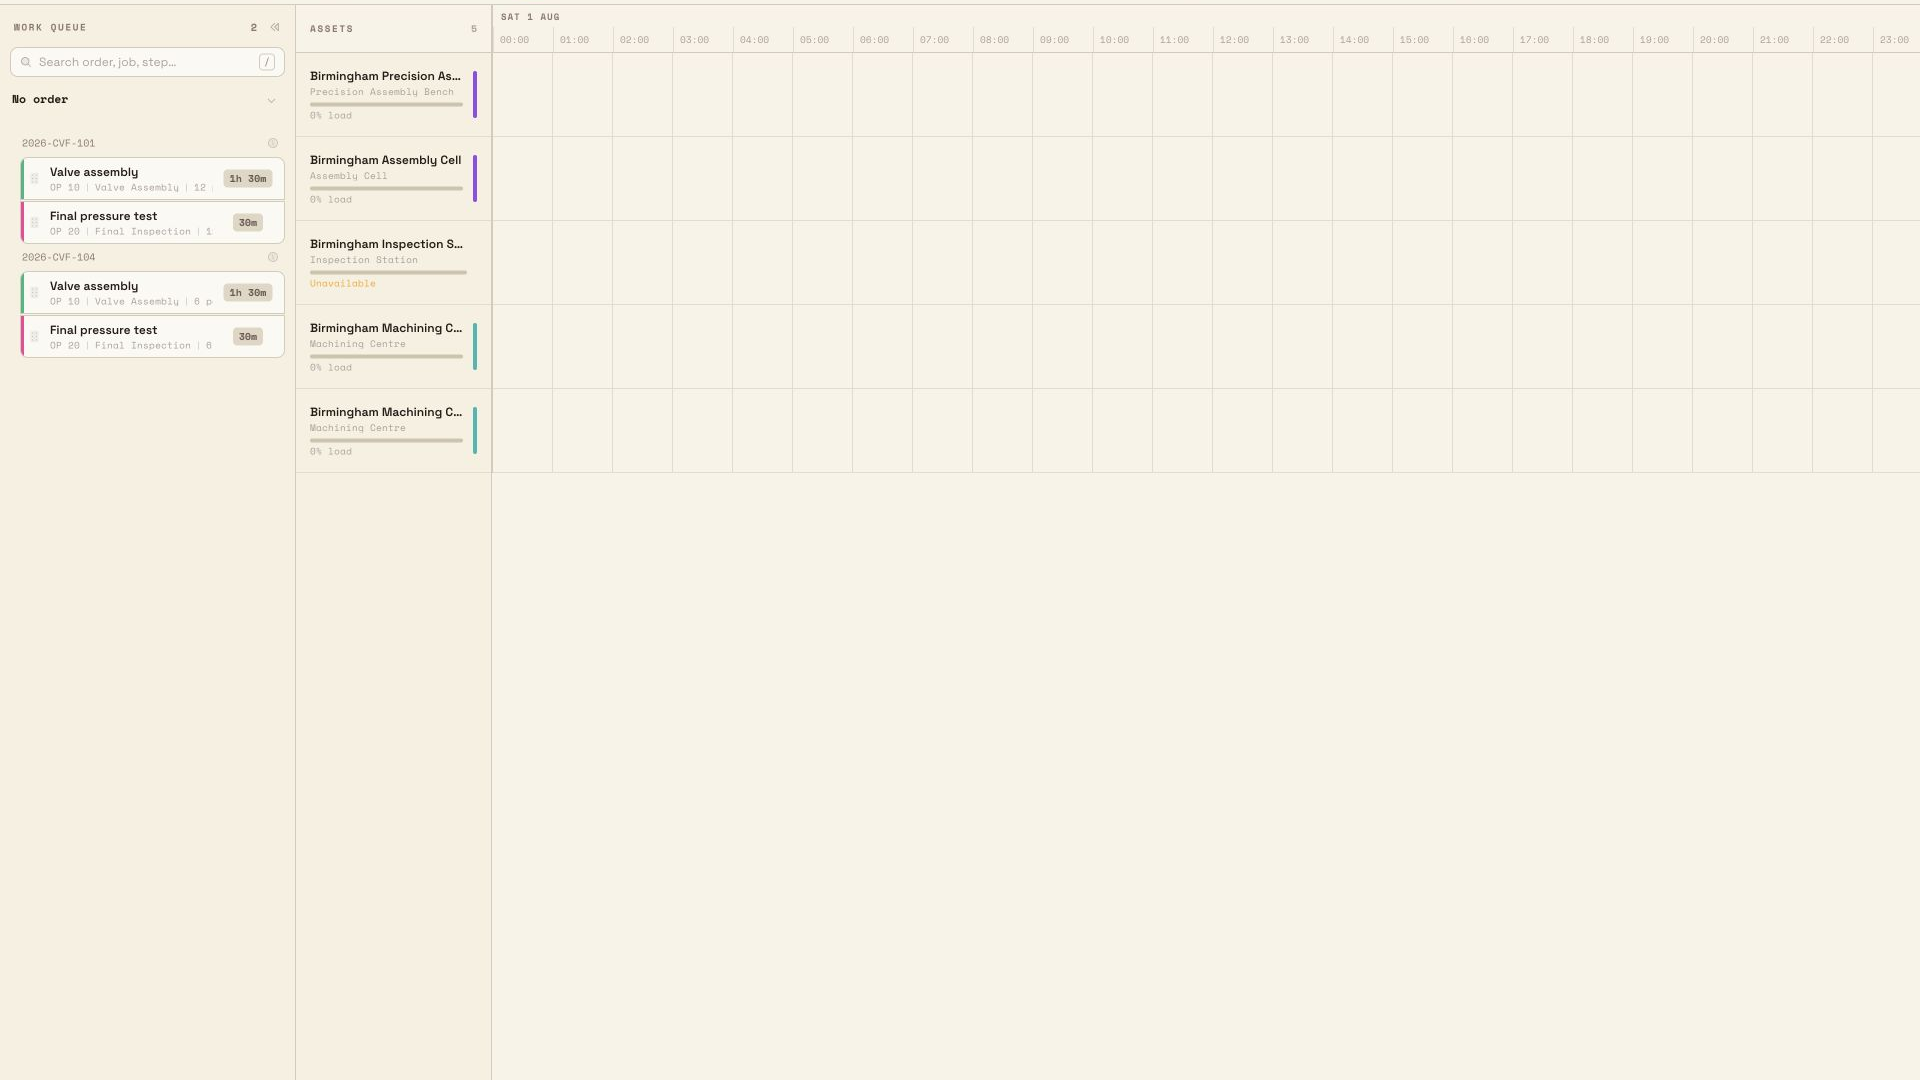
The board has three regions: the Work queue on the left, the machine timelines in the centre and right, and a keyboard-shortcut strip along the bottom.
Work queue
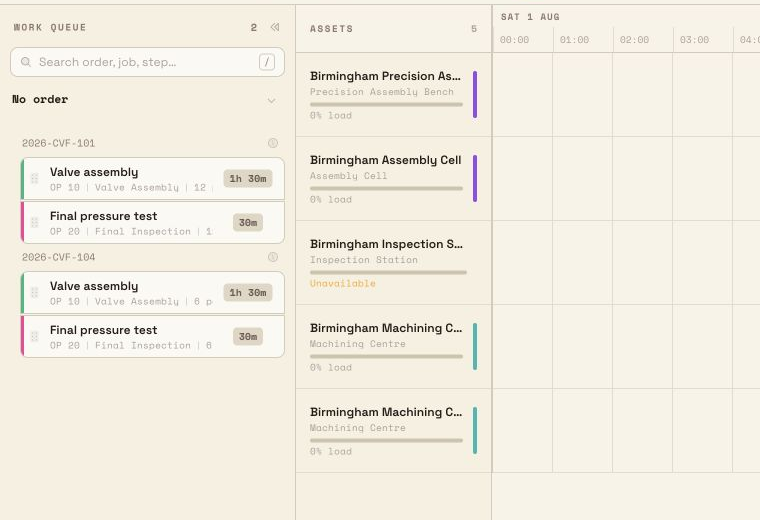
The Work queue lists unplanned steps, grouped Order → Job → Step. Large queues load automatically in batches: the panel first reads Loading work queue…, then keeps the rows already available while Loading more jobs… appears below them. There are no page buttons. The count beside Work queue grows as more jobs arrive, and your scroll position stays on the same job while earlier groups fill in.
Select Search order, job, step… (or press /) to search the whole site rather than only the cards that have loaded into the panel. Search shows up to six matching jobs and twelve matching steps at a time. Choosing an unplanned result opens the queue, scrolls to it, and briefly highlights it; if that job is beyond the queue's display limit, Bulk temporarily shows it at the top so you can still act on it. Choose a more specific search phrase when the result you need is not among those first matches. You can also collapse the whole panel to a thin Work queue rail with the double-arrow button and expand it again later.
Each step is a draggable card showing:
- the step name and its operation number (OP followed by the sequence);
- the resource (work centre) the step needs;
- the quantity in pieces (pcs);
- an estimated duration. Hover it to see the estimate source — such as Part history, Step history, Similar part, Resource history, Plan, Resource, or Fallback — its confidence, and how many past runs it is based on.
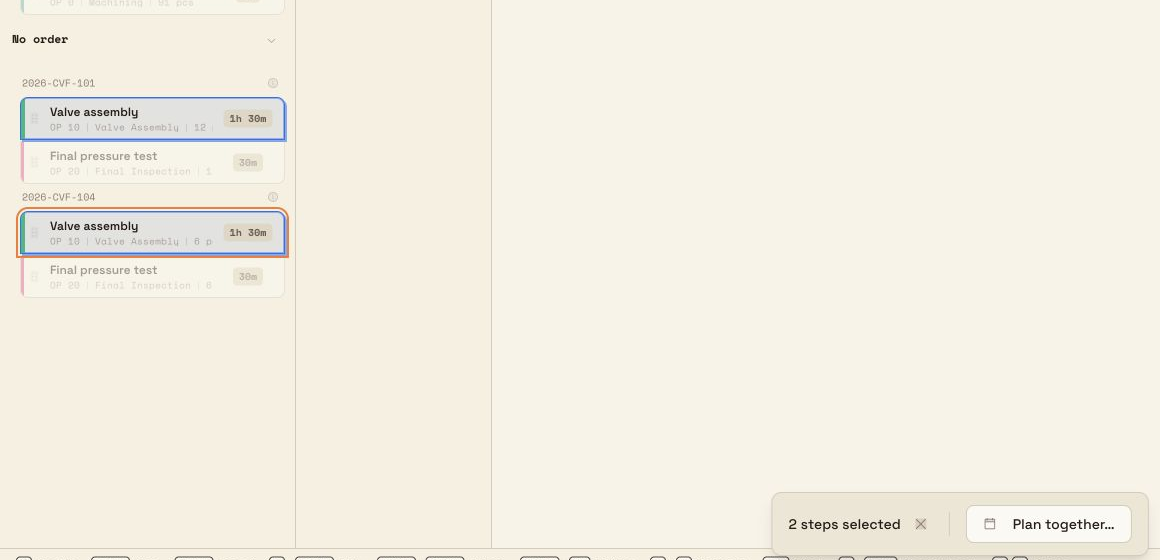
Click a card to select it. Ctrl-click (⌘-click on a Mac) adds or removes one card, and Shift-click selects a range — the same gestures as a file list. Space toggles the focused card, Ctrl/⌘ + A selects the loaded cards for that work centre, and Esc clears the selection. A selection stays selected when you scroll it out of view. If a range crosses cards that are still loading, Bulk skips those cards and tells you how many were skipped. Selected cards are outlined; cards belonging to a different resource dim, because a selection can only hold steps that share one work centre.
Hovering a card's estimate opens a part history panel: the timing behind the estimate, plus how many jobs this part is typically loaded alongside on each machine and machine type.
When the queue is empty it reads "Queue is clear — every step is planned."
scheduling.planning-board-02
Machine timelines
To the right of the queue, each active machine gets one row. The row label shows the machine's name, its type, a small load bar with the day's load percentage, and its status — a machine set to maintenance or offline reads Unavailable, and a machine that is switched off reads Inactive. Colour codes on the right edge of each machine label show which resources that machine can accept.
The timeline itself spans several days (three by default). A vertical line marks the current time ("now"). When you start dragging a step, machines that can accept its resource highlight as drop targets and machines that cannot are dimmed — so you can only drop work where it can actually run.
Planned blocks
Each placed run appears as a block on its machine's timeline. A block shows the job number, the step, and its planned time range, and its appearance reflects the real state of the work:
- a normal planned block;
- an in-progress block, which shows how far it has run (for example "running 40%");
- a done block, once the step is completed;
- a conflict block, labelled "overlaps", when two blocks share time on the same machine.
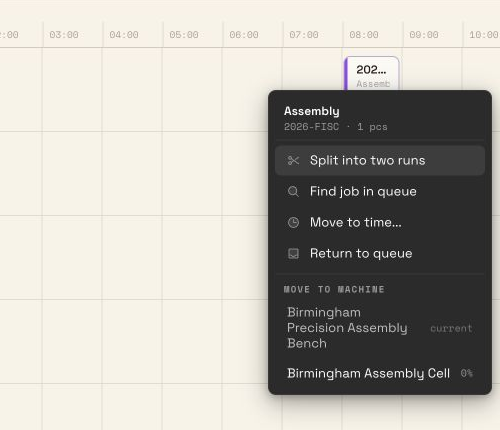
You can resize a block from its right edge to change its duration, remove it with the × button to return the step to the queue, or right-click it for more actions: Split into two runs, Merge all … runs back, Reset to estimate, Find job in queue, Move to time…, Return to queue, and Move to machine. Move to machine shows the machine the block is on now (labelled current), then a short list of other compatible machines with their load. When there are many destinations, a search field appears so you can filter by machine name instead of scrolling a long list.
scheduling.planning-board-03
When several jobs share the same machine and time, the board groups them into a batch — a single block labelled with the number of jobs it holds, which then moves, resizes and unplans as one. A batch cannot be split by quantity, so its menu offers Split apart instead: the jobs keep the machine and run back-to-back from the batch's start time, each at its own duration. They are laid out in sequence rather than left on top of each other, because jobs sharing a machine and a start time outside a batch would be flagged as conflicts.
Small squares on a block show its typical machine load — how many jobs this machine usually runs together for this kind of work, learned from Load Job history. Filled squares are the jobs in the block; empty ones are the room that history suggests is left.
Header and footer controls
The board header carries the controls that change your view without changing the plan:
- Zoom in and Zoom out stretch or compress the timeline.
- A date chip with Previous day, the current day label, and Next day moves the window; a Today marker returns you to the current day.
- Find job or step (keyboard shortcut
/) searches across the whole board and jumps to a match.
An Auto-plan button sits in the header but is not yet functional in this beta release; selecting it only shows a notice.
The strip along the bottom lists the board's keyboard shortcuts — search, plan, select, add to a selection, select a range, select all, clear, back-to-back drop, and resize — shedding the less-used hints as the window narrows. If the board is showing more work than it can render, a "board truncated — not all runs shown" warning also appears here.
Plan several steps at once
Select several queue cards and drag any one of them: the whole selection travels together, and the drag preview shows how many steps you are carrying.
Where they land depends on one key:
- Drop normally and the steps land as one batch — all at the same time on that machine, as a single block.
- Hold Alt (Option on a Mac) as you drop and they are laid out back-to-back instead, each starting when the previous one ends.
The drag preview states which of the two you are about to get, in words, so you are never guessing from the cursor. Every step in the selection must share one work centre, since a single machine has to be able to run all of them.
If the number of jobs exceeds what that machine typically runs together, the preview warns you — but it never blocks the drop. Typical load is a historical average, not a configured maximum, so the planner decides.
Selecting more than one card also reveals an action bar with Plan together…, which opens the same choice in a dialog. That is the route to use without a mouse, since drag-and-drop has no keyboard equivalent.
scheduling.planning-board-04
Choose what the board shows
The gear icon in the header opens Display, which tailors the board to how you work:
- Block title and Queue card title — show the job number, the part, or the step name. The two can differ.
- Block details and Queue card details — which chips appear on each block and card (time range, duration, quantity, job number, part, resource code, routing).
- Job headers — turn off to blend consecutive cards from different jobs into one flowing list.
- Asset types — choose which kinds of machine appear as lanes. Hiding types you are not planning shortens the board.
These are your own preferences, saved per site, and they persist between sessions. The asset-type choice also filters the Work queue to steps that can run on at least one visible machine type. While Bulk applies a changed filter, the queue shows its loading state instead of leaving old cards visible. These settings change only what you see — never the plan itself.
A day at Granite Peak
At the Leeds Fabrication Plant, a planner opens Scheduling → Planning at the start of the early shift. The Work queue shows 18 unplanned steps grouped under three orders, including order 2026-4101 for a customer with a laser-cut bracket job.
The planner expands that order, finds the "Laser cut — OP 10" step (resource: Laser cutting, 24 pcs, estimated 45m from Part history), and drags it onto the "Trumpf Laser 3030" machine timeline for 08:00. The step becomes a planned block, the machine's load bar rises, and the Work queue total drops by one.
Later a rush weld job needs the same welder that already has work at 10:00. When the planner drops it onto the busy time, the board offers to Create batch so both jobs run together, or to Plan separately. The planner chooses to move it instead, right-clicks the block, and picks another welder from Move to machine — resolving the overlap without leaving the board.
What planning does and doesn't change
Planning on this board is a scheduling overlay. It records your intended machine and time for each step; it does not change the machine actually assigned to a job elsewhere in Bulk, and it does not block overlaps. Overlapping placements are allowed and simply flagged as conflicts for you to resolve. Because planning is separate from execution, a plan you build here is a proposal for the shop floor rather than a committed production loading. For how planned work reaches the floor, see the related guide on handing work to production.
Feature state and limitations
The planning board is in beta. Note the following in this release:
- Auto-plan is not available yet. The button is visible but does nothing beyond showing a notice; place work manually for now.
- The queue can display up to 30,000 jobs. It loads them automatically as one scrollable list. If there are more, the queue reads Showing the first … jobs — search to reach the rest. Search still reaches jobs beyond that display limit.
- The timeline has separate limits. It draws up to 5,000 planned runs across a window of up to 60 days. When the run limit is reached, the footer reads board truncated — not all runs shown; narrow or move the date window to see the rest.
- A selection is limited to one work centre and 25 steps per drop. Larger batches need more than one drag.
- In-progress and completed steps can't be re-planned. Once a step starts or finishes, its block is read-only and it no longer appears in the queue.
- Planning is view-only without the Plan jobs permission. Users with only View job planning can read the board but cannot drag, resize, split, merge, or unplan.
Troubleshooting
"No machines to plan on." The board shows this empty state when the selected site has no active machine that accepts any resource. Follow its Open asset settings action, then in Settings → Assets add machines and allow resources on their asset types. Steps can only be planned onto machines whose asset type accepts the step's resource.
A step never appears in the queue. The queue only lists steps whose job is open and whose item is still pending or loaded. If a step is missing, check that its job is not closed and that the step has not already started or completed.
The queue says "Loading more jobs…". Keep working with the rows already shown; Bulk is adding the next part of the queue automatically. If the message is replaced by Showing the first … jobs — search to reach the rest, use Find job or step for work beyond the 30,000-job display limit.
Search is recovering or unavailable. A temporary search interruption shows Search recovering and retries automatically. For another search error, change the search text to try again, using a specific job number, order number, customer, or step name. Queue scrolling continues separately.
The planning board says "Something went wrong". Select Try again. The page keeps the failure inside Job planning rather than taking down the rest of Bulk.
"board truncated — not all runs shown." The board hit its run limit and some planned work is hidden. Reduce the number of days in view or move the window so fewer runs fall inside it.
You can't drag or edit blocks. Either your role lacks Plan jobs, or the block you are trying to change is already in progress or done and is locked.
Related guides
- Scheduling overview — where the planning board fits in the module.
- Place or move a job — step-by-step for dragging, moving, splitting, and batching runs.
- Set a planning time window — zoom, day navigation, and choosing how much time to show.
- Review capacity and resource context — reading machine load, resource compatibility, and conflicts.
- Hand planned work to production — how the plan relates to what runs on the floor.
Scheduling
Plan production job steps onto machine timelines in the Scheduling job planning board, then move, resize, split, and balance work before it reaches the shop floor.
Place or move a job
Put an unplanned job step onto a machine at a chosen time, and move or reschedule placed work, on the Scheduling planning board.