Run data imports
Upload CSV or Excel files to create bulk records for a site — customers, parts, jobs, tasks, and more — through a guided six-step import wizard.
Data imports let you load many records into Bulk from a CSV or Excel file instead of creating them one by one. You pick an import type (for example Customers, Parts, or Production Jobs), upload the file, map its columns to Bulk fields, validate the rows, and run the import into the site you currently have selected.
Use imports when you are onboarding a site, migrating master data from another system, or bringing in a large list of production jobs, projects, or tasks. Day-to-day single-record work still happens on the normal master-data and production screens; this page is for batch loading.
Before you start
- Open Settings, expand the Data group, and select Imports. The list page address ends in
/settings/data/imports. - Select the site (entity) you want the records to land in. Import history and new imports are always scoped to the selected site. If no site is selected, Bulk asks you to select one before you can continue.
- Prepare a CSV, XLSX, or XLS file. One file at a time; maximum size 50 MB. Put column headers in the first row so Bulk can suggest mappings.
- Confirm the import type you need is enabled for your organization. Admins can turn types on or off under Settings → Organization → Settings, on the Imports tab.
You need these permissions:
imports.view— open the Imports page, browse history, and open a job’s detail view.imports.manage— start a new import (the New Import button and the wizard). Built-in roles that grant this include Super user, Entity admin, and Master data.- The create permission for the target data (for example
customers.createfor Customers,parts.createfor Parts,production_jobs.createfor Production Jobs). Without that permission, creating a job for that type is rejected even if you can manage imports.
If New Import is missing, you likely have view-only access. If a type does not appear in the wizard, it may be disabled for the organization, or you may lack the matching create permission once you try to upload.
What the Imports page shows
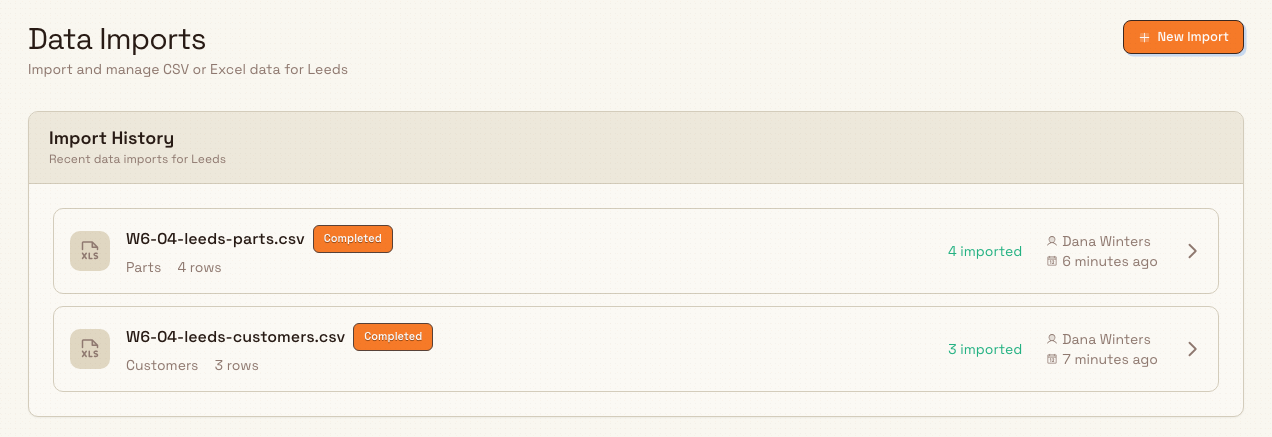
The page title is Data Imports. With a site selected, the description names that site. Users who can manage imports see a New Import button in the header.
When there are past jobs, an Import History card lists recent imports for the site. Each row shows:
- The file name and a status badge (for example Completed, Importing, Failed).
- The import type label (for example Customers) and total row count when known.
- Who started the import and roughly when.
- On completed jobs: how many records were created or updated, and how many rows had errors.
Select a row to open the job detail page. If the site has never imported, you see No imports yet with an optional Create Your First Import action when you have manage permission.
administration.data.imports-01
Available import types
Only types enabled for your organization appear in the wizard. Labels and required fields come from Bulk’s built-in catalogue. Common types include:
| Import type | Typical use | Required fields (column targets) |
|---|---|---|
| Customers | Customer records for orders and jobs | code, name |
| Parts | Part numbers for production | number |
| Routings | Routing headers (process types) | code, name |
| Processes | Manufacturing processes | code |
| Production Jobs | Production orders and jobs from spreadsheet lines | quantity, process_type, process, part, customer, po_number |
| Projects | Project records | name |
| Tasks | Tasks on projects | name, project_id, status |
| Task Comments | Comments on existing tasks | task_id, content, user_email |
| Task Checklists | Checklist lines on tasks | task_id, content |
| Consumables | Consumable product definitions | name, code |
| Consumable Variants | Variants under existing consumables | consumable_code, name |
For Customers, optional targets also include contact fields (email, phone, notes, currency_unit_id) and structured address fields (street, city, state, zipcode, country, address_kinds, address_label, is_primary). To attach multiple addresses to one customer, repeat the same code on extra rows and fill the address columns on each row; scalars such as name and currency only need to appear on the first row of the group. address_kinds accepts semicolon-separated values business, invoice, and delivery. Legacy free-text address still works for a single unstructured address when structured columns are omitted.
Reference fields (for example customer code, part number, or process code) must already exist in the selected site when the import looks them up. Tasks is the only type that can update an existing record when the same task name and project already match; other types always create new records, so re-importing the same file can create duplicates.
Run a new import
- Select New Import. The New Import page opens at
/settings/data/imports/newwith the six-step wizard. - Work through the steps below. Use Next (or Validate on the mapping step) to move forward, Back to return, and Cancel if you need to abandon the job.
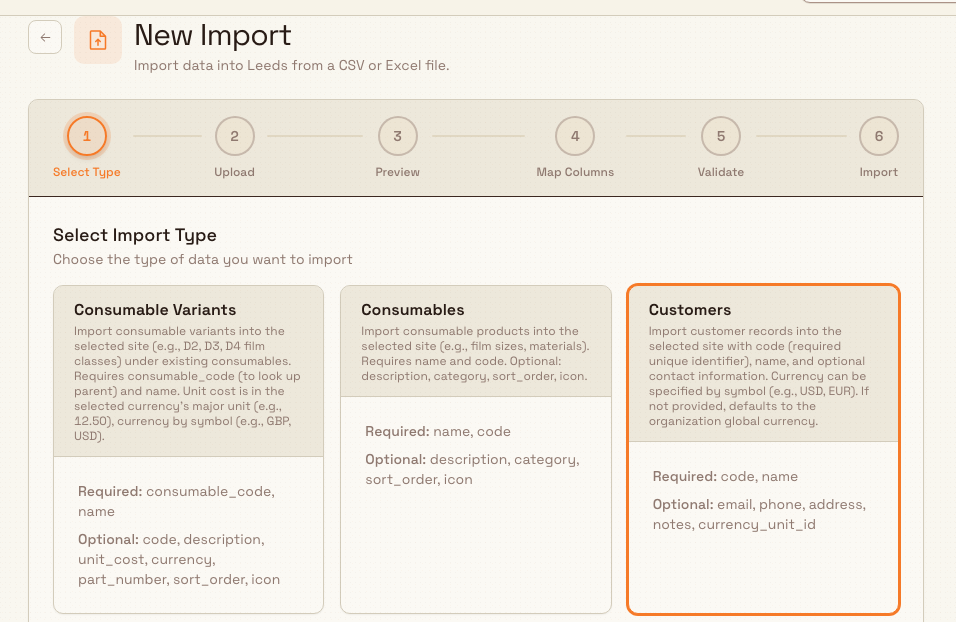
Step 1 — Select Type
Choose the type of data to import. Each card shows the type label, optional description, Required fields, and Optional fields. Select one card so it is highlighted, then Next.
If no types appear (No Import Types Available), an administrator must enable import types for the organization (organization Import Settings), or contact Bulk support if the catalogue was never seeded for the tenant.
Step 2 — Upload
Upload a CSV, XLSX, or XLS file for the selected site: drag and drop onto the drop zone, or select browse. Progress shows preparing, uploading, then processing. When the file is accepted, Bulk creates an import job and moves you toward the preview once parsing finishes.
Step 3 — Preview
File Preview shows sample rows (up to 20) from the total row count, column headers, and automatically detected data types. Confirm the file looks right, then Next.
Step 4 — Map Columns
Column Mapping links each source column to a target field. Bulk suggests matches from header names. Required targets are marked; you cannot continue until every required field is mapped. Unneeded source columns can stay unmapped (they are skipped). When mapping is complete, select Validate — Bulk saves the mapping and starts validation.
Step 5 — Validate
While status is Validating, progress shows rows processed. When status is Validated, Validation Results summarize Valid Rows, Invalid Rows, and warnings. If there are invalid rows, open Error Summary (by error type and by field) or Error Details (row-level messages). Fix the file and start a new import if needed, or continue and skip invalid rows on the next step. Select Next when validation has finished.
Step 6 — Import
Confirm Import shows total, valid, and invalid row counts and Rows to import. If invalid rows exist, leave Skip invalid rows and import only valid data checked (the default) so only valid rows load; if you clear it, import stops when it hits invalid data. Select Start Import (N rows).
While status is Importing, progress shows processed rows, successes, creates/updates when available, and errors. On success you see Import Completed (or Import Completed with Errors / Import Failed if rows failed). Select Done to return to the Imports list.
administration.data.imports-02
Review a completed import
Open any history row to go to /settings/data/imports/<job id>. The detail page shows:
- Breadcrumbs: Settings → Data → Imports → file name.
- File name as the title, import type and creator in the description, and a status badge.
- Live progress while status is Validating or Importing.
- Stat cards: Total Rows, Processed, Created / Updated (or Successful), and Errors.
- Details tab: file name and size, import type, creator, created/started/completed times, duration, column mapping (source → target, or skipped), and any job-level error message.
- Errors tab (when the job has errors): paginated row errors with field messages.
Status labels you may see across the flow: Pending, Parsing, Parsed, Validating, Validated, Importing, Completed, Failed, Cancelled.
Example: customer list at Granite Peak Manufacturing
Dana Winters is bringing the Leeds Fabrication Plant online. She has a leeds-customers.csv file with columns Customer Code, Customer Name, Email, and Phone. For customers that need more than one site address, she adds extra rows that repeat the same customer code and fill Street, City, Zipcode, Country, Address Kinds, and Is Primary.
She switches to Leeds Fabrication Plant, opens Settings → Data → Imports, and selects New Import. On Select Type she picks Customers, uploads the CSV, checks the preview, and maps Customer Code → code, Customer Name → name, the optional contact columns, and the structured address columns. She validates, keeps Skip invalid rows on, and starts the import. When status is Completed, the history list shows the file under Customers with create counts; those customers (including multiple addresses where provided) are then available on orders and production jobs for that site.
Expected result
After a successful import:
- The job status is Completed (sometimes with a non-zero error count if invalid rows were skipped).
- New records exist in the selected site for the import type (or existing Tasks were updated when name and project matched).
- The job appears at the top of Import History for that site, and its detail page shows mapping, counts, and any row errors.
Feature state and limits
Data imports are generally available. Keep these limits in mind:
- Imports are per site; they never write into another site’s data.
- File formats are CSV, XLSX, and XLS only, one file at a time, max 50 MB.
- Organization-level toggles can hide types from the wizard even when the product supports them.
- Creating a job also requires the target create permission for that type, not only
imports.manage. - Only Tasks updates existing rows on match; all other types insert new rows and can duplicate if re-run.
- Cancel is only available while a job is still Pending, Parsing, or Validating — not once import has started.
Troubleshooting
- "Select a site to view imports" / "Select a site before importing" — choose a site in the site switcher, then reopen Imports.
- New Import is missing — you need
imports.manage(for example Entity admin, Master data, or Super user). - No Import Types Available — enable types under organization Import Settings, or ask an admin to enable them.
- "Import type not enabled for your organization" — the type is off for the tenant; turn it on in organization Import Settings.
- Missing required field mappings — on Map Columns, map every required field shown for the type (for example
codeandnamefor Customers). - Many invalid rows on Validate — open Error Details, fix values (enums, lengths, missing references such as part numbers or customer codes that must already exist), re-export the file, and run a new import.
- Import stops on invalid data — enable Skip invalid rows and import only valid data on Confirm Import, or clean the file first.
- Permission error when creating the job — you need the create permission for that data type (for example
parts.create) in addition toimports.manage. - Import not found on the detail page — wrong site selected, or you lack
imports.viewfor that job.
Related
- Configure exports — pull data out of Bulk for reporting or migration the other way.
- Configure reports — saved and scheduled reporting.
- Manage processes — process master data that production-job imports can reference by code.
- Manage customers — maintain customer records after bulk load.
- Manage parts — maintain part numbers after bulk load.
- Manage roles and permissions — grant
imports.view,imports.manage, and target create permissions.
Configure reports
Build multi-page PDF reports from widgets, publish them, generate one-off downloads, and schedule email delivery for each site.
Integrations
Open the Integrations catalog under Settings to see which ERP, identity, messaging, data, and AI connectors Bulk can use — which are ready to configure, which are beta, and which are coming soon.