Configure departments and job titles
Build the site's department hierarchy with managers and cost centres, and maintain the standard job titles used on employee records and in training.
Departments and job titles are the two catalogues that give a site a consistent way to group people and name their roles. Departments nest into a hierarchy with optional managers and cost centres so org structure, headcount, and reporting lines stay clear. Job titles are the standard role labels you assign on employee records — and that training filters and requirements can key off — so classifications do not drift plant by plant.
Configure both when you bring a site online, restructure teams, or introduce a new role name. Day-to-day work such as creating an employee or viewing the org chart uses these lists; you return here to maintain them, not to run the workforce hour to hour.
Before you start
Both areas live under Settings → People in the left sidebar:
| Area | How you open it | Page address ends in |
|---|---|---|
| Departments | Settings → People → Departments | /settings/people/departments |
| Job Titles | Settings → People → Job Titles | /people/job-titles |
Job Titles is listed under Settings → People, but its route lives under the People module path (/people/job-titles), not under /settings/people/…. Neither item carries a Beta badge.
You need the matching permissions for the selected site:
| Area | View | Create, edit, delete |
|---|---|---|
| Departments | View departments (departments.view) | departments.create, departments.update, departments.delete |
| Job titles | View job titles (job_titles.view) | job_titles.create, job_titles.update, job_titles.delete |
Built-in roles that include full access to both catalogues include People (described as managing employees, job titles, working hours, and training operations), Entity admin, Manager, and Super user. If create or edit actions fail, ask an administrator to grant the matching permissions or assign the People role.
Both catalogues are per site (entity). Switching plant changes which departments and job titles you see. Set them up separately for each site that needs its own structure.
Departments
What the Departments page shows
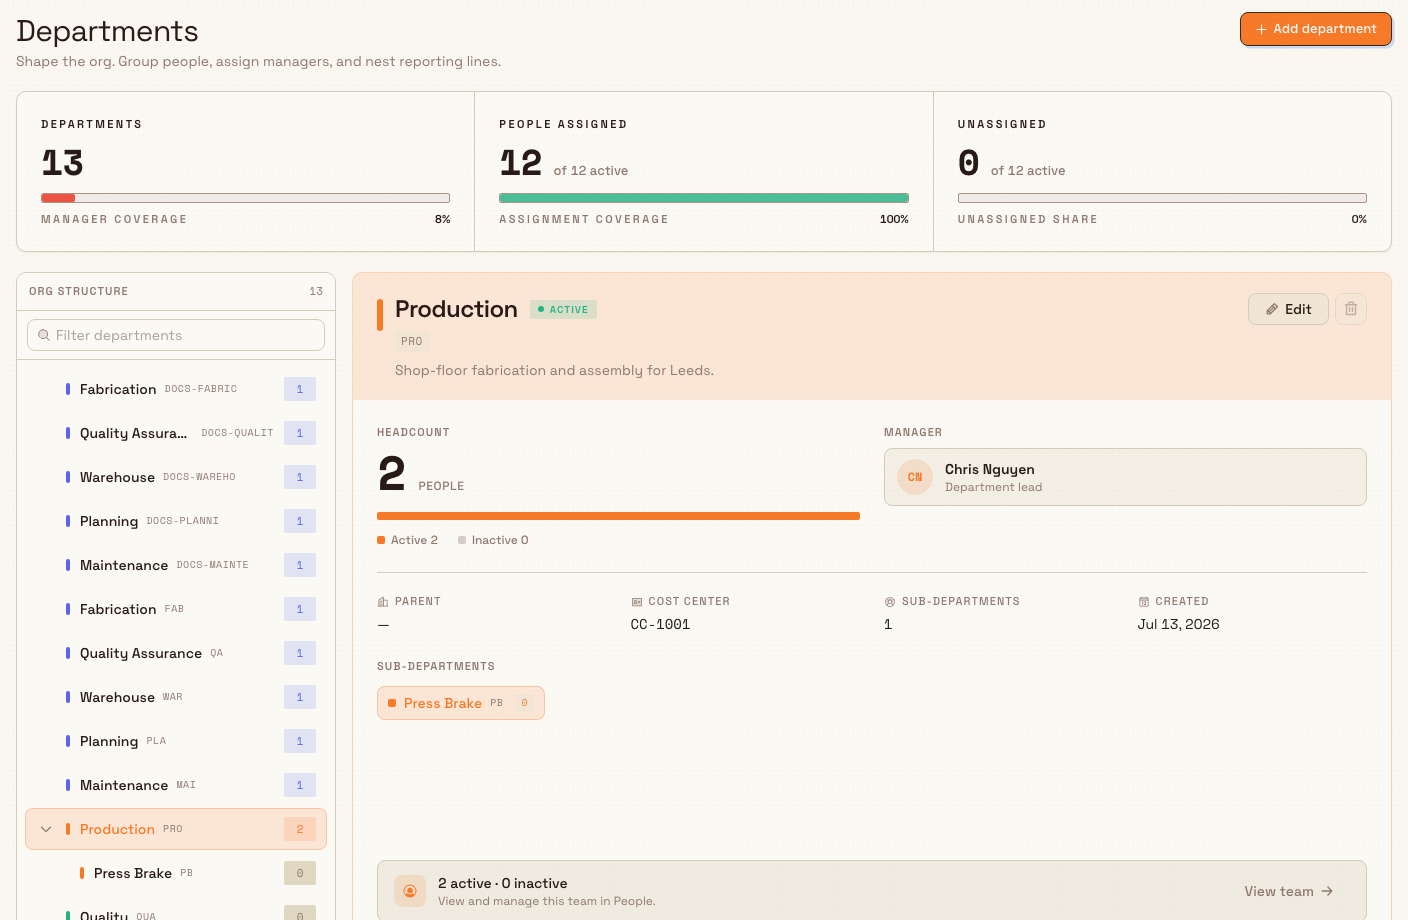
The page header is Departments, with the description “Shape the org. Group people, assign managers, and nest reporting lines.” and an Add department button.
When the site has no departments yet, the empty state kicks off with Org structure, the title Define the shape of the floor, and a short explanation that departments group people, assign managers, and shape reporting lines. Use Create first department (or Add department in the header). The page notes that the code auto-generates from the name, and shows common starting points such as Production, Quality, Warehouse, and Maintenance.
Once departments exist, the page has three parts:
- Summary strip — Departments (count, with manager coverage), People assigned (of active headcount), and Unassigned (active people with no department).
- Org structure rail (left) — the department tree, a total count, and a Filter departments search that matches name or code. Nested teams expand and collapse.
- Detail panel (right) — the selected department: name, Active or Inactive status, code, description, headcount (active and inactive), manager, parent, cost centre, sub-department count and chips, created date, and a View team link into the employee list filtered to that department.
Selection is kept in the URL as ?dept=…. If nothing is selected, the first root department is selected automatically. When a department has no manager, the detail panel shows No manager assigned with an Assign action that opens edit.
administration.people.departments-job-titles-01
Add a department
- Select Add department (or Create first department on an empty site).
- In the Create Department dialog (“Add a new department to the organization”), fill in:
- Identity
- Name — required, up to 100 characters (for example
Production). The short code is generated from the name when you save (single-word names use the first three letters; multi-word names use the first letter of each word). You do not type the code when creating. - Description — optional notes on what the department is responsible for (up to 500 characters).
- Color — optional accent for the department in the UI.
- Name — required, up to 100 characters (for example
- Organization
- Parent department — leave as None (top-level) or nest under an existing department.
- Manager — optional employee from the site list (placeholder Unassigned). Search with Search employees….
- Cost center — optional code (for example
CC-1001, up to 50 characters).
- Identity
- Select Create.
A confirmation reads Department created. The new department is selected in the rail so you can continue nesting or assigning a manager.
New departments start active. The code is unique within the site; if a matching code already exists, Bulk reports that the department code already exists in this facility.
Edit a department
- Open the department in the rail, then select Edit on the detail panel.
- The Edit Department dialog shows the Code as read-only (the code cannot change after create).
- Update Name, Description, Color, Parent department, Manager, or Cost center as needed.
- Under Status, use the Active switch when you need to hide a department. The hint reads: “Inactive departments are hidden from most pickers.”
- Select Save Changes.
A confirmation reads Department updated. Bulk blocks a department from being its own parent and blocks circular parent links (“Circular parent reference detected”).
Delete a department
Delete is available only when the department has no child departments and no assigned employees (can_delete). When it cannot be deleted, the delete control is disabled and explains that you must move children and reassign employees first.
- On a deletable department, select the delete control.
- Confirm in Delete Department. The dialog names the department and code and states that the action cannot be undone.
- Select Delete.
A confirmation reads Department deleted. If the backend still finds children or employees, it returns:
- “Cannot delete department with child departments. Delete or move children first.”
- “Cannot delete department with assigned employees. Reassign them first.”
Prefer nesting under another parent or reassigning people rather than deleting a team that is still in use. Deletion is a soft remove for the site catalogue; it is not a restore flow from this page.
Job titles
What the Job Titles page shows
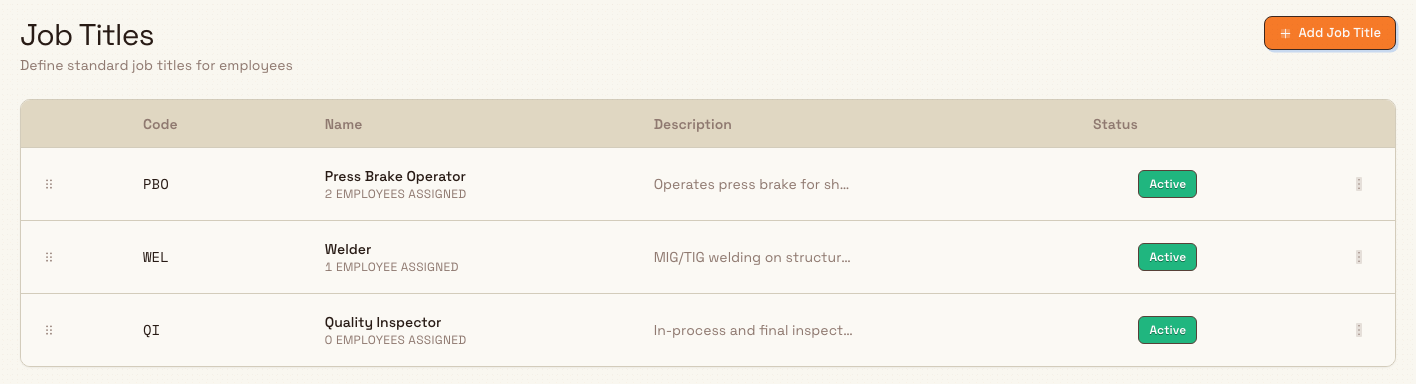
The page header is Job Titles, with the description “Define standard job titles for employees” and an Add Job Title button.
When the list is empty: No job titles yet / “Create your first job title to standardize employee classifications.” with Add Job Title.
When titles exist, a table lists:
- Code — short unique code for the title at this site.
- Name — with how many employees are assigned (“N employee(s) assigned”).
- Description — optional notes, or “-” when empty.
- Status — Active or Inactive.
- Row menu: Edit and Delete (Delete is disabled while any employees still use the title).
You can drag rows to reorder the list; the new order is saved for this site.
administration.people.departments-job-titles-02
Add a job title
- Select Add Job Title.
- In Create Job Title (“Add a new job title for employee classification”):
- Name — required, up to 100 characters (for example
Press Brake Operator). The field title-cases words as you type. The code is generated from the name on save the same way as departments (you do not enter a code when creating). - Description (optional) — up to 500 characters.
- Name — required, up to 100 characters (for example
- Select Create.
A confirmation reads Job title created. Codes are unique per site; a clash returns that a job title with that code already exists in this facility.
Edit a job title
- Open the row menu and select Edit.
- In Edit Job Title, the Code is read-only. Change Name and Description as needed.
- Select Save Changes.
A confirmation reads Job title updated. The create/edit dialogs on this page do not expose an Active switch; status in the table reflects the record’s active flag (new titles are created active).
Delete a job title
Delete is enabled only when no employees are assigned (can_delete).
- Choose Delete on a title with zero assignments.
- Confirm in Delete Job Title, which names the title and code and states the action cannot be undone.
- Select Delete.
A confirmation reads Job title deleted. If employees still use it, Bulk returns: “Cannot delete job title: N employee(s) are assigned. Please reassign them first.” Reassign those people on their employee records, then delete.
Example: Leeds structure and roles
At Granite Peak Manufacturing’s Leeds Fabrication Plant, Dana Winters prepares People configuration before the first wave of employee records.
- Under Departments, she selects Add department and creates Production (code becomes
PRO), then Quality, Warehouse, and Maintenance. She nests Press Brake under Production by setting Production as the parent, assigns the production lead as manager, and sets a cost centre for finance reporting. - Under Job Titles, she adds Press Brake Operator, Welder, and Quality Inspector. Each gets an auto-generated code and appears in the table with zero employees until HR assigns the titles on employee records.
- Later, when training builds a matrix layout filtered by role, those same job titles are available as the standard labels — so readiness reports and employee classification stay aligned.
Expected result
- The Departments page shows a navigable hierarchy for the selected site, with summary counts for assignment and manager coverage, and each department’s detail (including View team into employees for that department).
- Job titles appear as a sortable catalogue with codes and assignment counts, ready to pick on employee records and in training filters.
- Switching site shows that plant’s own departments and job titles, not a shared company-wide list.
Feature state and limits
Configuring departments and job titles is generally available. Keep these behaviours in mind:
- Two separate pages, both under Settings → People. Job Titles uses
/people/job-titlesrather than a/settings/people/…URL. - Site-scoped. Recreate or reconfigure catalogues when you onboard another entity.
- Codes are auto-generated and immutable after create on both pages.
- Department delete requires no children and no assigned employees. Job title delete requires no assigned employees.
- Department Active can be turned off in edit so inactive departments are hidden from most pickers. The Job Titles table can show Active/Inactive, but the standard create/edit dialogs do not toggle that flag.
- Job titles are used beyond HR classification (for example training matrix filters by job title); renaming a title does not invent a new code, so references that use the id stay valid, while people still see the new name.
Troubleshooting
- Add department / Add Job Title is missing, or the page rejects the request. You lack create/update permission for that catalogue. Ask an administrator for
departments.*orjob_titles.*, or the People role. - Delete is disabled on a department. The department still has child departments or assigned employees. Move or delete children and reassign people (for example via View team), then try again.
- Delete is disabled on a job title. Employees still hold that title. Reassign them on employee records first. If delete is attempted while people remain, Bulk reports how many are assigned.
- “Department code … already exists in this facility” or “A job title with code … already exists in this facility.” Another active record on this site already uses the generated or supplied code. Change the name so a different code is generated, or reuse the existing record.
- “Circular parent reference detected” or “Department cannot be its own parent.” Choose a different parent in the hierarchy so a department is not nested under itself or under one of its descendants.
- Departments or job titles from another plant do not appear. Switch to the correct site in the entity switcher; these catalogues are not shared across plants.
- You expected a single combined page. Departments and Job Titles are separate Settings → People items. See People configuration for the full group.
Related
- People configuration — overview of departments, job titles, absence types, and shifts.
- Configure absence types — leave categories for the same site.
- Configure shifts — rotation patterns for scheduling.
- Manage roles and permissions — grant department and job title permissions.
- People — day-to-day employee, org structure, and absence work that uses these catalogues.
People configuration
Set up the site-level building blocks for your workforce — departments, job titles, absence types, and shifts — so employee records, leave, and scheduling use a consistent catalogue.
Configure absence types
Build the leave catalogue for a site — import regional presets or add types by hand, set paid leave, approval, default entitlement days, and max carry-over.