Manage datasheets
Create, build, publish, and archive spreadsheet-style datasheet templates with formulas, validation, and version history for production records.
Last updated
A datasheet is a spreadsheet-style template you design once and attach to production work. Operators fill in input cells (measurements, checks, choices); formulas calculate results; validation and conditional formatting flag values that need attention. Each template is versioned: you edit a draft grid, publish it as a numbered live version, and every filled copy (instance) pins to the published layout it started with so later template edits never rewrite history.
Manage datasheets when you need calculated inspection sheets, tensile or dimensional checks, or any grid of readings that forms alone do not cover. Datasheets live in master data and are then attached on production records (starting with production orders). When a datasheet binds to a process, that binding follows the process itself: it does not inherit or imply a routing from the process.
Datasheets is in beta
In the Settings sidebar, Datasheets shows a Beta badge. The area is available for day-to-day setup, but the builder, options, and wording can still change. Prefer Archive over permanent delete while you settle templates, and treat early sheets as editable starting points rather than fixed plant standards.
Before you start
Open Settings, expand the Master Data group, and select Datasheets. The page address ends in /settings/master-data/datasheets. Opening a datasheet takes you to the builder at /settings/master-data/datasheets/<datasheet-id>.
You need permission to work with datasheets:
- View the list and open the builder requires
datasheets.view. - Create and duplicate require
datasheets.create. - Edit the grid, publish, restore versions, rename, and archive/restore require
datasheets.update. - Delete a datasheet with no filled instances requires
datasheets.delete.
These management permissions are granted by the built-in Super user, Entity admin, Manager, and Master data roles. If New datasheet or row actions are missing, ask an administrator to adjust your role.
Datasheets are per site. Templates, versions, and instances belong to the entity (site) you are working in. Switch site first if you need to manage another plant’s datasheets.
What the Datasheets page shows
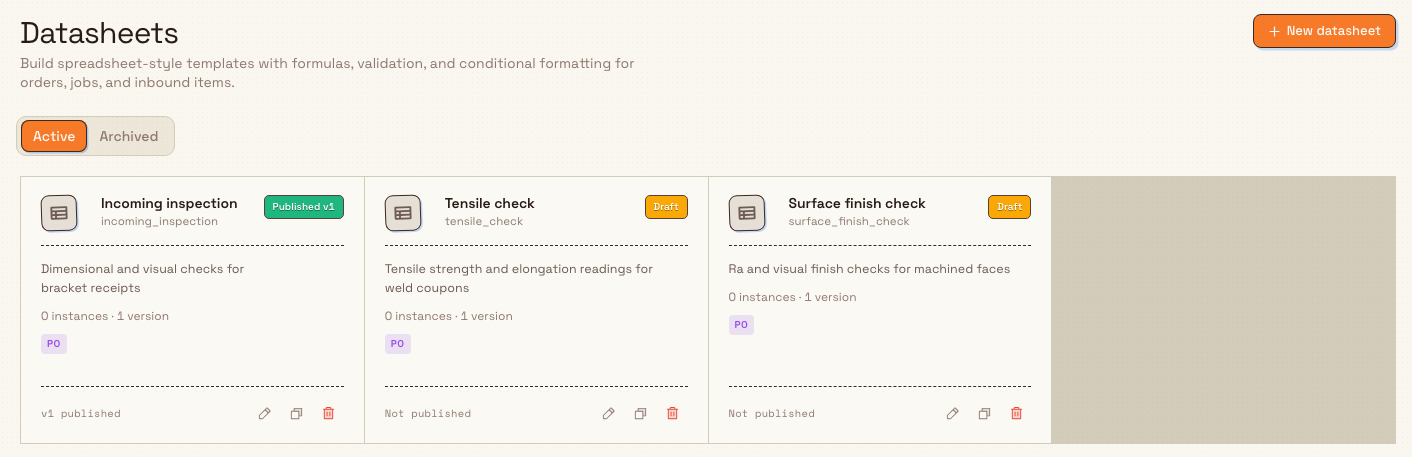
The page header is titled Datasheets, with the description: "Build spreadsheet-style templates with formulas, validation, and conditional formatting for orders, jobs, and inbound items." Select New datasheet to create a template.
Active and Archived sit under the header. Each template appears as a card with its name, code, description and status, such as Published v1 or Draft. The card also shows its instance and version counts, scope, and published version. Select a card to open its builder. The footer has Edit, Duplicate and Archive actions; archived templates have Restore.
The example below contains a published incoming-inspection sheet and a housing-hardness draft. Both contain saved input cells. Neither has been attached to a production order yet, so both show zero instances.
How versions work
Each datasheet has a durable header (name, code, description, active/archived) and one or more versions that store the grid.
| State | Meaning |
|---|---|
| Draft | The editable working grid. New templates start here at version number 0 until published. |
| Published | A frozen numbered version (v1, v2, …). New instances use the latest published version. |
| Archived (template) | The datasheet header is inactive (is_active off). It no longer appears under Active until restored. |
Important rules:
- There is at most one draft and one published pointer on the header at a time.
- Publish freezes the current draft as the next version number and clears the draft slot.
- Editing a datasheet that only has a published version starts from Edit as new version, which branches a new draft (a deep copy of the live grid). The toast reads "Draft created. Publish when ready." The published grid stays locked until that draft exists.
- Filled instances keep the grid snapshot from the published version they were created with. Publishing a new version does not change existing filled sheets.
Create a datasheet
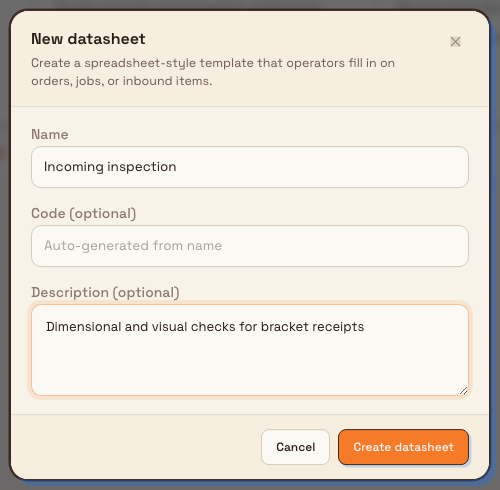
- Select New datasheet. The dialog describes a spreadsheet-style template that operators fill in on orders, jobs or inbound items.
- Fill in Name, for example
Incoming inspection. Code and Description are optional. A code left blank is generated from the name. - Select Create datasheet to open the new draft in the builder.
New templates default to Production Orders scope and manual attachment. Add meaningful static labels and input cells before publishing the first version.
Build the grid
The builder is a full-page spreadsheet. You can change cells only while the open version is a Draft and you are allowed to edit. A published workbook shows Published vN in the header and Edit as new version instead of Publish. Select Edit as new version to branch a draft. The toast is "Draft created. Publish when ready." Typing on the published grid does not branch a draft. An archived template stays locked until you restore it, and the banner reads "Restore this archived Datasheet before editing." Without edit permission, the banner reads "You do not have permission to edit Datasheets."
The header shows the name, a Draft or Published vN badge, the code, the worksheet count, and the save state: Saved, Saving..., Unsaved changes, or Save failed. Retry appears when a save fails. Draft edits save on their own. Header actions are History, Names, Sources, Print setup, Preview PDF, and Publish (or Edit as new version). If the workbook was imported and still has an import manifest, Review import with AI is also shown.
- Ribbon: undo and redo, show formulas (fx; the tooltip names Ctrl and the backtick key), bold, italic, strikethrough, wrap text, alignment, fill colour, cell borders, Row (insert below the selection), Col (insert to the right of the selection), Merge, and show or hide the inspector.
- Formula bar: the Cell reference box (placeholder
A1) and Formula or cell value (placeholder "Value, =formula, or =input(file)"). Type a reference in Cell reference and press Enter to jump to that cell or range. Escape restores the current reference. As you type a formula, Bulk suggests functions and shows the signature, the active argument, an example, and a result preview. The fx button on the formula bar (Start formula) inserts=in the selected cell. It is not the ribbon control that shows formulas. - Grid: the working sheet.
- Input setup (right panel): label, input type, required state, default, options, unit, and validation for the selected input. The panel title is Input plus the cell address.
- Worksheet tabs: switch sheets, add a sheet, or open the tab menu to rename, make a copy, move left, move right, or delete a worksheet. You cannot delete the last sheet.
Edit cells
On a draft, edit the grid the way you edit a spreadsheet.
- Click a cell to select it. Drag across cells, or hold Shift and click another cell, to select a range. Cell reference then shows the range, such as
B2:C4. Click a row number or a column letter to select that row or column. Drag the edge of a row or column header to resize it. - Type to replace the selected cell. Double-click the cell, or press F2, to edit the text that is already there. The formula bar shows the same text while you edit in the cell.
- Press Enter to keep the value and move down. Shift+Enter moves up. Tab moves right. Shift+Tab moves left. Escape discards the edit. Clicking away also keeps the value, unless you are inserting a cell reference into a formula.
- While you edit a formula and the caret is where a reference can go (after
=, an opening parenthesis, a comma, or an operator), click a cell or drag a range to insert that address. Arrow keys point at cells in the same situation. Press F2 to switch between pointing at cells and moving the caret. Press F4 to cycle dollar signs on the reference at the caret:A1,$A$1,A$1, then$A1. - Press Alt+Enter to insert a line break in the cell. On a Mac, that key is Option+Enter.
- With a range selected, press Ctrl+Enter (Command+Enter on a Mac) to write the value you are editing into every cell in the selection.
- Delete or Backspace clears the selection (Clear contents).
- Right-click the selection for Copy, Cut, Paste, and Paste special (Values only, Formulas only, Transpose). Insert cells can shift cells right or down, or insert rows and columns. Delete cells can shift cells left or up, or delete the selected rows or columns. Edit formula... starts a formula in the active cell.
- Drag the fill handle on the bottom-right corner of the selection to copy those cells into adjacent cells. Double-click the handle to extend the selection down to match a filled column beside it. When several cells are selected, drag the selection border to move them. Hold Alt while you drag (Option on a Mac) to copy instead of move.
- Undo and redo are on the ribbon. Ctrl+Z undoes, and Ctrl+Y or Ctrl+Shift+Z redoes. On a Mac, use the Command key for those shortcuts.
Do not type into a generated region. Those cells belong to the array formula in the anchor cell. Bulk refuses the change and names the anchor, for example "B2 is generated by A2. Edit the array formula or its source order instead." The same block applies if a paste, fill, move, merge, or row and column change would cross that region.
An ARRAY spill is read-only. It fills source values into the reserved cells and cannot store an operator input. A BINDARRAY region is also reserved in the template, but its INPUT columns are operator fields that operators fill later on the production order. Set those up on the anchor formula and in Input setup, not by typing in the striped cells. A calculated spill from an ordinary formula is different again: blank cells show the spill result, and they are not a BINDARRAY band. Writing into that area blocks the spill and shows #SPILL!. The formula section below is where you choose ARRAY or BINDARRAY.
Cell kinds
Commit a value from the formula bar or from the cell editor:
| What you enter | Result |
|---|---|
| Plain text or numbers | Static label or constant. |
Text starting with = | Formula (calculated when the sheet is filled or previewed). |
=input or =input(number), =input(date), and similar | Input cell operators will fill. In Input type: Text, Long text, Number, Currency, Date, Date and time, Yes / No, Single select, Multi-select, File, and User. |
Leading ' | Force static text (so values that look like formulas stay text). |
Use Names to make formulas readable, for example width_mm instead of B2. Use Input setup for an input's data type, options, default, unit, required state, and validation.
Array formulas and connected rows
Use an ordinary ARRAY when you only need a calculated, read-only spill:
=ARRAY(jobs, job_number, part_number)Use BINDARRAY when the Datasheet must create editable operator inputs for every connected record:
=BINDARRAY(jobs, job_number, part_number, INPUT("result"), INPUT("notes"))The important difference is identity:
ARRAY(...)spills read-only source values for each connected record. It reserves that region, but it cannot store an operator input against a source record.BINDARRAY(...)generates one row for every matching production-order record. Its source values are read-only, while eachINPUT("key")stores the operator value against that record’s stable source ID.- If an order has 20 jobs, the bound array automatically creates 20 rows. The striped region below the formula is reserved, so fixed cells, row insertion, and deletion cannot collide with an unknown future row count.
- Sorting, filtering, and source reordering move an entered value with its job; they do not attach it to a visible row number.
- If a source record disappears after an operator entered data, its generated entry remains visible with DELETED status. It can be removed as an orphan, or reconnects automatically if the same source ID returns.
Wrap the formula in TRANSPOSE to generate columns instead:
=TRANSPOSE(BINDARRAY(jobs, job_number, part_number, INPUT("result")))This creates one column per job and reserves the band to the right. The same stable-ID rule applies in either orientation.
Connected sources are selected from Sources and are limited to approved production-order data. The Datasheet itself still lives only on the production order; it is not attached directly to jobs, inbound documents, or inbound items.
No separate array builder
Enter connected arrays as formulas in the normal formula bar. Type =BIND to see the signature and argument help. There is no separate Array Setup panel.
You do not need arrays for every sheet: static labels, normal input cells, and a few formulas cover most inspection checklists.
Publish a version
When the draft is ready for operators:
- Select Publish. The Publish complete workbook? dialog opens. It says every worksheet is validated and published together, and that production orders already using an older version stay pinned to it.
- Optionally enter a Version note. The placeholder is "Version note (optional)".
- Select Publish vN (N is the next version number). Publish vN stays disabled while structural formula errors remain.
Bulk freezes the draft, assigns the version number, points the template at that published version, and shows "Published workbook vN". On a published workbook the header shows Edit as new version instead of Publish. New instances use this published layout; earlier instances keep their own snapshots.
Version history
Select History. The Workbook history dialog says a restore copies the complete workbook into the shared draft, and that published versions and lifecycle checkpoints are never compacted.
- Under Published versions, each row is Version N with its worksheet count and authored-cell count. Restore to Draft copies that version into the draft. The toast is "Complete workbook restored into the Draft".
- Compare on two published versions shows how many worksheets were added, removed, renamed, or moved, and how many had cell-content changes. With only one version selected, the dialog asks you to select one more published version.
- Grouped edits and checkpoints lists edit groups and checkpoints. Restore is available when the snapshot still has content. A compact audit record cannot be restored. If nothing is stored yet, the section says "No grouped edits yet."
Manage an existing datasheet
From the list
Click a row to select it. Double-click it, or select Open, to open the builder.
The more-actions menu on the row:
- Edit details opens Edit datasheet. Change Name, Code, and Description, then select Save changes. The toast is "Datasheet updated". The dialog description is "Datasheets are manually attached to production orders."
- Duplicate opens Duplicate datasheet. The description names the source, either "Latest published version vN" or "Unpublished draft", and says the copy starts active with a fresh identity and draft. The name defaults to the original name plus
(copy). Enter a new Code. Select Duplicate. The toast is "Datasheet duplicated from" that source label, and the copy stays selected on the list. - Export .xlsx downloads the workbook. The toast is "Workbook exported", or "Workbook exported with N compatibility findings" when the export records findings.
- Archive or Restore moves the template between Active and Archived. The toasts are "Datasheet archived" and "Datasheet restored".
- Delete is available only when the template has never been published and has no filled instances. The dialog title is Permanently delete datasheet? You must enter a Reason, then select Permanently delete. The toast is "Unused Datasheet permanently deleted". If the template has been published or used, Delete stays in the menu but is blocked, with "Archive this template because it has been published or used."
Prefer Archive for templates that have been used on the floor. Deletion is for unused drafts only.
From the builder
The builder does not repeat rename, duplicate, archive, export, or delete. Use the list for those. In the builder, Edit as new version branches a draft from the published workbook, and History opens version history. The worksheet tab menu renames, copies, moves, or deletes a sheet inside the draft.
Example: incoming inspection at Gotham
Bruce Wayne opens Datasheets at Gotham Applied Sciences and creates Incoming inspection, using the short code RCV-QC and a description of the receipt checks. The builder opens the new draft.
He adds a static title and labels for material heat, width and visual findings, then creates text and number input cells with =input(text) and =input(number). He publishes v1 with the release note "Initial receiving sheet with heat, dimensional and visual checks."
A separate Housing hardness template remains a draft with heat-traceability and numeric hardness inputs. The Active list makes the different states clear before either template is attached to production work.
Expected result
A published datasheet shows vN published on its row. Operators and planners can attach that published version on supported production records. A template that has never been published shows Draft until you publish. Archived templates leave the Active tab but keep their versions and instance history until you delete one that has never been published or used.
Feature state and limits
Datasheets are available with a Beta badge in navigation. Keep these behaviours in mind:
- Templates are per site (entity); they are not shared across plants.
- New templates default to Production Orders scope and manual creation mode.
- Only a draft grid can be edited; publish freezes a numbered version for new instances.
- Instances pin to the published version’s grid snapshot at creation time.
- Grid size is capped (20 000 populated cells and about 1 MB of grid JSON). Oversize saves return a clear validation error.
- Connected arrays are formula-first and production-order-only. Their runtime capacity is controlled by the deployment’s Datasheet limit setting.
- Locking an instance freezes its connected source snapshot and calculated results.
Troubleshooting
- You cannot edit a published grid. The header shows Edit as new version, not Publish. Select Edit as new version, then edit the draft. If a save still reports "Only the shared Draft can be edited.", branch that draft first.
- "Archive this template because it has been published or used." Delete is blocked. Archive the template if it should no longer be offered. Delete only a draft that was never published and never filled.
- "A Datasheet with this normalized code already exists." or "A Datasheet with this normalized name already exists." Choose a different code or name in Edit datasheet. A code that differs only by spaces or letter case still clashes. A name that differs only by letter case, or by repeated spaces, still clashes.
- Grid save fails with a cell or size limit message.: the sheet has too many cells or is too large. Remove unused cells, simplify formulas, or split into two templates.
#SPILL!appears on an array formula.: another authored cell, merged range, name, or generated region blocks the result. Move the formula or clear the conflicting area.- A striped area cannot be edited. It is reserved by an
ARRAYorBINDARRAYformula. Edit or move the anchor formula instead of writing inside its generated region. A read-onlyARRAYspill cannot hold operator inputs. UseBINDARRAYwhen the row needsINPUTcolumns. A spill result on blank cells, without that striped band, is an ordinary formula spill. Writing there shows#SPILL!. - A generated row says DELETED.: its source record disappeared, but Bulk kept the row because it contains operator data. Remove the orphan if it is no longer needed.
- A connected array shows stale or capacity status.: Bulk kept the last successful materialization because refresh failed or exceeded the configured limit. Correct the source/formula or raise the deployment limit before refreshing.
- "The selected Datasheet is no longer available." The row you had selected was removed. Choose another template. If the builder says "This Datasheet has no workbook.", use Back to Datasheets.
- New datasheet or edit actions are missing.: you have view-only access. Ask an administrator for datasheet create/update/delete permissions.
Dates and time zones
A datasheet Date cell stores a calendar day and stays on that day in the owning plant, including after publish, export, and PDF generation. Use a date-and-time field when the exact moment matters; those values keep the recorded instant.
Related
- Manage forms: structured field templates for inbound and production work (complementary to spreadsheet-style datasheets).
- Manage processes: controlled work instructions that often sit alongside inspection data.
- Manage custom fields and dates: extra attributes on master-data records.
- Roles and permissions: grant datasheet view, create, update, and delete permissions to a role.
Manage forms
Create and maintain form templates for inbound documents, production orders, inbound items, and jobs: sections, fields, categories, and the form builder.
Manage PDF templates
Create, design, publish, and export reusable PDF layouts for production orders, production jobs, inbound documents, and inbound items.