Manage PDF templates
Create, design, publish, and export reusable PDF layouts for production orders, production jobs, inbound documents, and inbound items.
Last updated
A PDF template is a reusable page layout that turns live production or inbound data into a printable PDF. You design the page once: text, logos, tables, barcodes, signatures, and fields bound to order, job, or inbound records: then publish it so people can export PDFs from matching work on the floor and in the office.
Manage PDF templates when you need shop-floor job sheets, order summaries, inbound document printouts, labels, or any fixed layout that should pull current data from Bulk. Templates are per site (entity): each plant keeps its own drafts, published layouts, and defaults.
Before you start
Open Settings, expand the Master Data group, and select PDF Templates. The page address ends in /settings/pdf-templates. Creating a template opens /settings/pdf-templates/new; editing one opens /settings/pdf-templates/<template-id>.
You need permission to work with PDF templates:
- View the list, open the editor, and preview requires
pdf_templates.view. - Create, edit drafts, publish, duplicate, import/export JSON, set a default, and delete require
pdf_templates.edit.
These permissions are granted by the built-in Super user, Entity admin, Manager, and Master data roles. The Operator role can view templates (for example when printing) but not manage them. If New Template or card actions are missing, ask an administrator to adjust your role.
Switch to the correct site before you start. Templates belong to the entity you are working in and are not shared across plants.
Optional but useful:
- Define custom fields and dates you want to print: dynamic text can insert job, order, inbound, customer, and related field tokens.
- Create the forms you want a PDF to include, and set each form to apply to the order, job, or inbound records that template will print.
- Know which record type you are printing: production orders, production jobs, inbound documents, or inbound items. Each template is locked to one type when you create it.
What the PDF Templates page shows
The page header is titled PDF Templates, with the description: “Create and manage PDF templates for production and inbound records.” Header actions are:
- Import JSON: create a draft from a previously exported template file.
- New Template: open the create form (type is pre-selected if a type tab is active).
Below the header, type tabs filter the grid:
| Tab | What it lists |
|---|---|
| All Types | Every template for this site |
| Production Orders | Order-level layouts |
| Production Jobs | Job-level layouts |
| Inbound Documents | Inbound document layouts |
| Inbound Items | Single inbound-item layouts |
Each template is a thumbnail card in a grid. A card shows:
- A first-page preview (or a sketch placeholder while a thumbnail is still generating).
- A status badge: Draft, Published, or Archived.
- The template name, with a star when it is the default for its type.
- A hover menu (three dots) for actions.
Click a card (outside the menu) to open the editor. If the site has no templates for the current filter, an empty state explains the type and offers a create action (for example Create Job Template or Create Template).
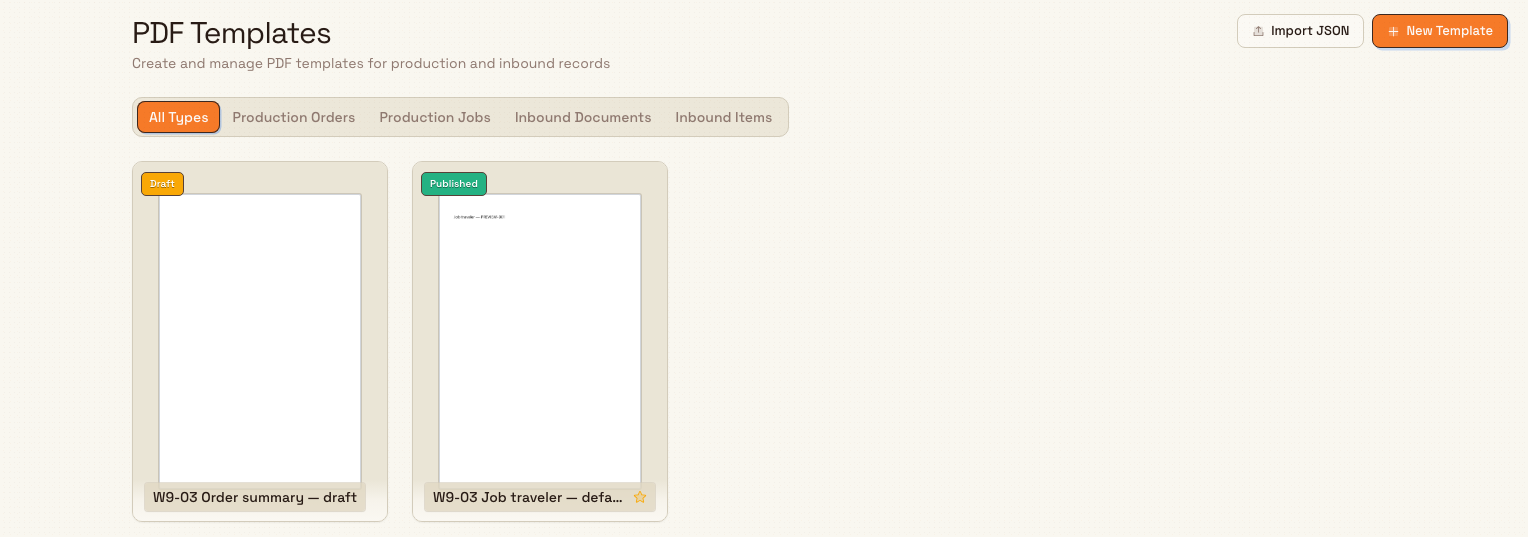
Template types and statuses
Types
When you create a template you choose one Template Type. That choice controls which record you pick when exporting a PDF and which data widgets are available on the canvas:
| Type (UI label) | Export picks | Typical use |
|---|---|---|
| Production Orders | An order | Order pack. Print from an order can include every job or only the jobs you select |
| Production Jobs | A job | Job traveler / shop sheet for one job |
| Inbound Documents | An inbound document | Receipt or certificate covering all items on the document |
| Inbound Items | One inbound item | Label or sheet for a single line item |
You cannot change the type after creation. To support another type, create or import a new template.
Statuses
- Draft: editable. Place widgets, set page size and margins, preview with sample data, then publish when ready.
- Published: available for PDF generation. The layout is read-only: you cannot rename it or change widgets. Publish cannot be undone from the editor.
- Archived: retired status kept in the product model (badge can appear if a template was archived). Day-to-day cleanup on the list is Delete, which soft-removes the template from the site list.
A site can mark at most one default published template per type. Defaults show a star on the card and are preferred when people print from production or inbound flows that use the default for that type.
Create a template
- Select New Template (or the empty-state create button). The Create New Template page opens at
/settings/pdf-templates/new(optionally with?type=when you started from a type tab). - Under Template Details, fill in:
- Template Name (required): for example
Job traveler: brackets. - Description (Optional): notes for other admins.
- Template Type: Production Orders, Production Jobs, Inbound Documents, or Inbound Items.
- Template Name (required): for example
- Under Page Format, choose a Preset:
- Documents: A4, Letter
- Labels: 4 × 6 in label, 100 × 50 mm label, 50 × 30 mm label, or Custom
- For document presets, set Orientation to Portrait or Landscape. For Custom, enter Width (mm) and Height (mm) (10 to 1000 each) and use Rotate to swap them. A summary line shows the export size (for example “Exports as 210 × 297 mm PDF”).
- Select Create Template.
Bulk creates a draft, shows “Template created successfully!”, and opens the visual editor. Defaults for a new A4 portrait template include standard margins and an 8 px grid for snapping widgets.
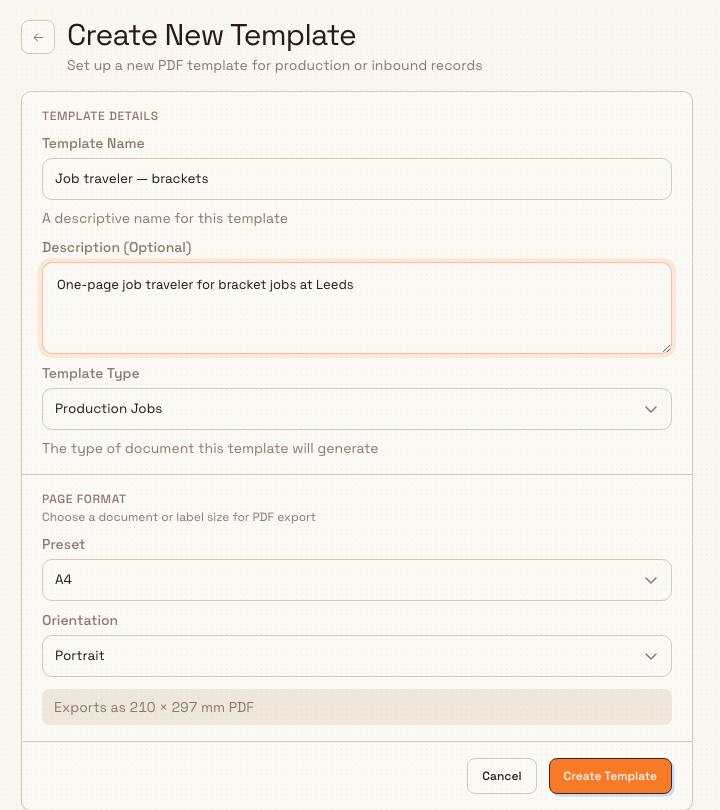
Design the layout in the editor
The editor is a full-bleed canvas for the selected draft (or a read-only view of a published template).
Header and save
- Use the PDF Templates breadcrumb to return to the list. The back button follows your previous page.
- The template name and a save status indicator (auto-save while you edit a draft).
- Page summary (size and orientation), portrait/landscape or Rotate for custom sizes, and a Toggle Grid control.
- Preview (or Actions → Preview / Export PDF when export is available).
- Publish (drafts only).
Preview first saves any pending draft changes, then builds a real PDF of the current layout. While a save or retry is in progress, wait for the save status to settle before opening Preview. Export from the editor is blocked until every widget fits inside the printable area.
Place widgets
Use the floating dock at the bottom of the canvas. Widgets are grouped as Basic, Data, and Layout. Drag a widget onto the page, or click to place. Undo / redo are available on the dock (Ctrl/⌘+Z and Ctrl/⌘+Shift+Z).
Common widgets (exact labels in the dock):
| Widget | Category | Purpose |
|---|---|---|
| Text | Basic | Static text and dynamic field tokens (for example job number, customer, custom fields) |
| Logo | Basic | Image logo from the site gallery |
| Static Table | Basic | Fixed rows and columns you fill with text |
| Signature | Basic | Signature block with a label |
| Jobs Table | Data | Jobs on a production order (order templates; multi-page). Print can include a selected subset |
| Items Table | Data | All items on an inbound document (document templates only; multi-page) |
| Routing Table | Data | Routing steps for a production job (job templates only) |
| Dynamic Table | Data | Table whose cells can pull live fields |
| Barcode/QR | Data | Barcode or QR from a field or value |
| Form Answers | Data | Answers filled into a form on the record |
| Divider, Box, Checkbox | Layout | Separators, panels, and check boxes |
Widget availability follows type. Jobs Table is not offered on inbound templates. Items Table is only on inbound documents. Routing Table is only on production job templates. Form Answers is offered on every template type. Standalone Field Value widgets are no longer added from the dock. Use Text with field tokens instead.
Double-click a Text widget to edit its content. Double-click a table to enter table-editing mode, then use the steps below. Select any widget to open the right-hand Widget Settings panel for settings that need exact values, such as styles and dimensions. For table widgets, Top header can show a title and subtitle above the column headers; both appear on the canvas and in the printed PDF. The Page Config tab sets preset, orientation, custom size, margins, and Show grid. Margins define the publish-safe printable area; drafts may temporarily place widgets outside it, but publish stays blocked until everything fits.
Print filled form answers
Form Answers prints what was filled into one form, for example an export control form. In the dock it is under Data, and its description is “Answers filled into a form on the record”. You can place it on a production order, production job, inbound document, or inbound item template.
Select the widget and use Widget Settings.
Under Form, choose the form. Each option shows the form name and code. Only active forms that apply to this template type are listed. If none do, the panel says: “No active forms apply to this template type. Build one in Settings, Forms, and set it to apply to these records.” See Manage forms.
Only completed forms starts on. The PDF then prints the latest completed copy and skips copies that are not finished. Turn it off to print the latest copy, finished or not.
All fields starts on and prints every field. Turn it off to tick the fields you want. Hide empty answers leaves out a field that has no answer. Fields the form hides for that copy are not printed.
Under Layout, you can Show form title, Show section headings, Show field labels, and Show borders. With the title on, Title replaces the form name when you fill it in. Under Text, set the font size, the Dates format, and Empty. Empty starts as “No form answers” and is what prints when there is no copy to show.
Which filled copies the PDF can include depends on the template:
| Template | Filled copies the PDF can include |
|---|---|
| Production Orders | The order, and its inbound document |
| Production Jobs | The job, its order, its inbound item when it has one, and the inbound document. That document is the job's own inbound document, or the order's when the job does not have one. |
| Inbound Documents | That document |
| Inbound Items | That item, and its document |
A template can print at most 20 different forms. If you try to save more, Bulk reports: “A PDF template can print at most 20 different forms.”
Preview uses sample answers from the form. To export or print the real answers, you need View filled forms (form_instances.view). Without that permission, export stops and reports: “This template prints filled form answers. Printing it needs the "View filled forms" permission.”
Edit a table directly on the canvas
Table editing works on Static Table, Dynamic Table, Jobs Table, Items Table, and Routing Table widgets. The available controls depend on whether the table contains rows you enter yourself or rows supplied by live Bulk records.
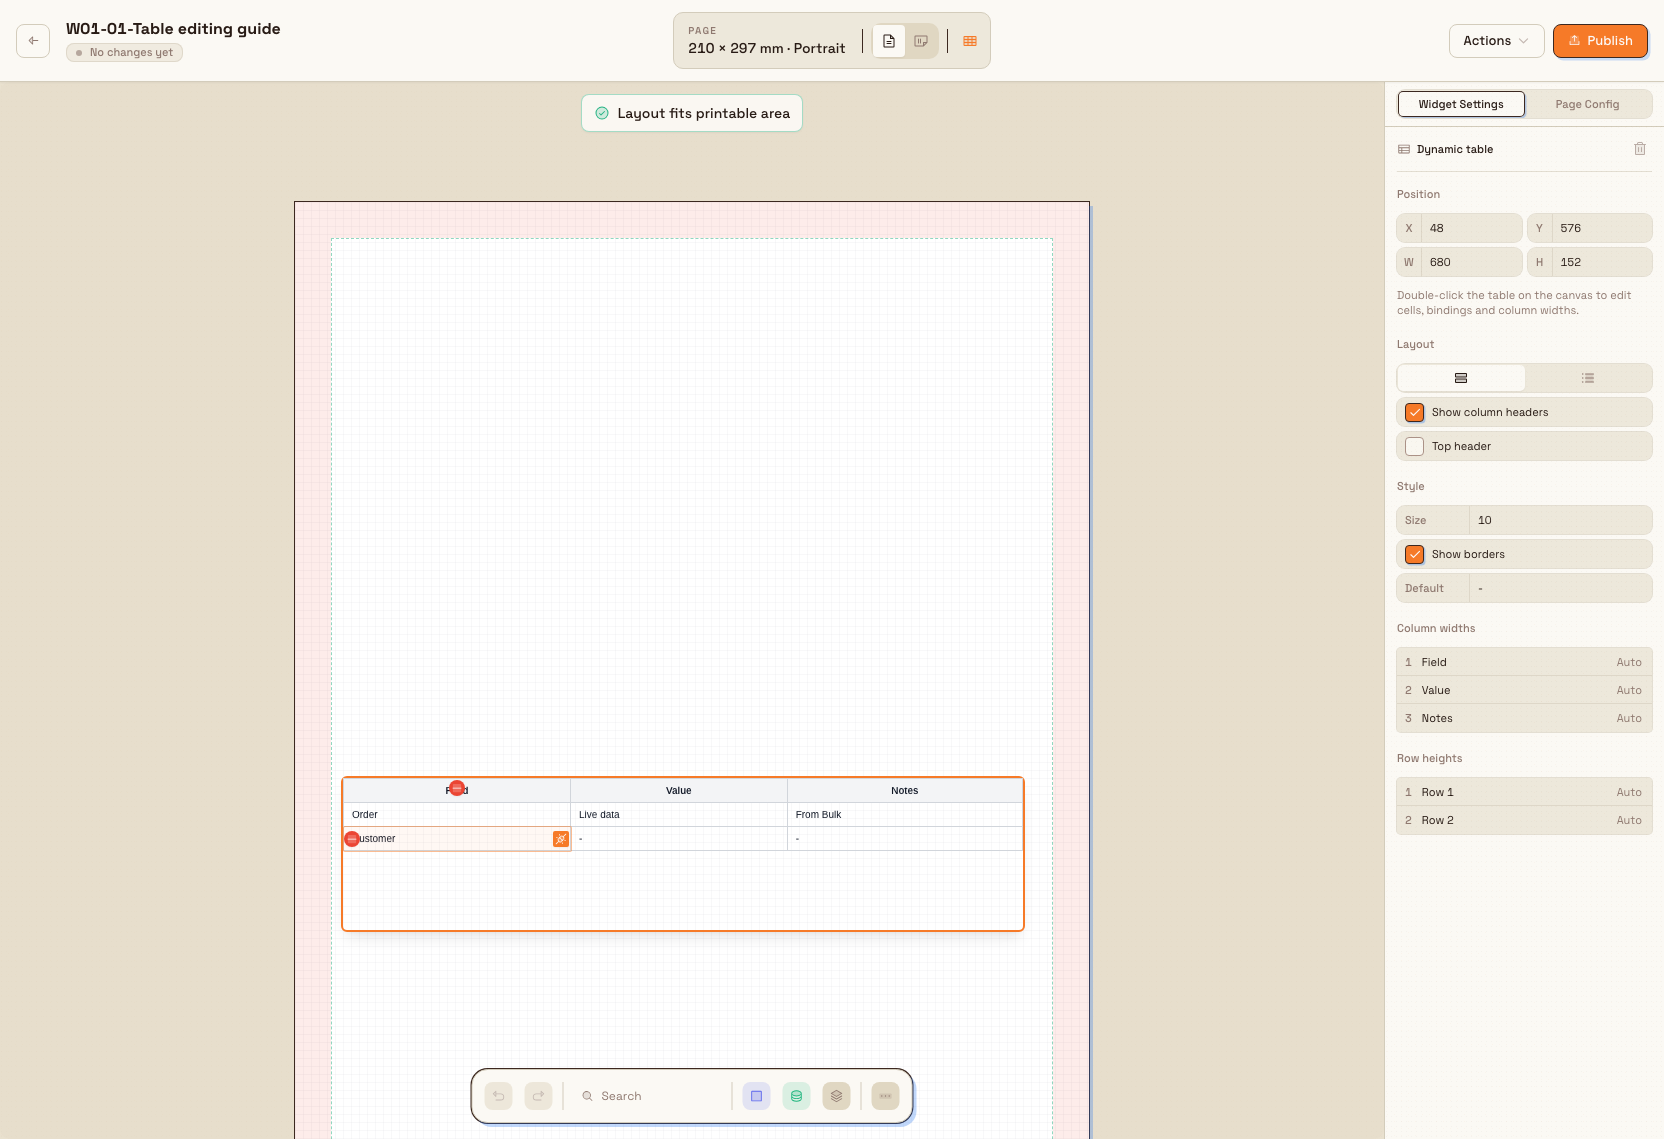
- Double-click a table in a draft. A solid outline shows that table-editing mode is active. Published templates are read-only; duplicate a published template first if you need to change it.
- To change a column heading or a static cell, select the cell and type. Enter saves and moves down the same column. Tab saves and moves across the row, Shift+Tab moves back, and Escape cancels the value currently being typed. At the edge of the table, or when the next cell is bound rather than typeable, editing ends after the save.
- To bind live data, select the plug icon on a bindable cell or select an already-bound data cell. Choose the Data Source and Field, then set the date format, prefix, suffix, or empty-value fallback when those options are available. Select Apply. Static tables do not have field bindings.
- Change the structure where the table allows it:
- For a horizontal Static Table or Dynamic Table, hover the right edge to add a column and the bottom edge to add a row. Hover a row or column to reveal its remove control.
- For a vertical static or dynamic table, the bottom control adds a field. The remove control removes that field from each record block.
- Jobs Table, Items Table, and Routing Table rows come from the selected order, inbound document, or routing. You cannot add data rows manually. Add or remove their columns in Widget Settings instead.
- In a horizontal table, drag a divider between columns to resize both neighbouring columns while keeping the table's total width. On a horizontal static or dynamic table, drag the bottom edge of a row to change its height. Use Widget Settings for exact column widths; horizontal static and dynamic tables also provide exact row heights. Adding a row grows the widget when there is room on the page.
- Select outside the table, or press Escape when no cell or binding form is open, to leave table-editing mode. Wait for the header save indicator to show that the draft is saved, then select Actions → Preview and check the real PDF for wrapping, spacing, and page breaks.
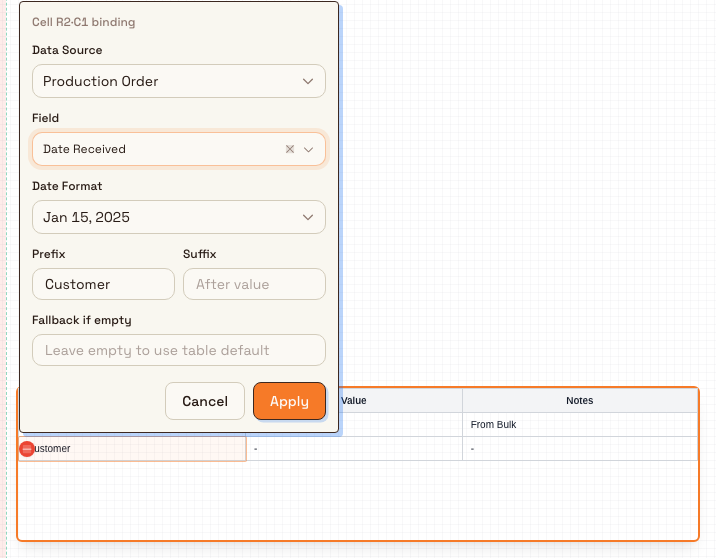
Use Undo and Redo on the bottom dock to reverse committed widget changes such as table edits, widget moves, or widget resizes. Page settings and adding or deleting a widget are not part of this session history. The shortcuts are Ctrl/⌘+Z and Ctrl/⌘+Shift+Z. Undo history belongs to the current editing session and clears when you leave the editor or switch templates. While your cursor is inside a text field or cell, the normal text undo applies; finish or leave the field before undoing the whole widget change.
Publish a draft
- Select Publish in the editor header.
- Review the Publish Template dialog: template name, type, widget count, and any errors or warnings.
- Fix blocking issues (for example “Template must have at least one widget”, or layout fit messages) if shown.
- Select Publish Template.
Publishing makes the template available for generation. Confirmation: “Template published successfully!”. The dialog notes that publishing cannot be undone: to change the layout later, Duplicate the published template into a new draft (named … (Copy)), edit that draft, publish it, and optionally Set as Default.
Manage templates from the list
Hover a card and open the actions menu:
| Action | When | What it does |
|---|---|---|
| Edit | Always | Opens the editor |
| Rename | Draft only | Renames the template (disabled on published with “Cannot rename published templates”) |
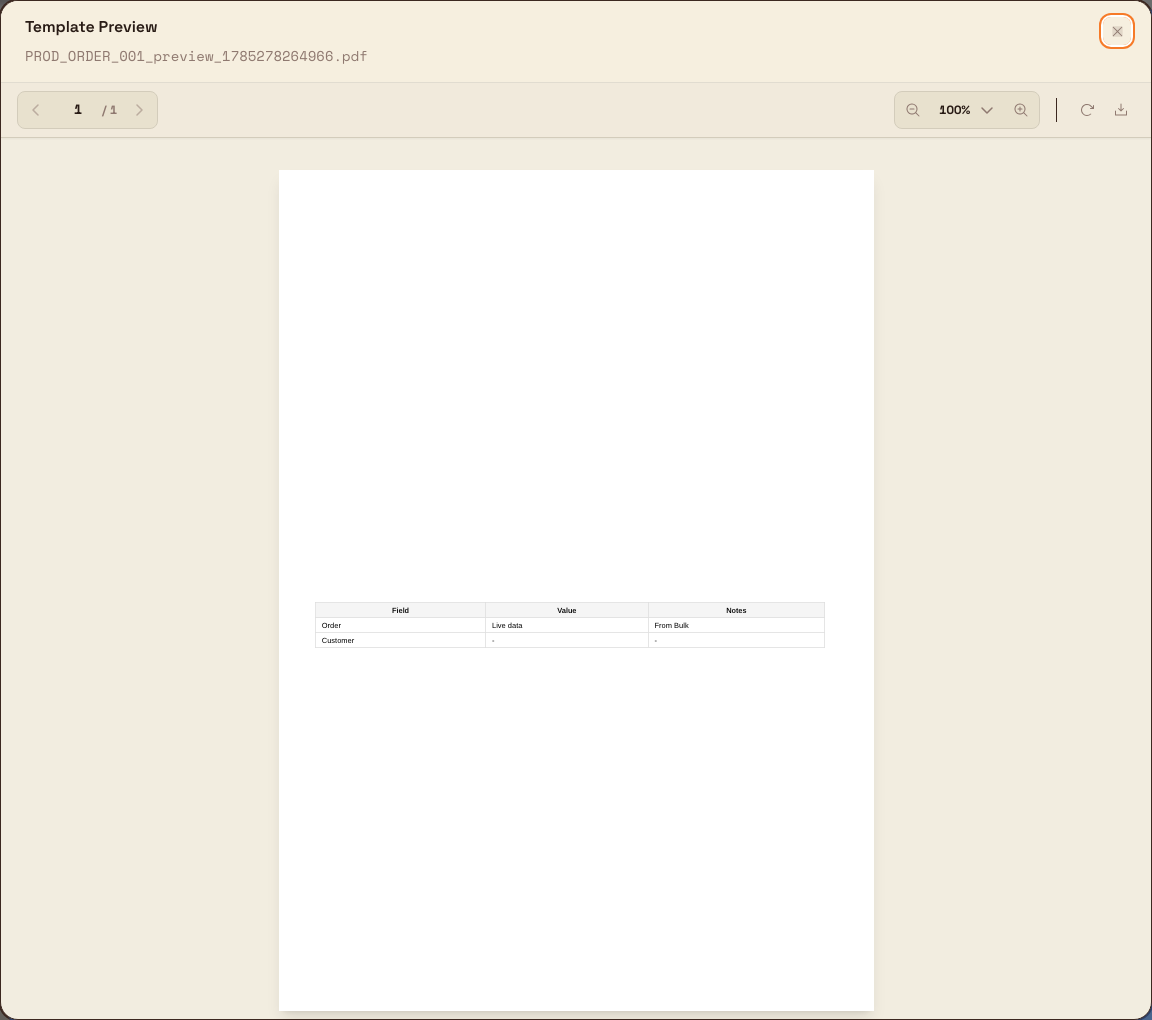
| Preview | Always | Opens the PDF preview with a generated sample PDF |
| Duplicate | Always | Copies layout into a new draft named Name (Copy) and opens the editor; toast “Template duplicated as "Name (Copy)"” |
| Export JSON | Always | Downloads a JSON export for backup or another site; toast “Template JSON exported” |
| Export PDF | Published | Opens Export PDF to pick a real order, job, inbound document, or item and generate a PDF |
| Set as Default | Published and not already default | Marks this template as the default for its type; toast "Name" set as default template |
| Delete | Always | Soft-deletes after confirm; toast “Template deleted” |
Import JSON
Select Import JSON on the list. In Import PDF template, upload or paste a JSON export, then import. Bulk creates a draft, may warn about adjustments (for example logos), shows “Template imported”, and opens the new draft in the editor.
Export PDF with live data
From a published template’s menu (or the editor Actions menu when allowed):
- Choose Export PDF.
- Select the matching record (order, job, inbound document, or inbound item) with the search combobox.
- Select Export PDF. The PDF opens in a new browser tab; toast reports success with generation time.
Help text matches the type. Settings Export PDF for an order template still generates the selected order with every job. Job export uses data from the selected job.
People can also print from day-to-day work without opening Settings. On a production order or job, Print opens a shared wizard that lists published templates of the matching type as thumbnail cards. Pick a template, then select which jobs to include. An order template prints one PDF whose jobs table lists only those jobs. A job template can open one merged PDF or a ZIP of separate job sheets. From an inbound document, Print can offer inbound layouts or production layouts (choose a category first when both apply). Job Print that is already in production skips the category step. Only published templates appear in those wizards.
Calendar-only fields keep their saved day in the generated PDF. Fields that include a time keep their recorded moment and are formatted in the template site's timezone, even when the export is started from a computer in another timezone.
Bulk print from inbound and production
Published templates are also used when people print many records at once from inbound documents or production work (for example Print Labels, Generate Traveller, or the document Print hub):
- Choose a published template of the matching type.
- Select the records to include (up to 1,000 per export).
- Choose one merged PDF or a ZIP of separate PDFs.
- Start the export.
Selections of up to 100 records finish immediately in the browser. Larger selections (101 to 1,000) run as a background job: a progress dialog shows how many documents are done, lets you Cancel, and offers Download when the file is ready. You can hide the dialog and keep working; reopen it from the same session while the job is still tracked.
You need pdf_templates.view to run these exports. Inbound item selections still respect inbound document view rules, so people only receive PDFs for items they can already see.
Delete a template
Select Delete, then confirm in Delete Template: “Delete Name? This action cannot be undone.” Prefer keeping a published default until a replacement is published and set as default so print flows still have a layout.
Example: job traveler at Granite Peak Manufacturing
Granite Peak Manufacturing’s Leeds Fabrication Plant prints a one-page job traveler for bracket jobs. Dana Winters opens Settings → Master Data → PDF Templates, selects New Template, names it Job traveler: brackets, chooses Production Jobs, keeps A4 Portrait, and selects Create Template.
In the editor she places a Logo, Text blocks with job number and customer tokens, a Routing Table, and a Signature block. She previews, then Publishes. On the list she opens the card menu and chooses Set as Default so workstation print uses this layout. When the traveler needs a notes row, she Duplicates the published template, edits the draft copy, publishes the copy, and sets the new version as default.
Expected result
After you publish a template of the right type:
- The card shows Published (and a star if it is the default for that type).
- People with access can Export PDF against real orders, jobs, or inbound records of that type.
- Published order and job templates also appear in the production-order Print wizard (and in inbound Print when printing production records).
- Drafts remain editable until you publish them; published layouts stay fixed until you replace them with a new published draft (usually via Duplicate).
Feature state and limits
Managing PDF templates is a generally available feature. Keep these behaviors in mind:
- Templates are per site (entity); they are not shared across plants.
- Publish is permanent for that template record: you cannot unpublish back to an editable draft. Use Duplicate to get an editable copy.
- Only published templates can be set as default, and only one default exists per type per site.
- Publish and export require at least one widget and a layout that fits inside margins.
- Some widgets are type-specific (jobs table, items table, routing table).
- Form Answers is available on every template type. One template can print at most 20 different forms. Exporting the real answers needs View filled forms (
form_instances.view). Preview uses sample answers and does not check that permission. - List cleanup uses Delete (soft delete). An Archived status exists in the product, but the main list actions center on draft/publish and delete rather than a separate archive control in the card menu.
Troubleshooting
- New Template or card actions are missing.: You may have view-only access (
pdf_templates.viewwithoutpdf_templates.edit). Ask an administrator for Super user, Entity admin, Manager, or Master data (or an equivalent custom role). - Cannot rename or edit widgets.: The template is Published. Duplicate it to a draft, or create a new template.
- Publish is disabled or fails with validation errors.: Add at least one widget, and move or resize any widgets that fall outside the printable area (margins). Warnings about few or overlapping widgets do not always block publish; errors do.
- Export PDF is missing on the card.: The template is not published yet, or it is archived. Publish a draft first.
- The Form Answers form list is empty. No active form applies to this template type. Open Settings → Master Data → Forms and set the form so it applies to the records this template prints.
- Export stops and asks for View filled forms. The template includes Form Answers. You need View filled forms (
form_instances.view) on the account that runs the export. Ask an administrator to grant it. The message is: “This template prints filled form answers. Printing it needs the "View filled forms" permission.” - “Fit all widgets inside the printable area before exporting.”: Shown when the layout does not pass fit checks. Adjust positions, sizes, or margins on the Page Config tab.
- “Only published templates can be set as default”.: Publish first, then use Set as Default.
- This PDF template is unavailable or your account does not have access to it.: The editor shows a restricted page when the template is missing, deleted, or not in your current entity. Switch site or return to the list.
- Import fails or warns.: JSON must be a valid PDF template export. Logos or fields may need re-linking after import; follow any warning toast details.
Related
- Manage custom fields and dates: extra fields you can print with text tokens.
- Manage forms: structured data templates for inbound and production records. Form Answers prints a filled copy of one of those forms.
- Manage routings: routing steps that appear in the Routing Table widget on job templates.
- Manage processes: controlled work methods often referenced on production work you print.
- Roles and permissions: grant
pdf_templates.viewandpdf_templates.edit.
Manage datasheets
Create, build, publish, and archive spreadsheet-style datasheet templates with formulas, validation, and version history for production records.
Configure OEE dashboards
Create and manage asset OEE timeline dashboards for a site: choose which machines appear, set display options, and pick the default for the floor.