Update personal account settings
Manage your own Bulk account from the Account page. Change your display name and avatar, update your password, and reach two-factor authentication.
Last updated
Your account settings are the personal details Bulk keeps for you: the name and picture other people see next to your work, and the password and two-factor settings that protect how you sign in. They live on the Account page, and every signed-in person manages their own. Nothing you change here affects other people's accounts or how your plant is set up.
This is different from Settings, the separate preferences area (notifications, date and time display, and privacy). This article covers only your own account: your profile and your security. Bulk is a Manufacturing Execution System (MES), the shared software your team uses to run production, quality, scheduling, and audits, so keeping your name and photo current helps colleagues recognise your tasks, comments, and sign-offs across the workspace.
When you would use this
- Your display name changed, or was entered differently when your account was created, and you want it to read correctly everywhere in Bulk.
- You want to add or replace your avatar (the small profile picture) so teammates recognise you at a glance.
- You need to change your password, for example on a routine security refresh, or after signing in on a shared computer.
- You want to turn on two-factor authentication (2FA), an extra sign-in check that asks for a one-time code as well as your password.
Before you start
- You are signed in. The Account page is only reachable once you have signed in. If you cannot sign in, see Recover your password first.
- You have a plant selected. Bulk asks you to choose the site (called an entity, usually a plant or location) you are working in before it opens your account page. If you have not chosen one yet, see Select an entity.
- No special role is needed. Managing your own account is self-service. Every signed-in user can do it, regardless of permissions. You do not need to be an administrator.
- Password changes need a Bulk password. If your organisation signs you in through a single sign-on (SSO) provider rather than a Bulk password, the password section cannot change your credentials. Bulk will tell you no password is set. Manage those credentials with your identity provider instead.
Open your account settings
- Select your avatar in the top-right corner of the workspace to open the user menu. The menu shows your name and email at the top.
- Choose Account.
You land on the Account page, headed Account with the subtitle "Manage your account information and security settings." It has two tabs: Profile and Security.
Go straight there
You can also open the page directly at /settings/account. The Settings item in the same menu opens a different area for your notification, display, and privacy preferences, separate from the account details covered here.
Update your profile
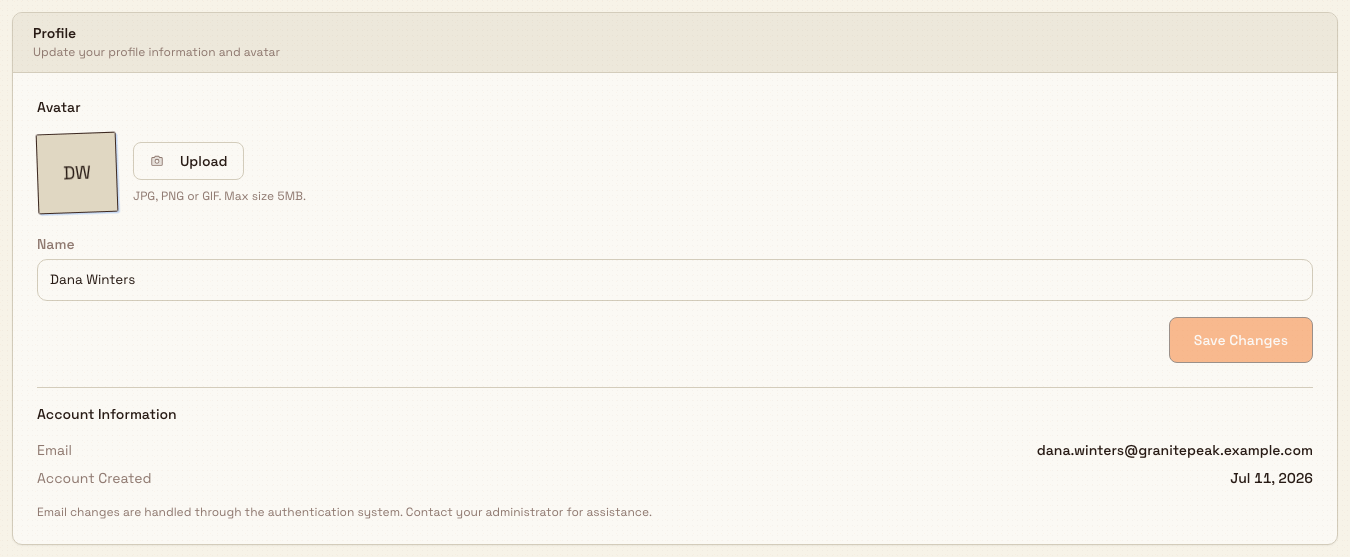
The Profile tab ("Update your profile information and avatar") is where you change how you appear to others.
Change your avatar
The Avatar block shows your current picture, or your initials if you have not set one.
- Select Upload to choose an image from your device. The uploader accepts common image formats (JPG, PNG, GIF, and WebP) and shows the hint "JPG, PNG or GIF. Max size 5MB."
- If you already have an avatar, select Remove to clear it. Bulk asks you to confirm before removing.
Your new picture appears as soon as the upload finishes, and Bulk shows a brief "Avatar uploaded successfully" confirmation.
Keep avatars small
Although the on-screen hint mentions 5 MB, Bulk currently stores avatars up to 2 MB. If your image is larger than 2 MB the upload is rejected with a file-size message. Resize or export the picture below 2 MB and try again.
Change your name
- Edit the Name field. Your name must be at least two characters.
- Select Save Changes.
Save Changes stays greyed out until you actually change the field, so if the button looks disabled you have not edited anything yet. While the change is saving, the button reads Saving..., and Bulk confirms with "Profile updated successfully."
Account information (read-only)
Below the form, the Account Information list shows details you can see but not edit here:
- Email: the address you sign in with.
- Account Created: the date your account was set up.
- Last Login: when you most recently signed in (shown when Bulk has recorded it).
A note reminds you that email changes are handled through the authentication system. To change the address you sign in with, contact your administrator.
Manage your security
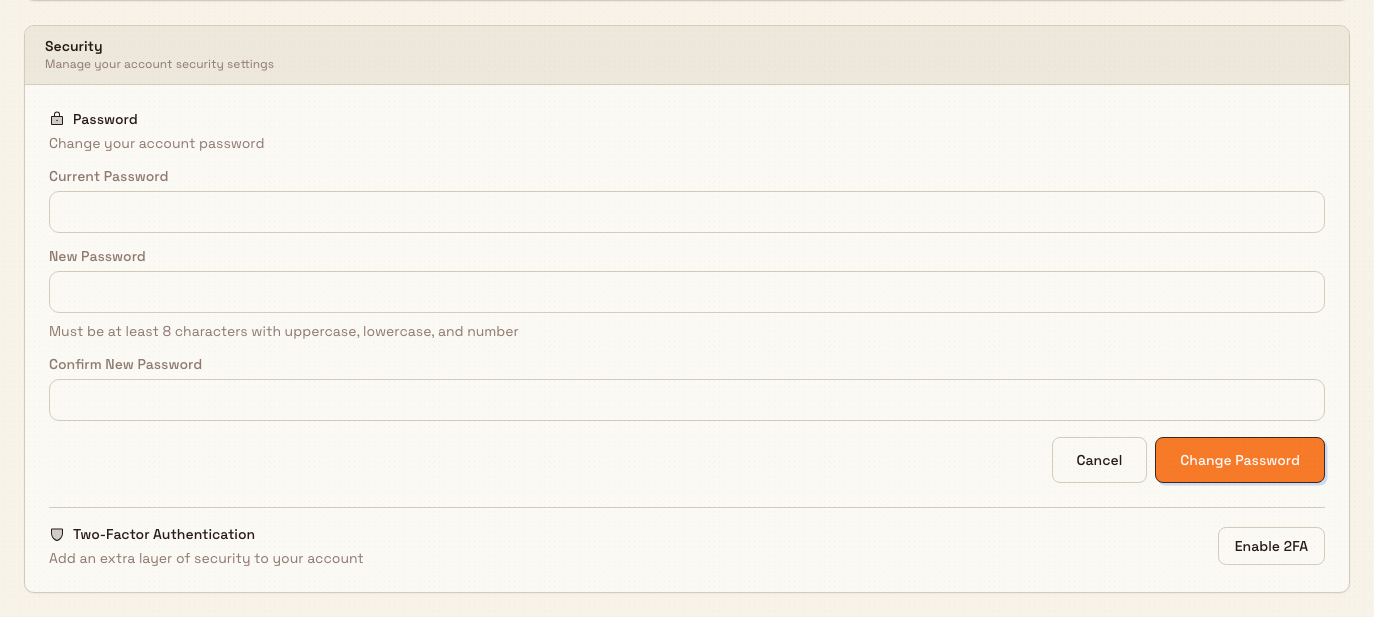
Select the Security tab to see the password form and two-factor controls.
Change your password
- Select the Security tab. The three password fields are already visible.
- Enter your Current Password.
- Enter a New Password. It must be "at least 8 characters with uppercase, lowercase, and number," and it must be different from your current password.
- Re-type it in Confirm New Password so the two match.
- Select Change Password to save, or Cancel to clear the fields without changing anything.
Bulk checks your current password before making any change. When it succeeds, you see "Password changed successfully" and the password fields clear. Your existing session stays signed in.
Two-factor authentication
The Two-factor authentication row shows a switch and your current status. When it is off, the row reads "Add an extra layer of security to your account." Switching it on starts the authenticator setup on the same page. Complete the setup and save your backup codes before enabling 2FA.
When 2FA is enabled, a code from your authenticator app is required at sign-in. The same Security tab contains its management controls. For the full walkthrough, see Enable two-factor authentication.
Example: Bruce reviews his account at Gotham
Bruce Wayne works at Wayne Corp's Gotham Applied Sciences site. He wants his name and picture to be recognisable beside production approvals and task comments.
- He opens his avatar menu and selects Account.
- On Profile, he checks his current name and account information, then uses Upload when he has a suitable headshot under 2 MB.
- If his name needs correcting, he edits Name and selects Save Changes.
- He selects Security to review the password form and two-factor status.
- When he is ready to set up 2FA, he starts from the switch and follows the authenticator setup, saving the backup codes before enabling it.
What to expect
- Your name and avatar update immediately across Bulk, including in the user menu, on your tasks, comments, and sign-offs, so colleagues see the current version.
- A password change takes effect at once; you stay signed in on the device you changed it on, but will use the new password next time you sign in elsewhere.
- Email, Account Created, and Last Login are informational only on this page.
Availability and limits
- The Account page is generally available to every signed-in user for managing their own account.
- Avatar size: the uploader hint says 5 MB, but Bulk stores avatars up to 2 MB. Keep images under 2 MB to avoid a rejected upload.
- Email is not editable here. Changing your sign-in email goes through your administrator and the authentication system.
- Password rules: at least 8 characters, with an uppercase letter, a lowercase letter, and a number; it must differ from your current password.
- SSO accounts: if you sign in through single sign-on rather than a Bulk password, the password section cannot set or change credentials.
- Self-only: this page manages your account. Administrators manage other people's accounts elsewhere in the workspace, not from here.
If something goes wrong
- The Save Changes button is greyed out. You have not edited the Name field yet. The button only becomes active once the value actually changes.
- "Name must be at least 2 characters." Enter a name of two characters or more, then select Save Changes.
- The avatar upload is rejected for size. Your image is over the 2 MB the server stores. Resize or re-export it below 2 MB and upload again.
- "Current password is incorrect." The current password you typed does not match. Re-enter it carefully; if you have forgotten it, sign out and use Recover your password.
- "New password must be different from current password." Choose a new password you have not just been using.
- The password could not be set because no password is on the account. Your account signs in through single sign-on (SSO). Manage those credentials with your identity provider, not on this page.
Related guidance
Understand access and visible navigation
How your roles, permissions, and plant access decide what you can open in Bulk, and what to do when an area shows an access screen instead of its content.
Enable two-factor authentication
Add a second sign-in step to your Bulk account with an authenticator app, save your backup codes, and manage or turn off protection later.