Work with the inbound grid
Use the inbound grid, a spreadsheet-style view of an inbound document, to edit, fill, and mark ready many line items at once before production.
Last updated
The inbound grid is a spreadsheet-style layout for a single inbound document. An inbound document is an incoming order, such as a purchase order, work order, or manual entry, that you process in Bulk before it becomes production work. The grid lays the whole document out in one vertical flow: the document's fields, its services, and its line items (the individual rows of work) in an editable, Excel-like table. Use it when a document has many line items and you want to edit, fill, and check them quickly rather than opening one item at a time.
This grid is the current inbound document workspace. Open a document that has left the draft stage and Bulk takes you directly to it. Old document links also redirect to the current workspace.
When to use the grid
Reach for the grid when you are working through a document's line items in bulk, for example pasting a column of quantities from a supplier spreadsheet, copying the same routing across a run of identical parts, applying a service to a batch of rows, or marking many rows ready in one pass. All item changes happen inline, while the grid keeps the whole document available around them.
Before you start
You reach the grid by opening an inbound document, so you need access to the Inbound module and to the document itself.
- View inbound documents (
inbound_documents.view): required to open a document and see the grid. - Edit inbound documents (
inbound_documents.update): required to change any document field or document-level service. - Create, edit, or delete inbound items (
inbound_items.create,inbound_items.update,inbound_items.delete): required for the matching line-item actions. For example, editing cells and marking rows ready need the update permission; adding or duplicating rows needs create; deleting rows needs delete. - Submit inbound documents (
inbound_documents.submit): required for the Submit to production action. - Delete inbound documents (
inbound_documents.delete): required to delete the document itself. - Put on / release from hold (
inbound_documents.put_on_hold,inbound_documents.release_from_hold): required for the hold actions. - View, create, edit, or delete filled forms (
form_instances.view,form_instances.create,form_instances.update,form_instances.delete): required for the matching Forms-card actions.
Default roles carry different combinations of these permissions, and your site can customise them. Exporting line items additionally needs the Run exports permission, and the service-code picker needs View service codes.
Two things also shape what you can do:
- Draft documents open in the draft editor. You can apply a full document template there before the document enters its normal workflow. Other editing rules still depend on the document status and your permissions.
- Editing is available while the document is a draft or in progress. Once a document is on hold, being submitted in the background, submitted for approval, approved, in production, completed, or cancelled, the grid becomes read-only. A Ready row can still be returned to Pending for corrections while the document remains editable. A row is permanently locked here once its production job has been created.
The top bar and tabs
The top bar shows the document number with a live save indicator. Print and, when available, Submit to production are direct buttons. The Actions menu groups the other document-level actions that your permissions, the document's status, and its currency setup allow:
- Save as template, Apply template, and Clone as draft: reuse the document setup.
- Convert currency: change the document currency when the customer supports more than one currency and the document is editable.
- Export: export the line items (needs the export permission).
- Put on hold / Release from hold: pause the document with a reason, or resume it.
- Delete: delete the document.

The three reuse tools work as follows:
- Save as template: choose the document fields, items, and item setup to preserve as a reusable full-document template. Attachments, completed form answers, approvals, history, and production jobs are never saved.
- Apply template: add a template to an editable draft. When the draft already has items, choose whether to replace those items or append the template items. Selected dates move relative to today.
- Clone as draft: create one new draft from the visible document. Choose which document fields to copy; all reusable item setup is copied, but every new item starts as Pending and the document workflow starts again. Selected source dates are copied unchanged.
The reuse controls open in a context drawer so you can preview warnings and make field choices without leaving the document. Saving or applying a template supports up to 100 items. Clone as draft supports up to 5,000 items; large clones copy in the background and report progress in the drawer. If a saved customer or other shared setting is no longer available, Bulk either blocks the action or warns you which reusable value will be skipped.
Below the top bar are two tabs: General (the document and its items) and Activity (a searchable, filterable log of changes to the document, with a count of recent entries).
The General tab, top to bottom
The General tab stacks everything about the document in one flow:
- A hold banner, shown only while the document is on hold.
- Any running or failed submission, approval update, or job creation band. These appear before the approval actions so a failure cannot be hidden below a decision card.
- Any approval requests awaiting a decision.
- Attachments, where you can add or remove source files.
- The document fields: customer, PO number, references, dates, priority, notes, and assigned contact: edited inline.
- The document's custom fields and any forms attached to the document.
- The services panel, where you add services to the whole document, apply a pricing template, or pick from the catalogue.
- The Document items sheet: the spreadsheet itself.
The inbound and production order numbers in General info are read-only. Use the copy button beside either number to copy it without selecting the field. The production order number appears only after one has been created.
Attach and complete forms
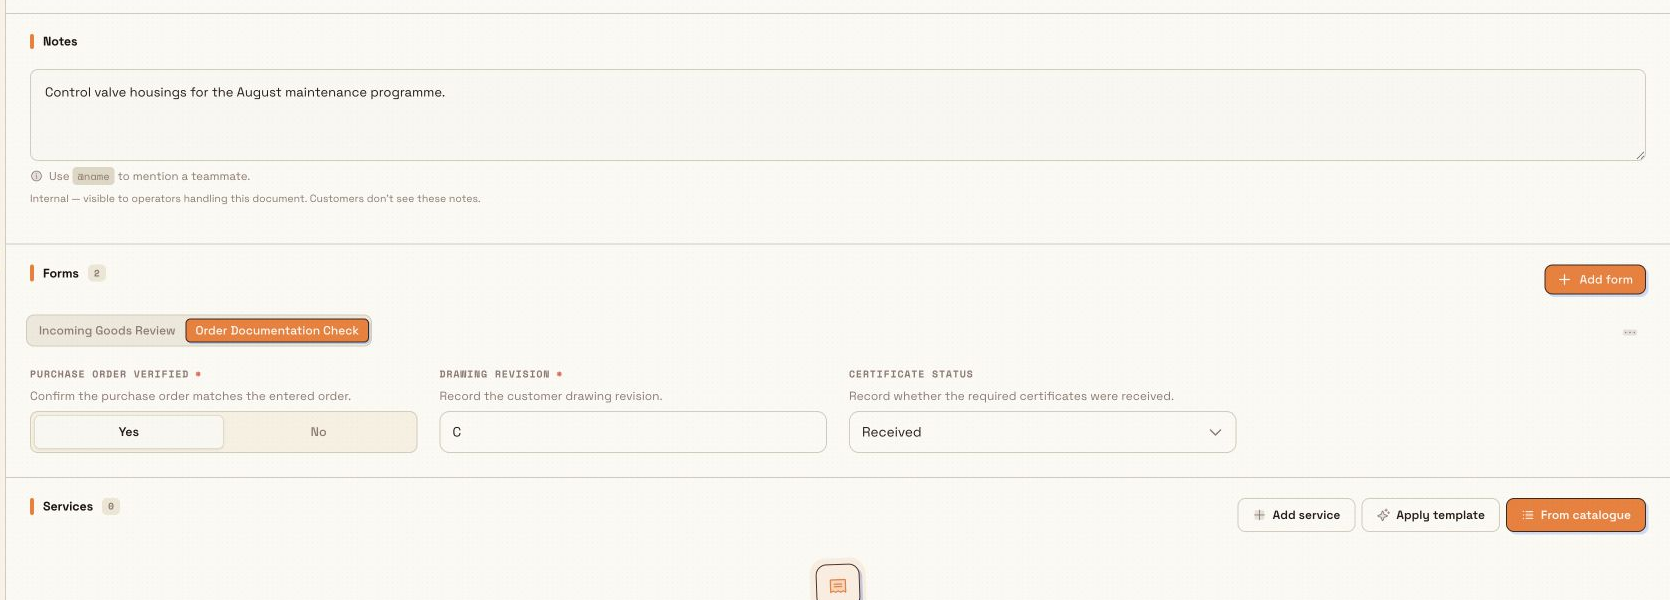
The Forms card shows the number of attached forms and, when applicable, how many required forms remain open. Select Add form to open the form library. There you can search by form name, code, description, or category; filter by category; and sort alphabetically, by most fields, or by category. Forms already assigned to this document are identified in the library and cannot be added a second time.
After you add a form, its name appears as a tab and the form opens inline. Enter the answers in the document page; they autosave as you work. Switch tabs to move between attached forms. If your permissions and the form state allow it, use the form's three-dot menu to delete that form instance.
Document reuse copies only blank form assignments when that option is selected. It does not copy completed answers: a saved template, applied template, or cloned draft creates fresh blank forms for the new document or items.
The Document items sheet
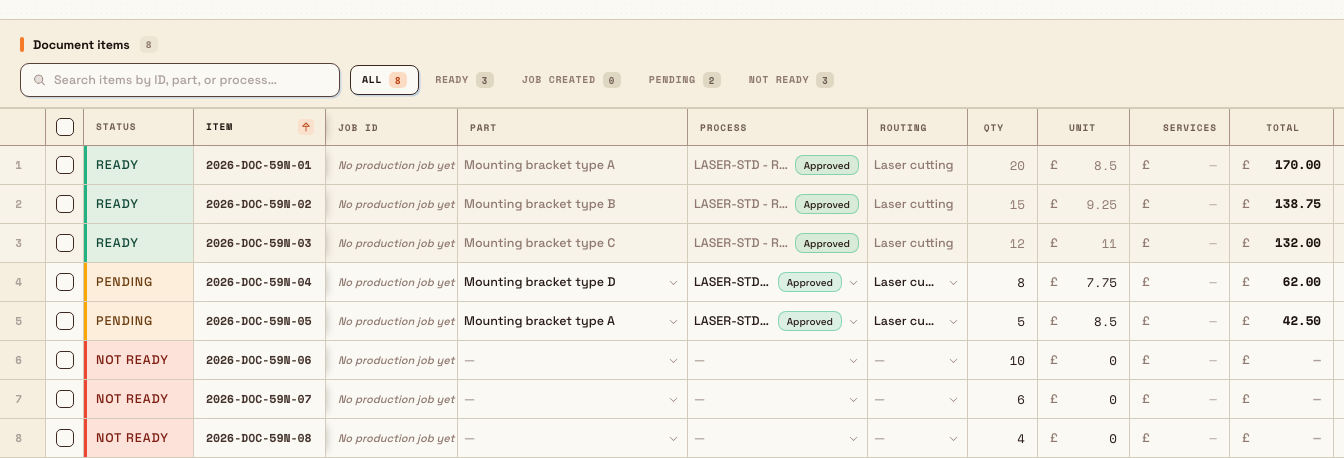
The sheet is the heart of the grid. Each row is one line item. The columns, left to right, are Status, Item, Job ID, Part, Process, Routing, Qty, Unit (unit price), Services (the calculated service cost), Total, Docs (required-document status), Services (the service tags you assign), and Required (the required-by date). Any per-item custom fields appear as additional columns. You can reorder, resize, and freeze columns, and Bulk remembers your arrangement.
You edit cells directly: Part, Process, Routing, Qty, Unit, the Services tags, Required, and editable custom fields. Status, Item, Job ID, the calculated Services cost, Total, and Docs are read-only. The sheet behaves like a spreadsheet: click or use the arrow keys to move between cells, select a range, copy and paste, and drag the fill handle to repeat a value down a column. Every edit saves on its own; the indicator by the document number shows Saving, then Saved, and flags a cell if a save fails so you can re-enter the value.
The sheet grows with its rows. A short list stays only as tall as those rows, and Add item sits under the last row. When the rows need more room than the space under the top bar and tabs, the sheet stops growing and scrolls on its own. The Document items heading and the toolbar stay in view above that scroll, and the column headings stay pinned while you move through the rows.
Row statuses and the filters
The Status column and the toolbar filters use the same five states:
- Pending: the row is valid but has not yet been marked Ready.
- Not ready: the row has a validation problem to resolve.
- Ready: the row is complete and has been marked ready. While the document remains editable, return it to Pending before making corrections.
- Job created: a production job already exists for the row; it is locked.
- All: every row.
Above the sheet, a search box ("Search items by ID, part, or process…") and the status filter chips: each with a live count: narrow the sheet to just the rows you want. The search checks the item number, job number, part number and name, process code and name, and process-type code. It does not search Routing, Services, Required date, or per-item custom fields. Sort by clicking a column header.
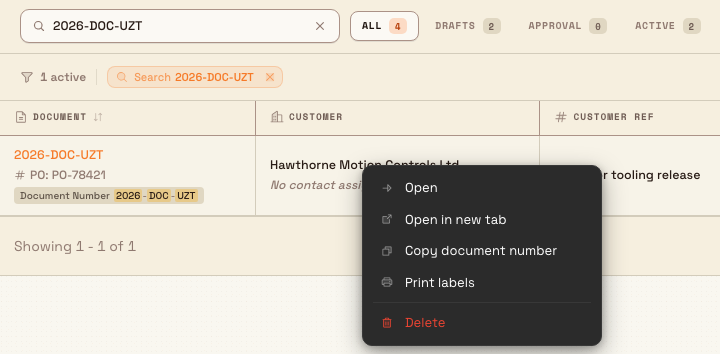
This search applies only to items inside the open document. The search on the main Inbound Documents list instead checks document number, PO number, customer reference, customer name, assigned-contact name and email, notes, and document custom-field values. When a custom field matches, the result can show a match badge even if that custom-field column is hidden.
Right-clicking a document on that main list opens its own menu: Open, Open in new tab, Copy document number, Print labels, and Delete. Copy document number copies only the visible document number and confirms Document number copied. Print labels is disabled when the document has no items. Delete is disabled unless both your permission and the document state allow deletion.
Complete a row and mark it ready
A row can only be marked Ready once its required values are in place: typically Part, Process, Routing, Quantity, and any required documents. If a row cannot be marked ready, the grid flags the missing columns so you can see exactly what to fill in. Fill them, then mark the row ready.
Right-click a row's Item cell (or open its row menu) to Duplicate item, Duplicate multiple…, or Delete row. When the sheet is empty you can add your first line item with Add item.
Quantity may be fixed to 1
If your site is set to use a quantity of one for every job, the Qty column is read-only in the grid and paste or fill skips it. This is a site-wide operating rule, not a per-document setting.
Work with many rows at once
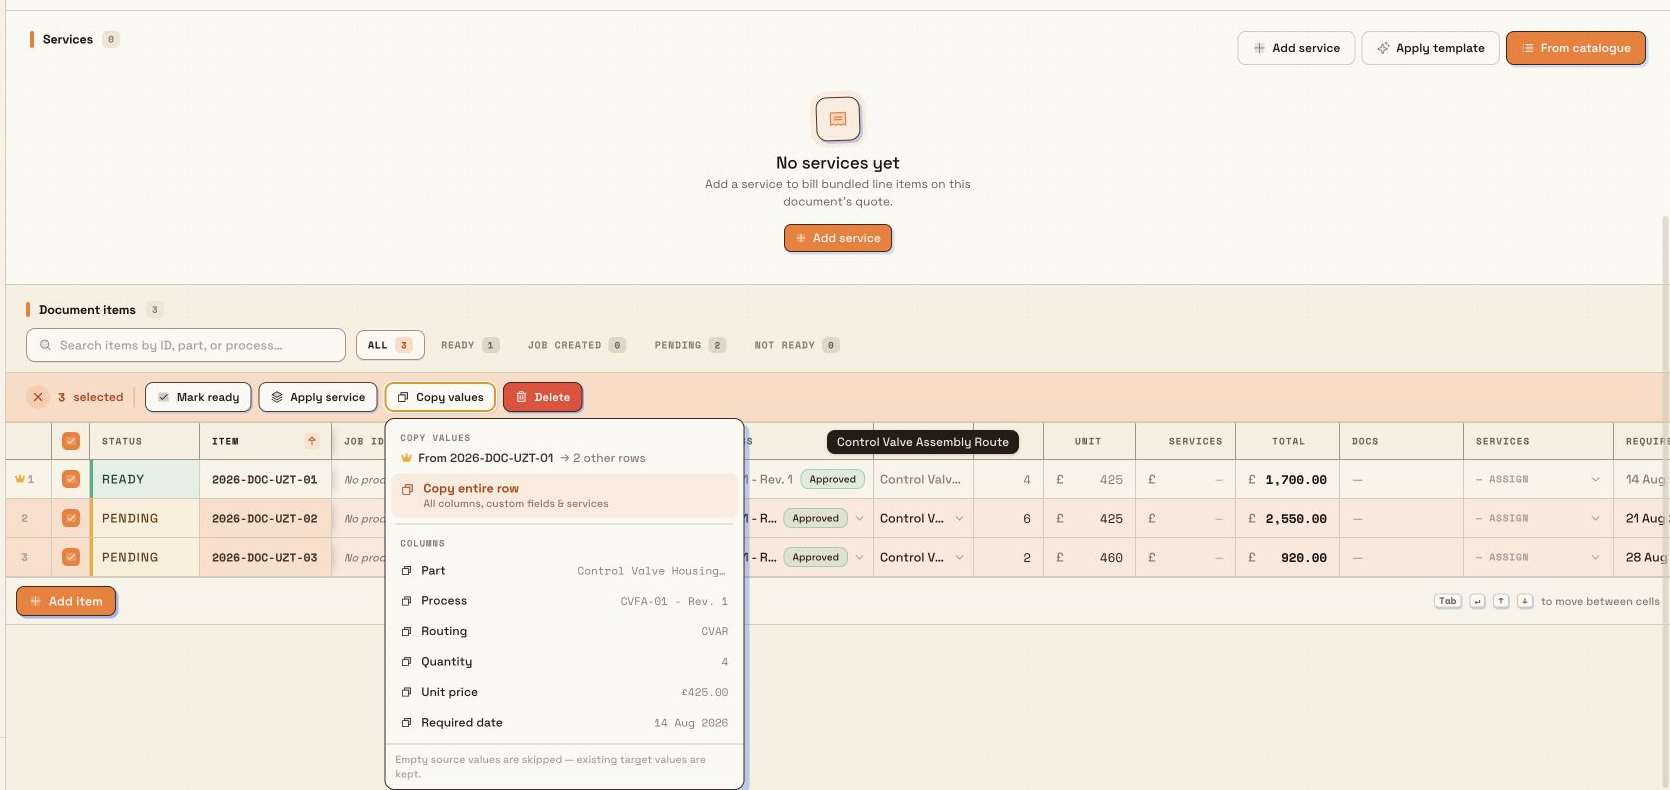
Select rows with their checkboxes to reveal the bulk-action bar. Click a row checkbox, then Shift-click another row to select every row currently shown from the first through the second. Shift-click again to move the end of that range. The start stays the last checkbox you clicked without Shift. If nothing is selected, Shift-click selects only that row. The bar shows how many rows are selected and lets you act on all of them together:
- Mark ready: mark every selected row ready (rows that are not yet complete are reported back to you).
- Apply service: add one of the document's services to all selected rows.
- Copy values: copy from the first selected row (the source) onto the others. Copy entire row copies every non-empty copyable field: Part, Process, Routing, Quantity, Unit price, Required date, custom fields, and assigned services. It does not copy read-only columns such as Status, Item, Job ID, totals, or document status. You can instead copy a single field such as Part, Routing, or Required date. Empty source values are skipped, so existing values on the target rows are kept.
- Print prints the rows selected when you open it. The dialog is titled Print and states the document number and how many items are selected. You choose a template, and Bulk uses those items without asking you to pick rows again. When that template prints more than one file, choose Print All or Download ZIP. Job templates print only the jobs linked to the selected items. An order template does the same when the document already has a production order. On a read-only document the bar keeps Print and hides the editing actions. Print in the top bar is separate and is not limited to the selected rows.
- Delete: remove the selected line items from the document.
Delete removes line items
Delete takes the selected line items off the document. Make sure you have the right rows selected before you confirm: deletion is not something you can undo from the grid.
Submit when lines have no service
When the document has at least one service, submission can stop to warn you about ready lines that have none attached.
- Select Submit to production.
- In Confirm Submission, select the submit action after every line is ready.
- If a ready line has none of the document's current services attached, Bulk opens Some lines have no service instead of submitting. It names each of those lines by item number and quantity, and it shows how many of the document's lines have no service.
- Check that those lines should continue without a service. Select Go back to return to the summary, or continue with the submit button that ends in anyway.
Bulk skips this warning when the document has no services. Lines that already have a production job are not listed. For the other submit checks, see Review an inbound document.
Example: a bracket order at Gotham Applied Sciences
A production coordinator at Wayne Enterprises' Gotham Applied Sciences site receives a purchase order from the customer Gotham City Transit for 60 laser-cut mounting brackets spread across four part numbers. The order was captured as an inbound document, so the coordinator opens it from the Inbound list and starts in the grid.
Working down the Document items sheet, they paste the quantity column from Gotham City Transit's spreadsheet straight into the Qty column. For the run of identical brackets they select those rows, use Copy values → Routing to fill the same routing down, then use Apply service to add the plant's Deburring service to the batch. As each row's Part, Process, Routing, and Quantity fall into place, they mark that row Ready. With every row marked Ready, the coordinator clicks Submit to production to move the document forward.
The confirmation closes after Bulk safely queues the submission. The grid then becomes read-only and a band at the top reports item checks, approval setup, and item locking. The coordinator can leave the page; the queued work continues. After approval, Creating production jobs reports the saved count until the document reaches In production.
What you should see
Edited cells save on their own and the totals recalculate as you go. Completed rows show a Ready status, and the status-filter counts update to match. Return a Ready row to Pending before correcting it. Once the document is complete and in progress, Submit to production queues the background checks that send it on to approval and production. If the document has services and a ready line has none attached, Confirm Submission stops on Some lines have no service until you go back or submit anyway.
Feature state and limits
The inbound grid is generally available.
- The grid is the current inbound document workspace. Old document links redirect to it automatically.
- The grid can be edited while a document is in progress and you hold the edit permission. On hold, in approval, approved, in production, completed, and cancelled documents cannot be edited here.
- Draft documents open in the draft editor from the main list and from direct document links.
Troubleshooting
- Submit warns that some lines have no service. The document has services, and at least one ready line has none of them attached. Select Go back and attach a service, or submit anyway if those lines should continue without one.
- A row will not mark ready. It is missing a required value: usually Part, Process, Routing, Quantity, or a required document. The grid flags the missing columns; fill them and mark the row ready.
- The grid is read-only. The document is on hold or has moved past in progress, or you lack the edit permission. Release the hold (Actions → Release from hold) or check the document's status and your role.
- A cell shows a save error. The last save for that cell failed. Re-enter the value to try again; other cells are unaffected.
- A submission or approval band needs attention. Use the retry on that band: Retry submission repeats or resumes the submit checks; Retry approval update finishes an already-saved approval decision; Retry job creation continues the same production order without repeating jobs already created. Read Review an inbound document for the exact recovery steps and permissions.
- "No production order yet" under the document number. No production order is linked to this document yet. This is expected while job creation is queued or still preparing its first job.
Related guidance
Review an inbound import
Open an upload session from Import History to confirm each file was read correctly, retry failures, and open the documents and orders it created.
Review an inbound document
Check an inbound document in the grid, correct its items, complete required forms, and submit it for approval.