Manage audit areas
Define the physical and logical places where audits run, organise them in a hierarchy, assign departments and owners, and see how schedules attach on the ownership graph.
An audit area is a place on the site where checklists and inspections run — a production bay, warehouse zone, quality lab, or any other location you need to cover. Areas can nest under parent areas, link to one or more departments, and list owners who are responsible when audits fail. On the Areas settings page, Bulk draws those relationships on a live ownership graph so you can see departments, areas, child areas, and linked schedules at a glance.
Use this page when you set up a plant for scheduled audits, restructure ownership, or retire a location that no longer needs inspections. Day-to-day running of audits happens elsewhere; here you maintain the places those audits target.
Before you start
Open Settings, expand the Audits group, and select Areas. The page address ends in /settings/audits/areas.
You need permission for this site:
- View the graph and area details requires View audits (
audits.view). - Create areas requires Create audits (
audits.create). - Edit area details (name, location, hierarchy, ownership, image) requires Edit audits (
audits.update). - Archive an area requires Delete audits (
audits.delete).
These management permissions are granted by the built-in Super user, Entity admin, and Manager roles. Operator, Tablet user, and Invoicing can view audits but not manage areas. If Add Area, Edit, or Archive fails or stays disabled, ask an administrator to adjust your role.
Areas are per site (entity). Each plant keeps its own catalogue and graph. Switch site first if you need to manage another facility’s areas.
Departments you assign on an area come from the site’s People catalogue. Create or update departments under Settings → People → Departments before you rely on them here.
administration.audits.areas-01
What the Areas page shows
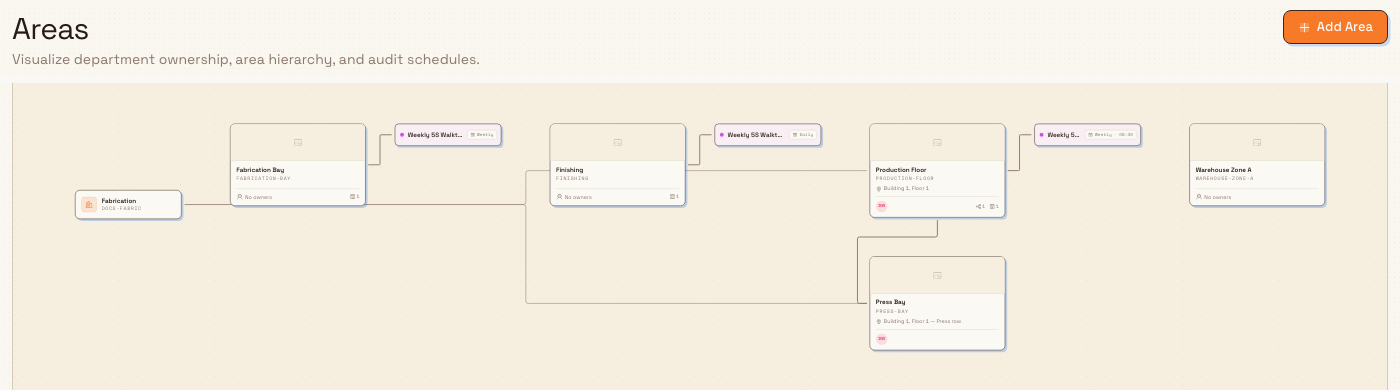
When the site has areas, departments linked to them, or schedules, the page shows an interactive graph (not a simple list):
- Department nodes (left) — name and code for each department that owns at least one area on the graph. Selecting a department opens a short detail dialog and points you to People settings to manage the department itself.
- Area cards (centre) — photo banner (or a placeholder), name, short code, optional location, owner avatars (or No owners), and counts for sub-areas and schedules when those exist.
- Schedule pills (right of an area) — the linked audit template name plus daily, weekly, or monthly and the scheduled time when set.
Edges connect departments to the areas they own, parents to child areas, and areas to their schedules. Use the canvas controls to pan and zoom; a mini-map helps navigate large graphs. Nodes are not free-dragged into a custom layout — Bulk positions the forest for you.
If the site has nothing to show yet, the page shows No audit areas with the message to create the first area and build the ownership graph, plus an Add Area action.
Add an area
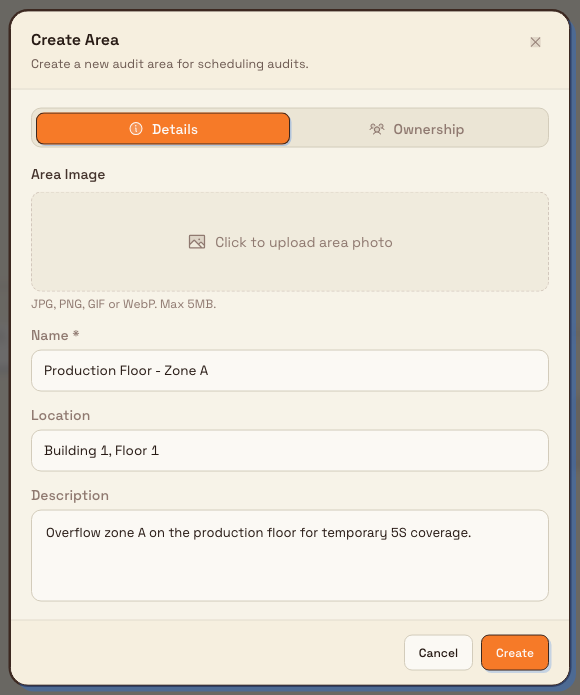
- Select Add Area (or Add Area from the empty state). The Create Area dialog opens with the description “Create a new audit area for scheduling audits.”
- On the Details tab:
- Optionally upload an Area Image (JPG, PNG, GIF, or WebP, max 5MB). Drag the preview to reposition the crop; use the camera control to replace it or the clear control to remove it.
- Enter a Name (required, up to 100 characters), for example
Production Floor - Zone A. - Optionally enter Location (up to 200 characters), for example
Building 1, Floor 1. - Optionally enter a Description (up to 500 characters).
- Open the Ownership tab:
- Parent Area — choose No Parent (Root Level) or another existing area. The helper text is “Organize areas in a hierarchy.”
- Departments — assign one or more departments, or leave empty. Placeholder: “Assign one or more departments.”
- Owners — people responsible for the area. The helper text explains that tasks will be assigned to owners when audits fail.
- Select Create.
Bulk saves the area as active, builds a unique code from the name (uppercase, non-letters become hyphens; if that code is already used on the site, Bulk appends -2, -3, and so on), and confirms with Area created successfully. The graph refreshes so the new card appears in place.
administration.audits.areas-02
Inspect a node on the graph
Click any node to open a detail dialog:
| Node type | What you see | Actions |
|---|---|---|
| Area | Photo, location, description, counts for Depts, Owners, Children, and Schedules, plus department badges and owner list | Edit (when you can edit) and Archive (when the area can be archived) |
| Department | Name and code, with a note that departments are managed in People settings | None on this page |
| Schedule | Template name and code, Type, Frequency, Schedule (daily/weekly/monthly), and Time | None on this page — manage schedules under Audits → Schedules |
Close the dialog or click the canvas background to clear the selection.
Edit an area
- Select the area card on the graph.
- In the detail dialog, select Edit (enabled when you have Edit audits). The Edit Area dialog opens with “Update the audit area details.”
- Change Details (image, name, location, description) and/or Ownership (parent, departments, owners) as needed. Setting Parent Area to No Parent (Root Level) makes the area a root again.
- Select Update.
A confirmation reads Area updated successfully. The graph reflects the new hierarchy, ownership links, and card content.
Bulk blocks invalid parents: an area cannot be its own parent, and you cannot set a parent that would create a circular hierarchy (including choosing a descendant as parent).
Archive an area
Archiving is the supported way to retire an area from the live graph.
- Select the area card, then Archive in the detail dialog. Archive is enabled only when you have Delete audits and the area is eligible (no child areas and no active schedules).
- Confirm in the Archive Area dialog. The copy asks whether to archive the named area and explains that this deactivates the area and disables its active schedules. If the area still has linked schedules in history, a warning can list how many will be affected.
- Select Archive.
A confirmation reads Area archived successfully. The default graph shows only active areas, so the card disappears after archive. Child areas and active schedules must be reassigned or deactivated first — otherwise Archive stays disabled and the backend rejects the action with a message such as “Area has N child area(s). Delete or reassign them first.” or “Area has N active schedule(s). Deactivate or delete them first.”
Restore is not on this page
The backend can restore an archived area and re-enable schedules that were stored in its archive snapshot, but the Areas settings UI does not expose a Restore control. Once archived, the area leaves the default graph. Plan hierarchy and schedule changes before you archive, or use schedules and support paths if you need a retired area brought back.
Example: areas at Granite Peak Manufacturing
Granite Peak Manufacturing runs the Leeds Fabrication Plant. Dana Winters sets up places for weekly 5S and safety walks.
She opens Settings → Audits → Areas and selects Add Area. On Details she names the area Production Floor, sets location Building 1, Floor 1, and uploads a photo of the bay. On Ownership she leaves the parent as No Parent (Root Level), assigns the Fabrication department, and adds the shift lead as an owner. She selects Create. Bulk stores a code such as PRODUCTION-FLOOR.
She adds a second area, Press Bay, chooses Production Floor as the parent, assigns the same department, and creates it. On the graph she sees Fabrication linking into Production Floor, Production Floor linking down to Press Bay, and — after schedules are configured under Schedules — weekly pills hanging off the areas that need them. When a temporary overflow bay is retired, she archives it only after moving any child areas and deactivating its schedules so Archive is available.
Expected result
Active areas appear on the ownership graph with correct parent–child links, department connections, owner avatars, and schedule pills when schedules exist. Creating or editing an area returns the success toast and refreshes the canvas. Archiving removes the area from the default active graph and frees that location from new schedule targeting until it is restored by a path that supports it.
Feature state and limits
Managing audit areas is a generally available feature. Keep these behaviours in mind:
- Areas are per site; they are not shared across entities.
- The code is generated from the name on create; the create/edit dialog does not offer a separate code field, and edit does not change the code.
- The graph loaded on this page excludes inactive (archived) areas by default, so archived cards do not remain visible after archive.
- Archive requires no child areas and no active schedules; it is gated by
audits.deletevia thecan_deleteflag on each area. - Soft-delete and bulk seed APIs exist for areas but are not exposed as buttons on this settings page.
- Restore exists in the API but is not wired into this UI.
- Department and schedule master data are edited on their own settings pages, not by editing those node types on the graph.
Troubleshooting
- Archive is disabled. — you lack Delete audits, or the area still has child areas or active schedules. Reassign or archive children first, and deactivate or remove active schedules under Schedules, then try again.
- “Area has N child area(s). Delete or reassign them first.” / “Area has N active schedule(s)…” — the backend blocked archive for the same reasons. Clear children and active schedules, then archive.
- “An area cannot be its own parent” / “Cannot set parent to a descendant area” / “Circular reference detected in area hierarchy” — pick a different parent or set No Parent (Root Level).
- “Please select an image file” or “Image must be less than 5MB” — only image files under 5MB are accepted (JPG, PNG, GIF, WebP).
- “Department not found” or “User not found” / “User is not active” — assign only active departments on this site and active users as owners.
- The graph is empty after archive. — expected: only active areas load. Create a new area or restore outside this page if you still need that location.
- Add Area or Edit fails with a permission error. — ask for a role that includes
audits.create/audits.update(for example Entity admin or Manager).
Related
- Audit configuration — overview of audit templates, areas, and schedules.
- Manage audit templates and the template library — checklist definitions used by schedules on areas.
- Schedule audits — attach recurring audits to the areas you define here.
- Configure departments and job titles — departments you assign as area ownership.
- Roles and permissions — grant the audit view, create, edit, and delete permissions to a role.
Build an audit template
Build the sections, check items, field types, scoring, and behavior policy for an audit template draft, then preview and publish it for operators.
Schedule audits
Link published audit templates to plant areas with daily, weekly, or monthly recurrence so due checks appear for operators on the right cadence.