Configure inbound OCR and extraction
Create inbound OCR configurations, choose an extraction model and automation level, and run the AI extraction wizard so uploaded PDFs become structured document and line-item data.
Inbound OCR is how Bulk turns customer PDF documents — purchase orders, work orders, and similar paperwork — into structured inbound data. Each configuration is a reusable template: which customer it belongs to, which AI model reads the PDF, how fields map to document and line-item columns, and whether jobs are created automatically after extraction or left for people to review.
Use this page when you onboard a new customer document layout, change how a field is read or mapped, switch automation from manual review to auto-create jobs, or roll extraction setup back to an earlier version. Day-to-day document upload and review live under Inbound operations; this settings area is where administrators define the templates those uploads use.
Before you start
Open Settings and select Inbound OCR. The page address ends in /settings/inbound/automation. The settings sidebar label is Inbound OCR.
You need permission for this site:
- View configurations requires
inbound_configs.view. - Create requires
inbound_configs.create. - Edit details, automation, models, and the extraction wizard requires
inbound_configs.update. - Delete requires
inbound_configs.delete.
These permissions are granted by the built-in Super user, Entity admin, and Master data roles. If Add configuration is missing or saves fail, ask an administrator to adjust your role for the selected site.
Configurations are per site (entity). Each plant keeps its own templates. Switch site first if you need to manage another facility.
Optional but recommended before you configure extraction:
- A customer record for the documents you will process (so customer-specific custom fields appear in the mapping steps).
- A clear sample PDF (up to 10 MB) that contains the fields you care about — the same layout operators will upload later.
- Master data that extraction may look up later (parts, processes, routings, customers) if you map fields that resolve against those catalogues.
administration.inbound.ocr-extraction-01
What the Inbound OCR page shows
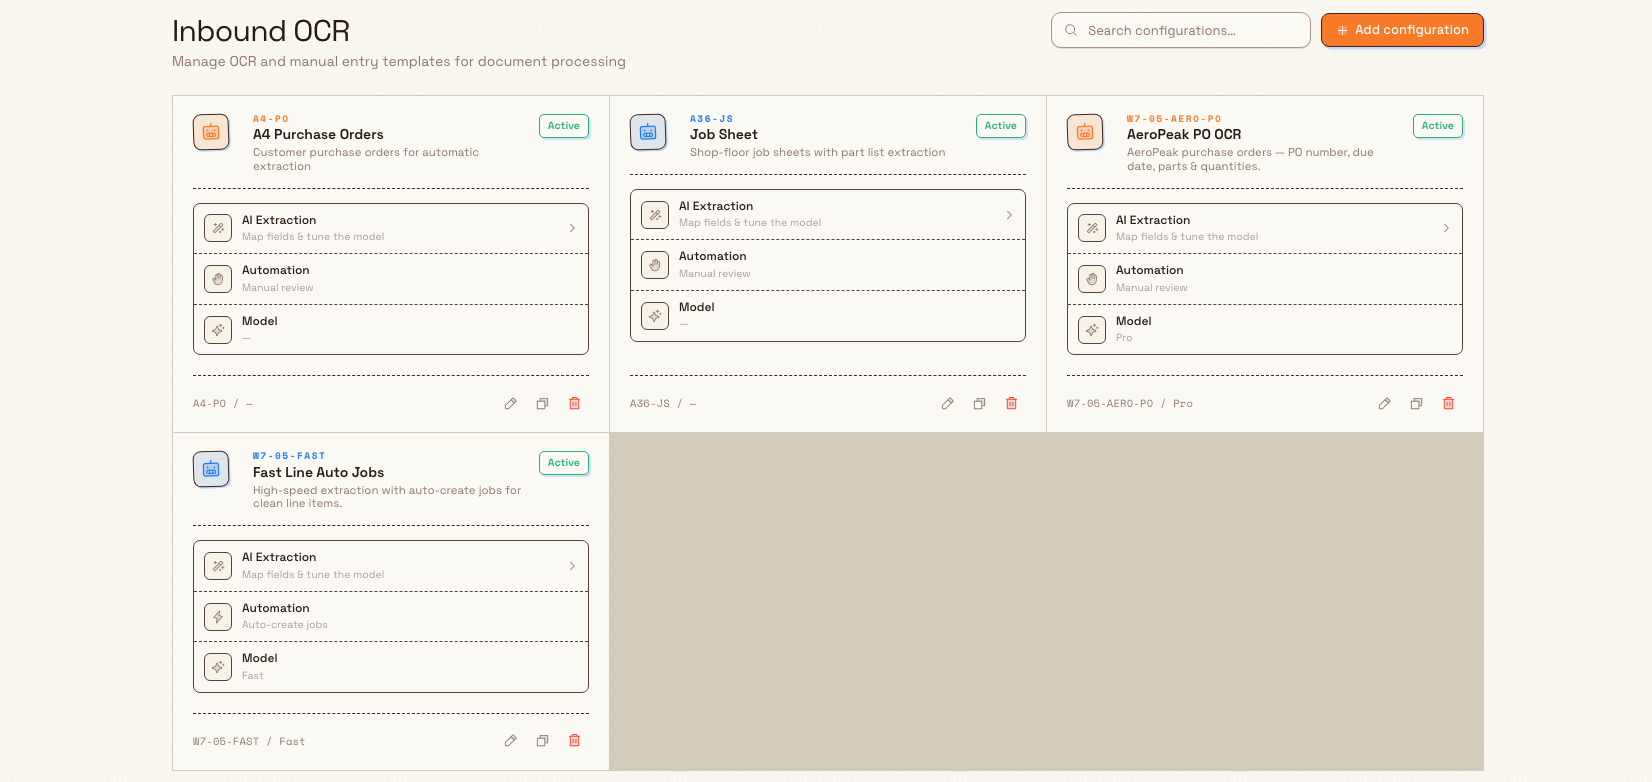
Each configuration is a tile in a grid. A tile shows:
- An icon, optional short code, name, and optional description (or the default subtitle Document extraction template).
- An Active or Inactive status pill.
- AI Extraction — open the mapping wizard for this config (“Map fields & tune the model”).
- Automation — Auto-create jobs or Manual review, depending on the automation level.
- Model — the friendly model name (Lightning, Fast, or Pro), or a dash if none is set.
- Footer actions to Edit, Duplicate, and Delete.
Use Search configurations… in the header to filter by name or code as you type. If nothing matches, the empty state explains that no configurations match and suggests clearing the search. If the site has no configurations yet, the page offers Add your first configuration with an Add configuration action.
New configurations created from this page are always OCR templates with a file required for processing. The page description also mentions manual-entry templates historically; creation here always builds an OCR configuration.
Add a configuration
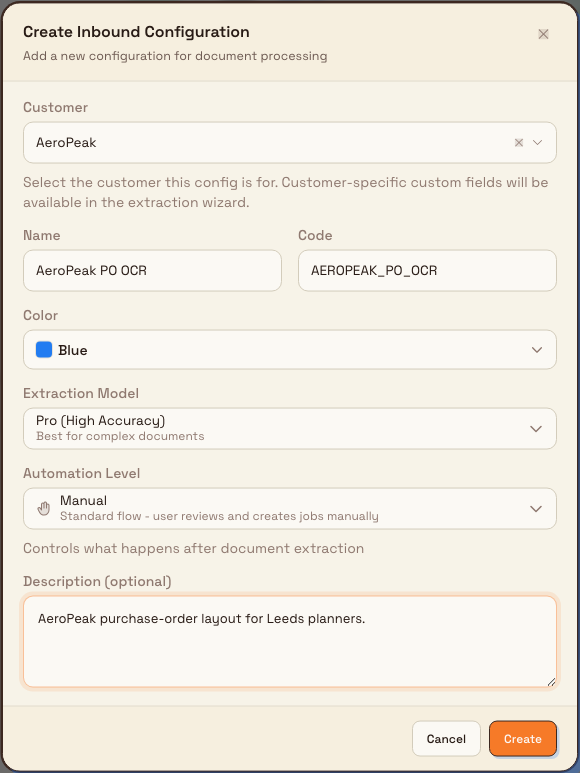
- Select Add configuration. The Create Inbound Configuration dialog opens.
- Fill in the details:
- Customer (optional) — the customer this template is for. Customer-specific custom fields become available in the extraction wizard when set.
- Name — for example
AeroPeak PO OCR(required, up to 100 characters). - Code — short unique code, letters, numbers, dashes, and underscores (required, up to 20 characters). The code is generated from the name as you type and uppercased; you can edit it.
- Color — accent colour for the tile.
- Extraction Model — Lightning (Ultra Fast), Pro (High Accuracy), or Fast (High Speed). New configs default to Pro (High Accuracy).
- Automation Level — Manual (operators review and create jobs themselves) or Auto-Create Jobs (Bulk creates jobs after extraction when required fields are valid). The dialog explains that automation “Controls what happens after document extraction”.
- If you choose Auto-Create Jobs, Required Fields for Auto-Job appears. Jobs are created only for line items that pass every selected check. Part Number, Process, Routing, and Quantity are always required and cannot be unchecked; you may also require Due Date, Unit Price, and/or Total Price.
- Description (optional) — short notes for this configuration.
- Select Create.
A confirmation reports that the configuration was created. The new tile appears on the grid. It is ready for details and automation, but it does not yet know how to read a PDF until you complete AI Extraction.
administration.inbound.ocr-extraction-02
Edit, duplicate, or delete
Edit
Select the pencil action on a tile to open Edit Configuration. The dialog has three tabs:
- Basic — Customer, Name, and Code.
- Appearance — Color and Description.
- Behavior — Extraction Model, Automation Level, and (when auto-create is on) Required Fields for Auto-Job.
Select Save Changes when finished. A confirmation reports that the configuration was updated.
Duplicate
Select the copy action to open Duplicate Configuration. Enter a New Name (default {original name} (Copy)) and New Code (default {original code}_COPY, auto-updated from the new name until you edit it), then Duplicate. The copy is a new configuration with the same setup as a starting point.
Delete
Select the trash action, confirm in Delete Configuration, and acknowledge that the action cannot be undone. Deletion soft-deletes the configuration and removes it from the list. There is no restore control on this page.
Configure AI extraction
On a tile, select the AI Extraction row. The address becomes /settings/inbound/automation/{configId}/extraction. The page title is Configure AI Extraction, with the configuration name in the description.
The page has two tabs:
- Configuration — the extraction wizard (always available).
- Version History — enabled only after the wizard has been completed and saved at least once.
AI extraction is only available for OCR configurations. If a non-OCR config is opened on this route, Bulk shows Not Applicable and links Back to Inbound Configs.
The five-step wizard
Work through the steps with Next (each step is saved as you advance). On the last step, Save Configuration writes the full setup and unlocks Version History. Progress through completed steps is kept so you can leave and resume later.
- Upload Sample — Upload a representative PDF (drag and drop or Select File; max 10 MB). Bulk analyses the document and reports type, description, page count, tables, and confidence when analysis completes. Tips on the step recommend a clear multi-page sample that includes all typical fields.
- Extracted Data — Review fields the AI detected and select which ones to keep. Selected fields are available in both later mapping steps. You can mark an array field as the line item driver so the number of line items follows that array’s length.
- Map Document Fields — For each document-level target (standard columns such as PO Number, Customer Name, Document Date, Document Title, Document Notes, plus custom fields), choose a source field or a static value. Optional processing (patterns, transforms, lookups) can refine the value. Reset All clears mappings on this step.
- Map Line Items — Map line-item targets such as Part Number, Process Code, Routing, Customer Code, Quantity, prices, notes, and dates, plus custom fields. After this step saves, Bulk compiles the mappings into extraction rules (you may see a success toast with a rule count, or a warnings dialog if compilation reports issues).
- Preview — Run a live extraction against the sample PDF (Run Extraction). Review document fields and line items side by side with the PDF, adjust the model if needed, then Save Configuration. Success confirms that extraction configuration was saved and that Version History is now available.
Navigation: Back moves one step; on the first step Cancel (or cancel while dirty) may ask whether to leave, noting that completed steps remain saved when you have progress.
Version history
After the first complete save, open Version History. Versions appear as a timeline with change type badges (for example Initial, Updated, Rollback), summaries, and authors. You can rollback to an earlier version; confirmation explains that the configuration is restored to that version and that a new version is created to record the rollback.
Example: AeroPeak purchase orders at Leeds
Granite Peak Manufacturing’s Leeds Fabrication Plant receives AeroPeak purchase-order PDFs that always list a PO number, due date, and a table of part numbers and quantities. Dana Winters opens Settings → Inbound OCR and selects Add configuration.
She picks customer AeroPeak, names the config AeroPeak PO OCR, accepts the generated code, leaves the model on Pro (High Accuracy), and keeps Manual automation so planners still review extractions. After Create, she opens AI Extraction, uploads a typical AeroPeak PO PDF, selects the detected PO number, due date, part number, and quantity fields, maps them to document and line-item targets, runs Preview → Run Extraction, and selects Save Configuration.
When Leeds is ready to auto-start work for clean orders, she edits the configuration, switches Automation Level to Auto-Create Jobs, keeps the compulsory required fields, and saves. Operators keep uploading the same PDF layout; only the post-extraction behaviour changes.
Expected result
After setup, the Inbound OCR grid shows each active template with its model and automation level. Selecting AI Extraction on a completed config reopens the wizard with previous progress and mappings. Uploads that use this configuration extract document and line-item data according to the saved mappings. With Manual automation, people review and create jobs in Inbound operations; with Auto-Create Jobs, Bulk creates jobs only for items that satisfy the required-field checks.
Feature state and limits
Configuring inbound OCR and extraction is generally available. Keep these behaviours in mind:
- Configurations are per site; they are not shared automatically across plants.
- Configs created from this page are OCR templates with a file required; the extraction wizard rejects non-OCR config types.
- Sample upload accepts PDF only, up to 10 MB.
- Version History stays disabled until the wizard is completed and saved at least once.
- Auto-create always requires part, process, routing, and quantity validity; optional due date and price checks are additive.
- Deep transform, pattern, calculation, and lookup options on each mapped field are available in the mapping steps but are advanced controls — start with direct field-to-column maps, then refine.
- Deleting a configuration soft-deletes it and cannot be undone from this UI.
Troubleshooting
- Add configuration or save fails with a permission error. You need
inbound_configs.create/inbound_configs.update(andinbound_configs.viewto open the page). Use Super user, Entity admin, or Master data, or grant the matching permissions for this site. - AI Extraction shows Not Applicable. The configuration is not an OCR type. Create an OCR configuration from this page, or open a different OCR tile.
- Version History tab is disabled. Complete the five-step wizard and select Save Configuration on Preview so the wizard is marked complete.
- Analysis Failed / invalid file. Use a PDF no larger than 10 MB. Non-PDF uploads are rejected with an invalid file type message.
- No Fields Detected. The sample may be unclear or atypical. Go back to Upload Sample and try a clearer, more complete PDF of the same layout.
- Auto-create does not create jobs for some lines. Required fields failed validation for those items. Check Part Number, Process, Routing, and Quantity (and any extra required fields you selected), then reprocess or fix mappings.
- Configuration Not Found on the extraction page. The config was deleted or the link is stale. Return to Inbound OCR from Back to Inbound Configs.
- Configurations from another plant do not appear. Switch to the correct site in the entity switcher.
Related
- Configure inbound forms — form templates used with inbound work.
- Inbound overview — day-to-day inbound operations that use these OCR templates.
- Import inbound documents — uploading documents that run through extraction.
- Review an inbound document — reviewing extracted data after OCR.
- Promote inbound work to production — turning validated inbound items into production work.
- Manage roles and permissions — grant
inbound_configs.*to a role.
Configure inbound forms
Set up form templates so inbound documents and items can collect structured data that follows into production orders and jobs.
Configure KPI categories
Create and manage the named groups — such as Safety, Quality, and Delivery — that organise KPIs across your organisation, with colour, description, and KPI counts.