Import inbound documents
Upload customer files so Bulk reads them automatically and builds inbound documents with their line items already filled in.
Import Documents is the fastest way to get customer paperwork into Bulk. You upload a file — a scanned or emailed purchase order, an order form, or a job sheet — and Bulk reads it automatically (a process called extraction, which uses OCR to pull text and values off the page) and creates an inbound document: a structured record with line items, the individual parts or tasks to make. Use Import Documents whenever a customer sends a file and you want Bulk to do the typing for you, instead of keying the order in by hand.
Importing is one of two ways work enters Inbound. When there is no file to work from — a phone order or a walk-in — you create the document manually instead. See Create an inbound document.
Before you start
A few things must be in place before an import will succeed:
- An active inbound configuration must exist. A configuration defines a type of document you can upload (for example "Purchase Order") and how Bulk should read it. You pick one on the first step of the import, and only configurations marked active appear. An administrator sets these up under Settings → Inbound OCR. See Configure inbound OCR and extraction.
- Permission to import. Importing creates an upload session and a file record for every file, and the first step reads the list of configurations. In the default roles, Owners and Entity admins have the full set of permissions this flow needs. If the configuration step shows an error or no configurations, your role may be missing the permission to view inbound configurations — ask an administrator.
- A supported file, under the size limit. Bulk accepts PDF, image (PNG, JPG/JPEG), and spreadsheet (XLSX, XLS, CSV) files, up to 10 MB each. You can add several files at once. The on-screen hint summarises this as "PDF, PNG, JPG, XLSX up to 10MB each".
Extraction is an assist, not a guarantee
Because files are read automatically, the quality of the scan matters. Sharp, straight, high-resolution scans extract far better than blurry, tilted, or low-resolution images. Always check the extracted values — especially quantities and part numbers — against the original file before you approve the document.
Where to find it
Open Inbound from the main sidebar and choose Import Documents. Past uploads live next to it under Import History.
Import a document, step by step
Import Documents is a three-step wizard. The header reads Import Documents, and a Step n of 3 indicator tracks your progress.
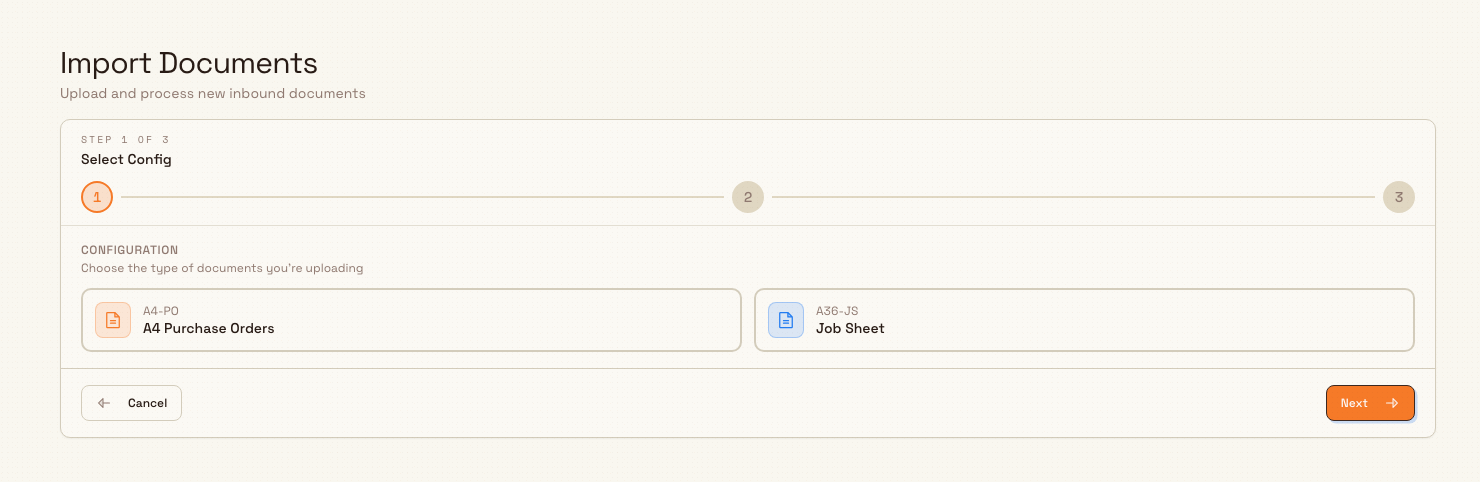
Step 1 — Select Config
Under Configuration, choose the type of documents you are uploading. Each active configuration appears as a card showing its name (and code, if it has one). Select the card that matches your file, then choose Next.
If you try to continue without selecting one, Bulk shows a Select a config message. If no configurations exist yet, you see No configurations yet with a Create configuration button that takes an administrator to the settings screen — a plant with no configuration cannot import until one is created.
inbound.import-documents-01
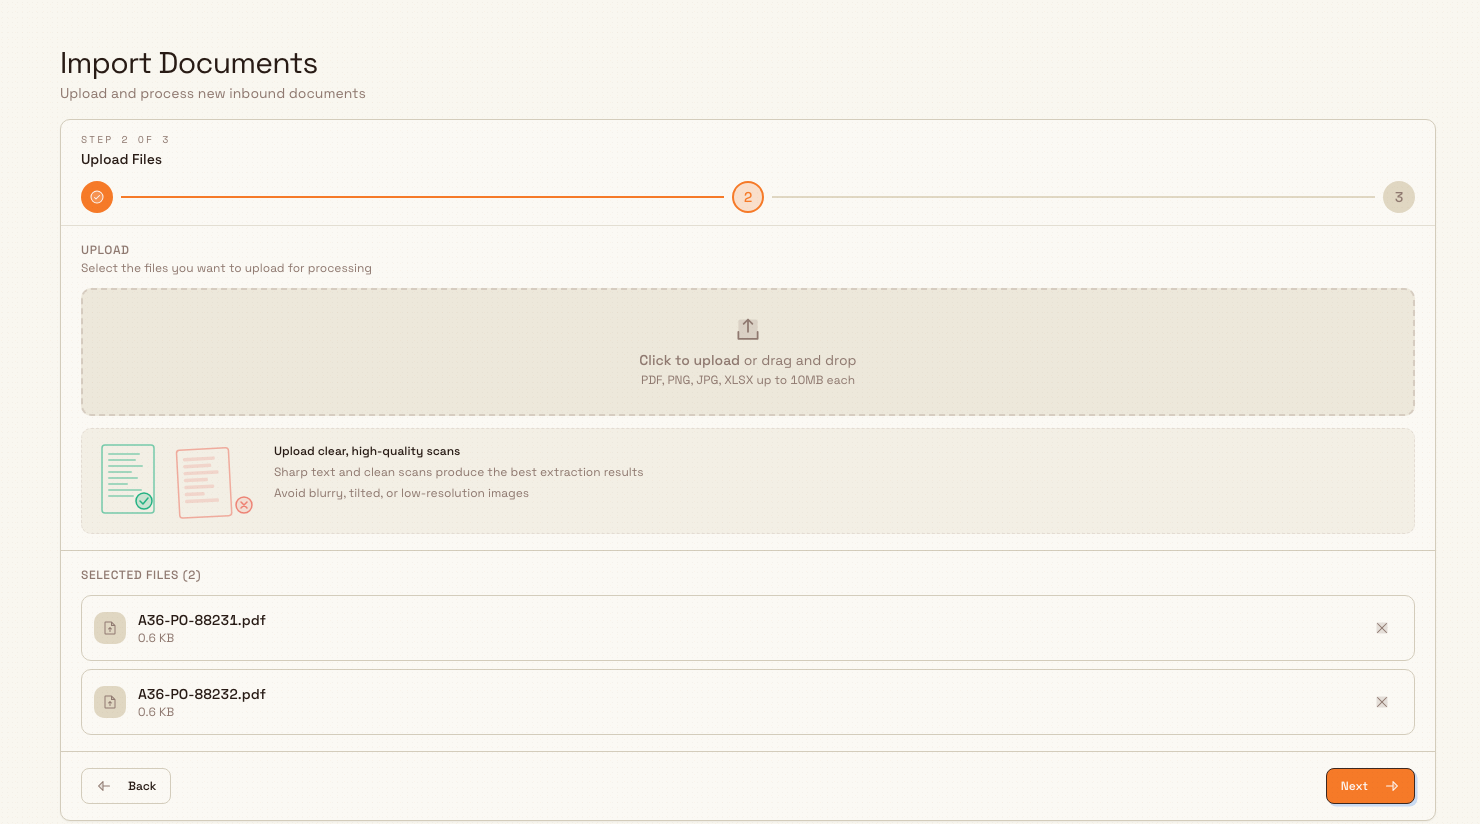
Step 2 — Upload Files
Under Upload, add your files. Drag them onto the drop zone, or select Click to upload to browse. While you drag a file over it, the zone reads Drop files here. Each file you add appears in a Selected Files list with its name and size; remove one with the X button before you upload.
Bulk checks each file against files you have imported before. If it recognises a match, it flags the file with a Duplicate badge (or Same Session if the match is another file in the same upload). Duplicates are only flagged, never blocked — you can still upload them.
Follow the Upload clear, high-quality scans hint shown on this step: "Sharp text and clean scans produce the best extraction results" and "Avoid blurry, tilted, or low-resolution images." When your files are ready, choose Next. Continuing with an empty list shows an Add files message.
inbound.import-documents-02
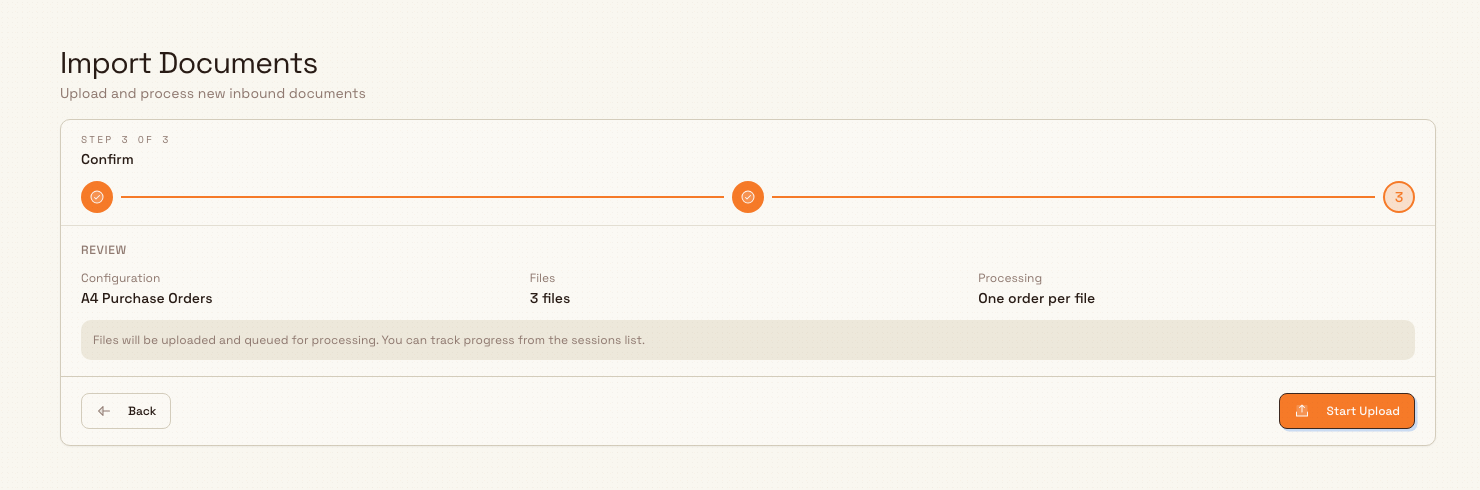
Step 3 — Confirm and start
The Review step summarises what you are about to import: the Configuration you chose, the number of Files, and the Processing mode, which is currently One order per file — every file becomes its own inbound document. Choose Start Upload to begin. The button reads Uploading... while files transfer; Cancel or Back step you out without importing.
inbound.import-documents-03
What happens after you upload
When the upload finishes, Bulk confirms with Upload complete and the note "All files have been uploaded. Processing will begin shortly." If any files were recognised as duplicates, the message becomes Upload complete with duplicates and tells you how many. Bulk then opens the session's detail view, where you can watch each file move through reading and document creation.
Every upload creates a session — a record of that batch of files — which you can reopen later from Import History. Processing runs on its own: each file is validated, read, and turned into an inbound document with its line items. Reviewing the result and fixing anything the reader got wrong is a separate step: see Review an inbound import.
Example: importing a purchase order at Granite Peak
At Granite Peak Manufacturing's Leeds Fabrication Plant, a coordinator receives an emailed purchase order, PO-88231, from the customer Pennine Rail for a batch of laser-cut mounting brackets. The coordinator opens Inbound → Import Documents.
On Select Config they pick the Purchase Order configuration and choose Next. On Upload Files they drag the PO's PDF onto the drop zone; it appears in Selected Files with no duplicate badge, so it is new. They choose Next, confirm the Review summary — Purchase Order, 1 file, one order per file — and choose Start Upload.
Bulk shows Upload complete and opens the session. Moments later the PO has become an inbound document with the customer, the PO reference, and each bracket line listed as an item, ready for the coordinator to check against the original before it goes for approval.
Expected result
- A new upload session exists, visible under Import History.
- Each uploaded file becomes an inbound document once reading succeeds, with its line items extracted.
- The document is ready to review, and — once its items are checked and approved — to become production jobs.
Feature state and limitations
Import Documents is generally available. Keep these limits in mind:
- One order per file only. Every file you upload becomes its own inbound document. Grouping several files into one order, or splitting one file into several, is not available on the import screen today.
- Supported types and size are enforced. Files outside PDF, PNG, JPG/JPEG, XLSX, XLS, or CSV, or larger than 10 MB, are rejected by the picker before upload.
- Duplicate detection depends on the file's content. Bulk compares a fingerprint of the file's contents, so an identical file uploaded twice is flagged, but a re-scanned or re-saved version of the same document may not be. Duplicates are flagged, never blocked.
- The configuration list needs its own permission. The first step reads your plant's inbound configurations, which requires the "view inbound configurations" permission. This is a narrower grant than uploading files, so a role that can upload may still be unable to open the configuration list — if that happens, ask an administrator to adjust your role.
Troubleshooting
- "No configurations yet" on Step 1. No active inbound configuration exists for this plant. An administrator must create one under Settings → Inbound OCR before you can import. See Configure inbound OCR and extraction.
- A file will not add to the list. It is probably an unsupported type or over 10 MB. Convert or re-export it to a supported format, or reduce its size, then try again.
- A file failed while processing. Files can fail validation, extraction, or document creation. Failed extraction and failed document creation can be retried from the file. A file that fails validation cannot be retried and must be re-uploaded. Reviewing and recovering failed files is covered in Review an inbound import.
- A file is flagged as a duplicate but you meant to upload it. The badge is a warning only. Continue if the upload is intentional — for example, a genuinely new order that happens to reuse an old file.
Related guidance
Create an inbound document
Create an inbound document manually, reuse a saved document setup, add forms, and check the requirements before starting work.
Review an inbound import
Open an upload session from Import History to confirm every uploaded file was read correctly, retry anything that failed, and jump to the inbound documents and production orders it created.