Design multi-page PDF templates
Use the current PDF editor, organize pages and masters, add section numbering and datasheets, and fix layout overflow before printing.
Last updated
Open Settings → Master Data → PDF Templates, then a template. This guide covers the current editor. See Manage PDF templates for record types, permissions, publication and printing from production or inbound.
Viewing needs pdf_templates.view; changing a layout needs pdf_templates.edit and an editable draft. A published layout opens read-only. Use Edit in a draft, or Open draft if its revision already exists, to work on a replacement while the published version keeps printing. Duplicate instead creates a separate template.
Find the editor controls
The header shows the template name, save status, Preview and Publish for a draft. The Bulk mark returns to PDF templates. Draft edits save automatically; wait for the saved state and resolve a save error with its retry control before leaving or previewing.
| Menu or control | Use it for |
|---|---|
| File | Preview, Export PDF when available, Publish and Back to templates |
| Edit | Undo, Redo, Copy, Paste and Delete for editable widgets |
| View | Show pages, Show properties, Show rulers, Show grid, Clear guides, zoom, Actual size and Fit width |
| Insert | Add a widget from Basic, Data or Layout, as available for the template type |
| Arrange | Bring to front / Bring forward / Send backward / Send to back |
| Page | Portrait/Landscape, Rotate custom page, New page, Duplicate page/master and Delete page/master |
| Formatting toolbar | Font, size, bold, italic, underline, text colour, alignment and line spacing; Format options opens the remaining styling |
| Right properties panel | Widget Settings for selected content; Page or Master for the current page's identity, paper and margins |
Format options is a toolbar control. The current top-level menus are File, Edit, View, Insert, Arrange and Page. Options that need an editable selection remain disabled until there is one.
The editor's Undo/Redo history covers committed widget content and geometry in this session. It does not reverse adding/deleting widgets, page settings or layer changes, and it clears when the template session closes. Read deletion confirmations before acting. Hugo's per-reply Undo, where offered, is a separate control.
Double-click Text to edit in place. Select words before applying toolbar emphasis to just those words. Dynamic fields inserts a data token; it is not a promise that the sample value matches every real record. For a boxed text block, use the text widget's background, border and spacing settings. Box is a separate layout panel, while Checkbox is a print-layout widget, not an interactive completion record.
Add and organize authored pages
- Show the page rail with View → Show pages.
- Choose Page → New page → Portrait page or Landscape page. Select its thumbnail to work on it.
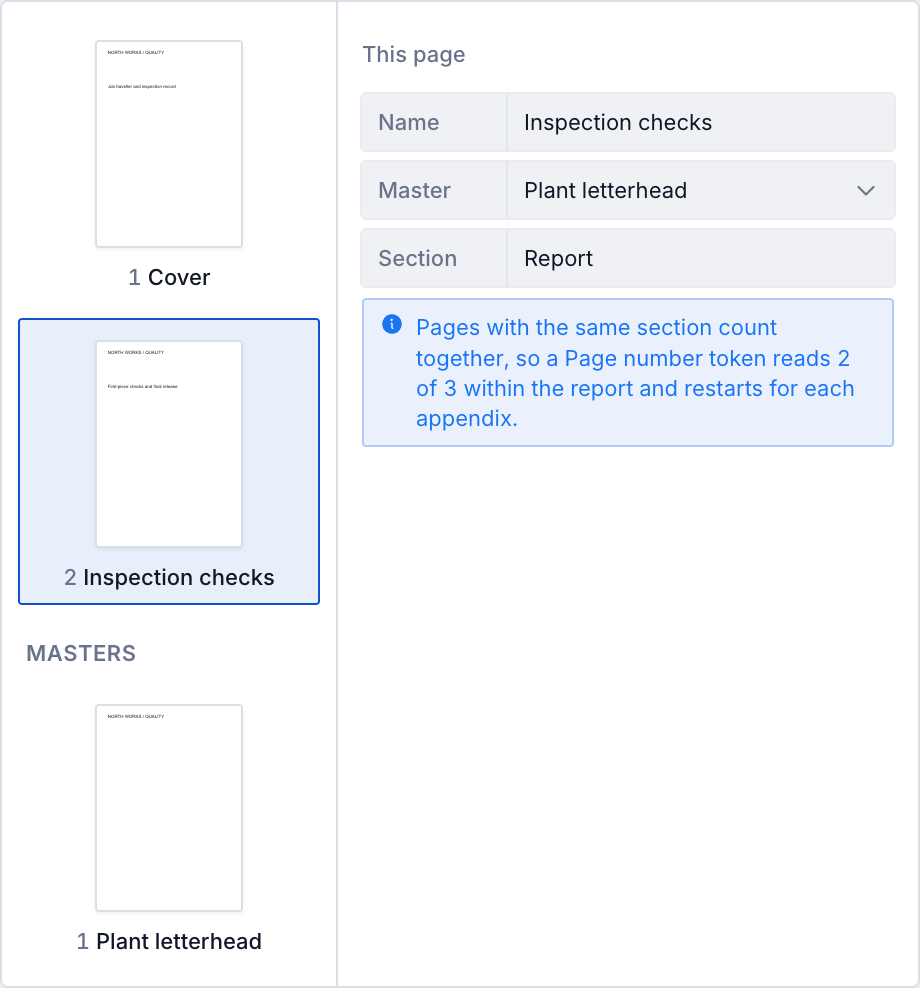
- Open the right panel's Page tab. Under This page, set Name. Under Page Setup, choose the paper Preset, orientation, custom dimensions where applicable, and margins for that page.
- Drag thumbnails to reorder printed pages. The separate Masters group keeps masters apart from the print order.
- Use a thumbnail's actions for Duplicate, Rotate to landscape/portrait or Delete page. The Page menu offers the same page operations; custom paper rotates through Rotate custom page or its page-size controls.
- Scroll the page stack or select another thumbnail to move between pages. The previews include the actual page widgets and any assigned master.
Each authored page can have its own paper size, orientation and margins. Changing paper with widgets already placed does not make every widget fit automatically; check the printable area again. You can keep up to 60 authored pages and masters combined. Additional sheets created when content continues are output pages, not new authored templates.
Duplicate copies a page and its own widgets after the original. Deleting a page removes its widgets, so check the confirmation carefully. The last printed page cannot be deleted. Reordering pages does not move a widget onto another page.
Reuse a master for a letterhead or footer
- Choose Page → New page → Master (header and footer).
- Select the master under Masters and name it, for example Plant letterhead.
- Add the logo, running header, footer or page-number text that should repeat. A master is not printed as a separate page.
- Select a printed page. In the right properties panel, open the Page tab and choose it under This page → Master. Repeat for the other pages that use it.
- Preview the document and check the inherited content behind each page's own widgets.
A master prints underneath the page's own content. Change its shared widgets on the master rather than copying them onto each page. You can select it in the rail, or double-click inherited content to edit the master in place, then finish that master edit to return to the page. A master cannot inherit another master.
Deleting a master removes its widgets and unassigns it from the pages using it; those pages remain. Choosing None on one page removes that page's master assignment.
Number a document and its sections
Set Section under This page for each printed page. Pages with the same section label count together, including their continuation sheets. Use a separate label for an appendix that needs its own count. Blank section labels also count together.
Double-click a Text widget, open Dynamic fields, and choose the Page number source. Its choices are:
| Choice | Result |
|---|---|
| Page number in section | This page's position among pages with the same Section |
| Pages in section | Total printed pages in that section |
| Section name | The page's Section text |
| Page number in document | Position across the complete generated document |
| Pages in document | Total printed pages across the document |
For a footer such as “Page 2 of 3”, insert the section page-number and section-count tokens around the words. Put that Text widget on a master to reuse it. Page tokens work in text, not table bindings. The canvas shows sample values; final numbering is filled after tables and datasheets have created any continuation sheets.
Print a filled datasheet
- Add Insert → Data → Datasheet, then select the widget.
- Under Datasheet, use Sheet to choose the published datasheet and Tab for its worksheet. Without a worksheet choice, it uses the first worksheet.
- Under Print range, set Cells, for example A1:H40, and Header rows, for example 1:2, if needed. Leave them empty to use the datasheet builder's print area and repeated rows.
- Under Layout → Size, choose Fill the width, Shrink to fit or Actual size. Fill the width can enlarge or shrink to the box width; Shrink to fit only reduces; Actual size keeps the sheet's size. These choices control width, not a promise to squeeze every row onto one page.
- Set Grid to As in the datasheet, Show or Hide. Adjust line colour and text size if needed. Use the datasheet grey restores the default line colour.
- Set Empty to the text to print when the record has no usable datasheet. Preview a realistic filled order before relying on the result.
The editor shows the published layout without entered values. Real generation prints the filled copy on the record's production order. Picking a datasheet and seeing its layout needs datasheets.view; printing filled values separately needs datasheet_instances.view, plus normal access to the template and record. A visible published layout is not proof that the person printing can access its filled answers.
Removed worksheet or an unresolved-reference warning means the saved sheet/range needs attention; empty text can print instead. Correct the reference and inspect the generated PDF. See Manage datasheets.
Fix overflow before publishing or printing
There are different checks:
- Widget geometry: every widget must fit inside its page's printable area, including masters and pages you are not currently viewing. Fix the named widget, paper size, position, dimensions or margins. Publish and Export remain blocked while geometry is invalid.
- Text fit: resolved text is measured using the document fonts, with automatic fitting within supported sizes. If it still cannot fit, generation reports Document text overflow instead of silently accepting clipped text. Make the box larger, shorten the content or adjust font/spacing, then preview again.
- Row tables: supported tables continue extra rows onto additional sheets. Their first-page box stays where you designed it; other widgets are not automatically pushed down just because the table has more rows.
- Datasheets: a sheet taller than its widget grows through the page and pushes widgets below its box down. When content reaches the bottom margin or the master's footer, it continues onto extra sheets, repeating the configured header rows when room permits. Content above or beside the sheet stays in place.
A row or header still needs room to print. A larger page, wider box, smaller print range or suitable width scaling can resolve a layout that cannot fit. Do not treat a successful save or canvas thumbnail as a successful export: inspect File → Preview, then a representative real record, including long text, large tables, filled datasheets and the last page.
Related guidance
Manage PDF templates
Create, design, publish, and export reusable PDF layouts for production orders, production jobs, inbound documents, and inbound items.
Configure OEE dashboards
Create and manage asset OEE timeline dashboards for a site: choose which machines appear, set display options, and pick the default for the floor.