Create an employee
Add a person to your workforce directory with the three-step Add Employee wizard, setting their employee code, name and contact details, and their manager, home site, role, shift, and employment settings.
An employee is a person in your workforce directory — the people you schedule, assign work and training to, and record absences for. Creating an employee gives that person a record in Bulk: a unique employee code, their name and contact details, and where they sit in your organization (their manager, home site, department, job title, and default shift). You create an employee when someone new joins, or to bring an existing worker who is not yet tracked into the directory.
Employee records are company-wide. A record is shared across all of your sites, and its employee code must be unique across the whole company, but each employee is given a home site so you know where they are based.
This guide covers the Add Employee wizard, the main way to create a single employee by hand.
Permission required
You need the Create employees permission (employees.create) to save a new employee. The built-in People, Manager, Entity admin, and Super user roles include it. The default Operator role does not, so if creating an employee fails, ask an administrator to grant a role that includes this permission.
Before you begin
- Confirm your role includes the create permission described above.
- Have the person's details ready: their name, and optionally an email and phone number.
- Make sure you have access to the site you will set as their home site. Bulk checks that you can access the chosen site before it saves the record.
- Optional but helpful: set up the job titles, departments, and shifts you want to assign first, so you can pick them during creation. You can always add these later by editing the employee.
To assign a manager, that person must already exist as an employee, because the manager list is drawn from your existing workforce directory.
Open the Add Employee wizard
Open People in the main navigation, then select Employees to reach the Employees directory, titled "Employees" with the description "Manage your workforce directory". In the page header, select the Add Employee button to open the wizard.
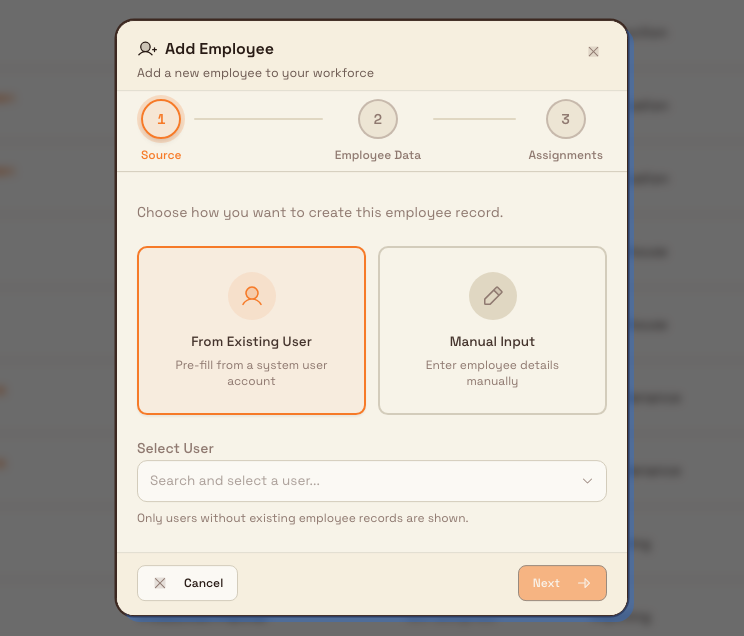
The dialog is titled Add Employee and walks you through three steps shown in the indicator across the top: Source, Employee Data, and Assignments. You can move Back and forward between steps; the Next button stays disabled until the current step's required fields are complete.
people.create-employee-01
Step 1 — Source
Choose how you want to create this employee record:
- From Existing User — pre-fill the record from an existing Bulk user account (someone who can sign in). Bulk copies their name and email, and links the new employee to that account. When you choose this, use the Select User picker to search for and choose the person. Only users who do not already have an employee record are listed.
- Manual Input — enter the employee's details yourself. Use this for a worker who does not have a Bulk login account.
With From Existing User, the Next button becomes active once you select a user. With Manual Input, you can continue straight away.
Step 2 — Employee Data
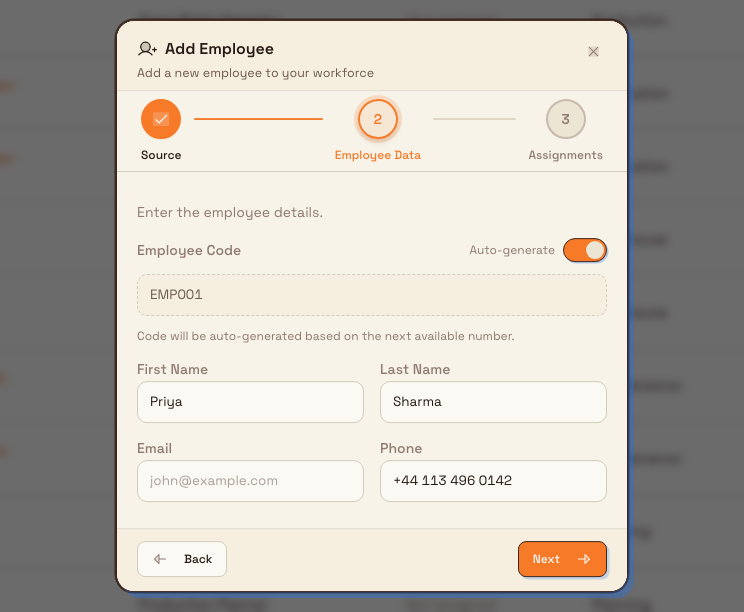
Set the employee's identity:
- Employee Code — a unique code for the person. Leave Auto-generate on to have Bulk assign the next available code in the
EMP001,EMP002sequence, or turn it off to type your own (for exampleEMP001). The code must be unique across your whole company. - First Name and Last Name — both required.
- Email and Phone — both optional contact details.
If you started from an existing user, the name and email are pre-filled from that account and cannot be edited here; the phone number is still editable. The Next button becomes active once the employee has a code, a first name, and a last name.
people.create-employee-02
Step 3 — Assignments
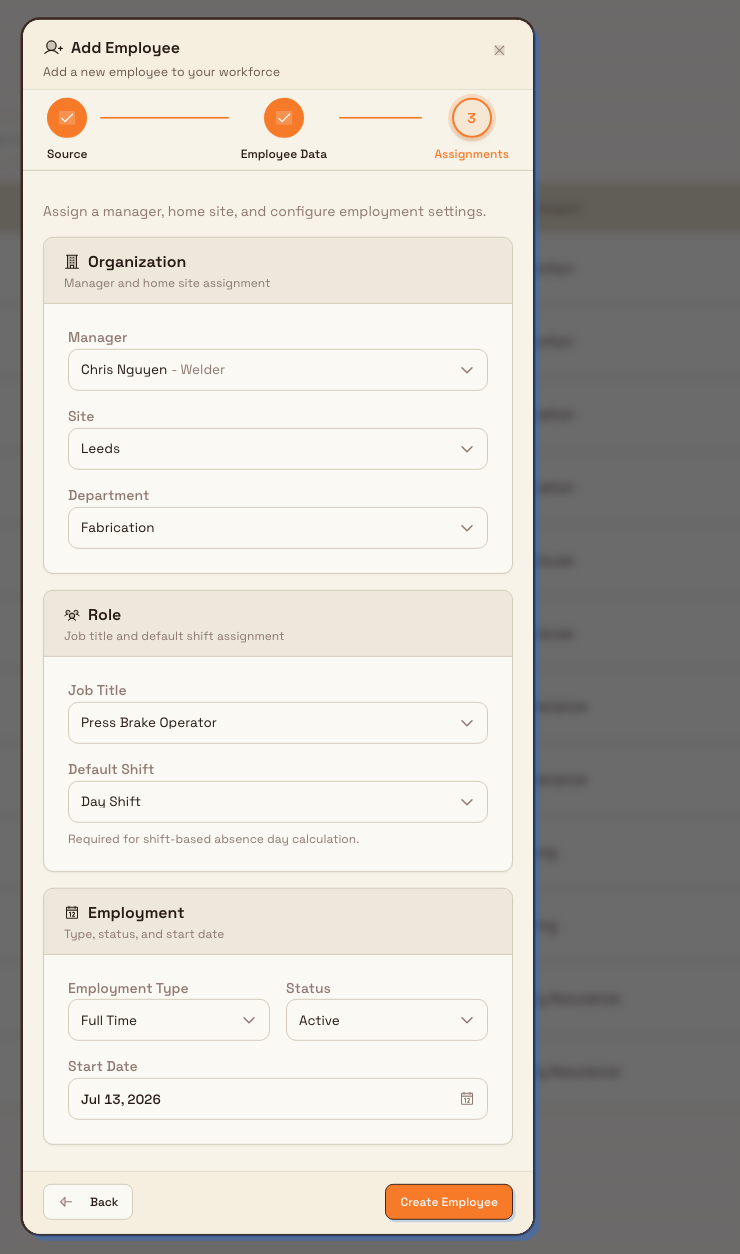
Place the employee in your organization. The step is grouped into three cards:
- Organization — choose a Manager (optional; drawn from your existing employees), a Site (required; the employee's home site), and a Department (optional).
- Role — choose a Job Title (optional) and a Default Shift (optional). A default shift is needed for shift-based absence day calculation, so set it if you plan to track this person's absences.
- Employment — choose an Employment Type (Full Time, Part Time, or Contractor), a Status (Active, On Leave, or Terminated), and a Start Date. The start date defaults to today.
The Create Employee button becomes active once a Site and a Start Date are set. Everything else on this step is optional and can be filled in later by editing the employee.
people.create-employee-03
Create the employee
When the details are complete, select Create Employee. The button shows Creating... while the record saves. On success, Bulk shows an Employee created confirmation with the message "<name> has been added successfully", closes the wizard, and the new person appears in the Employees directory.
If you select Cancel after entering any details, Bulk asks Cancel Employee Creation? and warns that your progress will be lost. Choose Continue Editing to keep your work, or Cancel to discard it.
Granite Peak Manufacturing example
Granite Peak Manufacturing hires a new press-brake operator, Priya Sharma, at its Leeds Fabrication Plant. Priya does not have a Bulk login yet, so a supervisor with the People role adds her by hand.
They open People, select Employees, and select Add Employee, then work through the wizard:
- Step 1 (Source) — choose Manual Input, because Priya has no existing user account.
- Step 2 (Employee Data) — leave Auto-generate on so Bulk assigns the next code, and enter the first name "Priya" and last name "Sharma" and a contact phone number.
- Step 3 (Assignments) — set the Manager to the fabrication shift supervisor, the Site to Leeds Fabrication Plant, the Department to Fabrication, the Job Title to Press Brake Operator, and the Default Shift to Early. They keep Employment Type as Full Time and Status as Active, and set the Start Date to Priya's first day.
They select Create Employee. Bulk shows "Priya Sharma has been added successfully", and Priya now appears in the workforce directory, ready to be scheduled, assigned training, and included in absence tracking.
Expected result
Creating an employee adds a record to your company-wide workforce directory with a unique employee code and the details you entered. The person is homed at the site you chose and appears in the Employees directory, where you can open their record to review or edit it, assign a manager, or take other actions. From here the employee can be included in shifts, absences, and training.
Feature state and limitations
Creating employees is a generally available capability; the Employees area carries no beta marker. The following are confirmed against the current build:
- Auto-generated codes follow the EMP pattern. Auto-generate finds the next free number in the
EMP001sequence by reading existing codes that match that pattern. Codes you typed in another format are not part of that numbering, so if you mix formats, check the suggested code before saving. - Assignable options must already exist. The Manager, Job Title, Department, and Default Shift pickers list what you have already set up. If a value you want is missing, create the employee without it and add it later by editing the record, or set up the option first.
- The Add Employee button is not itself permission-gated. The
employees.createpermission is enforced when the record is saved, not on the button, so a user without it may open the wizard but the final Create Employee step will fail. - Creating another employee record from an existing user is blocked. Each Bulk user account can be linked to only one employee record, and users who already have one are hidden from the Select User picker.
Troubleshooting
- Creating the employee fails or is blocked. Your role is likely missing the
employees.createpermission. Ask an administrator to assign the People, Manager, Entity admin, or Super user role. - You see "Employee code already exists". Employee codes are unique across your whole company. Choose a different code, or turn Auto-generate on to use the next free code.
- You see "User already has an employee record". The account you picked in From Existing User is already linked to an employee. Search for the existing record in the directory instead of creating a new one.
- Saving is rejected for the chosen site. You need access to the site you set as the home Site. Pick a site you can access, or ask an administrator to grant access.
- The Next button stays disabled. On step 1, if you chose From Existing User, select a user. On step 2, fill in the employee code, first name, and last name. On step 3, choose a Site and a Start Date before Create Employee activates.
To add several people at once instead of one at a time, use the Bulk Add Employees wizard, opened with the Bulk Add button next to Add Employee. It creates employee records for existing users who do not yet have one.
Related guidance
People
Understand the People module in Bulk — the workforce directory, org structure, absence tracking, shifts, departments, job titles, and company news that record who works at each plant and when they are available.
Review an employee record
Open an employee's record to review their employment details, training compliance, absence balances, and weekly production from one tabbed page.