Manage departments
Create, organize, and maintain the department hierarchy that groups people, assigns a manager, and shapes reporting lines for a site.
Departments are the organizational groups you use to structure the people who work at a site. Each department gives a team a name, a short code, an optional manager, a cost center, and a color, and it can sit inside a parent department to form a reporting hierarchy. You use departments to mirror how your production floor is actually organized, so that headcount, absences, and training can be understood team by team.
Departments belong to the People area of your workspace. They are managed per site: the departments you create apply to the site you are currently working in, and department codes must be unique within that site.
When to use departments
Set up departments when you want to:
- Group employees under a team such as Fabrication, Quality, or Warehouse.
- Show a clear reporting line by nesting one department inside another.
- Name a manager for each team so leadership is unambiguous.
- Track a cost center against a group of people.
- See how many people are assigned to each part of the floor, and how many are still unassigned.
Before you start
- You need the View departments permission to open the page. Creating, editing, and deleting each require their own permission — Create departments, Edit departments, and Delete departments.
- These permissions are included in the Super user, Entity admin, Manager, and People roles. If you cannot see the page or the Add department button, ask an administrator to check your role.
- To name a manager on a department, the person must already exist as an employee at the site. The manager picker is drawn from your employee list, so add people first if the list is empty.
Where to find departments
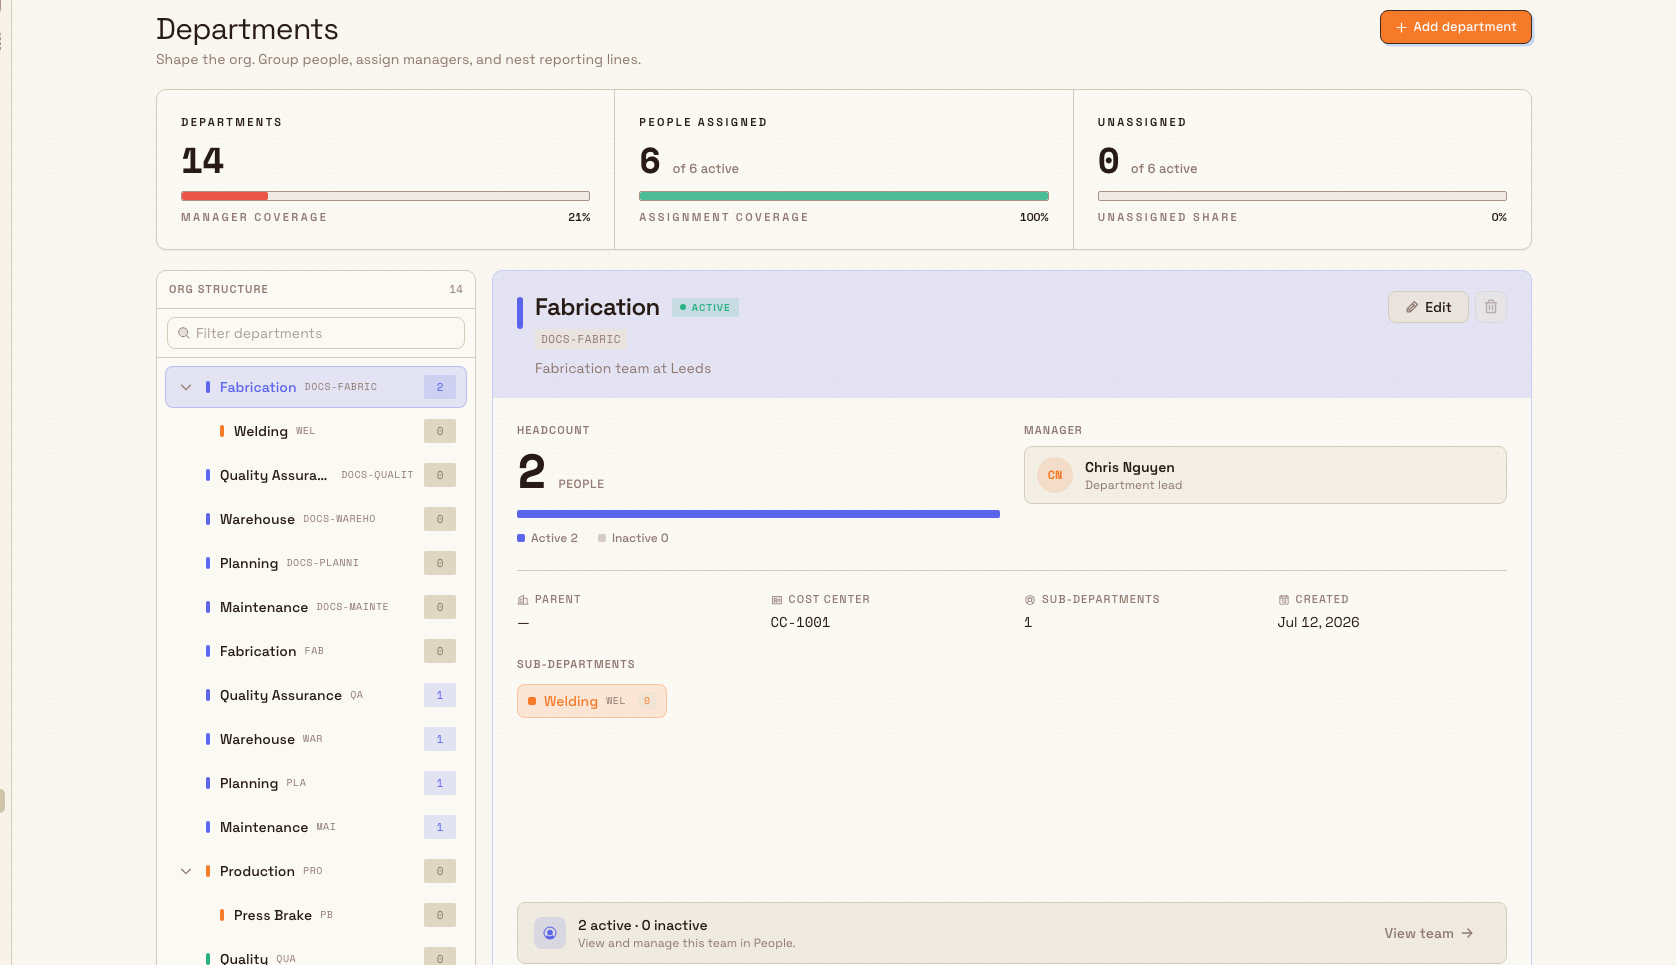
Open Settings, then People, then Departments. The page is a two-part workspace: an org-structure rail on the left and a detail panel on the right.
people.departments-01
The summary strip along the top gives three at-a-glance counts for the site:
- Departments — the total number of active departments, with a Manager coverage bar showing the share that have a manager assigned.
- People assigned — how many active people are assigned to a department, out of the active headcount, with an Assignment coverage bar.
- Unassigned — active people who are not in any department. This turns amber when it is above zero, because unassigned people are easy to overlook.
The left rail is labelled Org structure and lists every department as a tree. Parent departments show a caret you can use to expand or collapse their children, each row shows the department name, its code, and a headcount badge, and a Filter departments box narrows the tree by name or code. Selecting a row opens that department in the detail panel.
Add a department
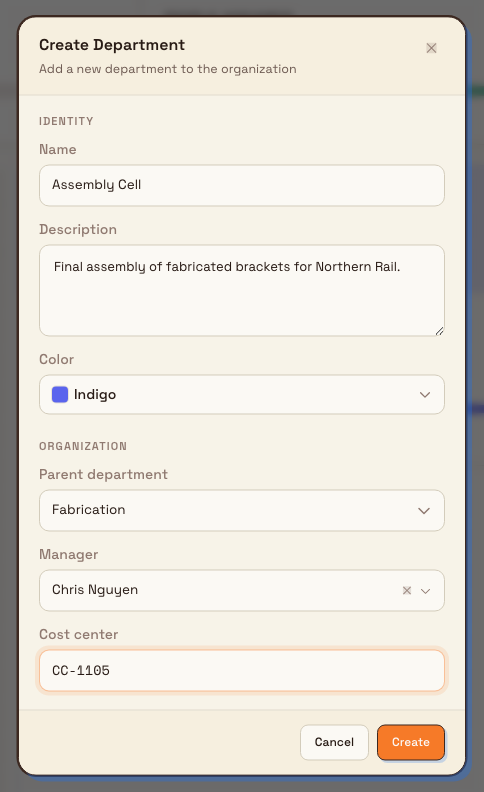
- Select Add department in the top-right of the page. The Create Department dialog opens.
- Under Identity, enter a Name (required). Optionally add a Description of what the team is responsible for, and choose a Color used to tint the department across the interface.
- Under Organization, optionally choose a Parent department (the default is
None (top-level)), assign a Manager from the employee list, and enter a Cost center. - Select Create.
You do not enter a code. Bulk generates a short code from the name automatically and guarantees it is unique within the site.
How codes are generated
A single-word name becomes its first three letters in uppercase — Production becomes PRO. A multi-word name becomes the first letter of each word — Quality Control becomes QC. If that code is already taken at the site, Bulk adds characters to keep it unique. The code is fixed once the department is created and cannot be changed later.
people.departments-02
Review a department
Selecting a department opens its detail panel on the right. From here you can read and act on everything about the team:
- A header with the department name, an Active or Inactive status chip, the code, and the description.
- A Headcount figure with a bar splitting active from inactive people.
- A Manager block naming the department lead, or a highlighted No manager assigned prompt with an Assign shortcut when leadership is missing.
- A meta row showing Parent, Cost center, Sub-departments count, and the Created date.
- Clickable chips for any Sub-departments, and a View team link that opens the department's people in the Employees list.
Edit a department
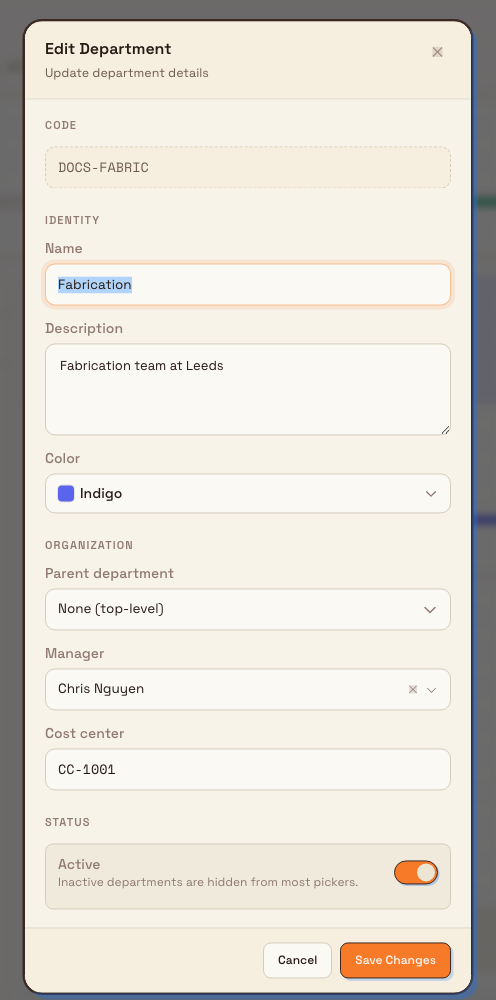
Select Edit in the detail panel header to open the Edit Department dialog. You can change the name, description, color, parent, manager, and cost center. The Code is shown but read-only, because it never changes after creation.
The edit dialog adds a Status section with an Active toggle. Turning a department off keeps its history but hides it from most pickers, which is the right choice when a team is retired but you do not want to delete its record.
people.departments-03
Delete a department
To remove a department, select the trash icon in the detail panel header, then confirm in the Delete Department dialog.
Deletion is guarded and cannot be undone
Bulk blocks deletion while a department still has dependents. If it has sub-departments you see "Cannot delete department with child departments. Delete or move children first." If people are still assigned you see "Cannot delete department with assigned employees. Reassign them first." The trash icon stays disabled until both conditions are clear. When deletion is allowed, it cannot be undone — deactivate a department instead if you might need it again.
Hierarchy rules
Departments nest through their parent. Bulk protects the tree from impossible shapes: a department cannot be its own parent, and it cannot be moved under one of its own descendants (a circular reporting line is rejected). Within each level, departments appear in their saved order and then alphabetically by name. This page does not offer manual drag-to-reorder; ordering follows the saved sort order, so plan the hierarchy through the parent field.
Example: Leeds Fabrication Plant
Granite Peak Manufacturing is setting up departments for its Leeds Fabrication Plant. The plant lead opens Settings → People → Departments and starts from the top of the floor:
- Create Fabrication as a top-level department (code
FAB), colored to stand out on the boards. - Create Welding and Press Brake with Fabrication as their parent, so the rail shows them nested beneath it.
- Create Quality, Warehouse, and Maintenance as their own top-level departments.
- Open Welding, select Edit, and assign the shift lead as its Manager and cost center
CC-2200.
Afterwards the summary strip shows six departments with a Manager coverage bar climbing as leads are assigned, and the Unassigned count highlights the operators still to be placed into a team. As people are moved into Welding, its headcount badge in the rail updates and its View team link jumps straight to that group in the Employees list.
Result and limitations
Once departments exist, they become the backbone for grouping people across the People area — employee records, absences, and training all read against the department a person belongs to. Keep these points in mind:
- Codes are permanent. Choose the name carefully; the generated code cannot be edited later.
- Managers come from employees. You can only assign someone who is already an employee at the site; add the person first if they are missing from the picker.
- Deletion is conditional. A department with children or assigned people cannot be deleted until those are moved or reassigned. Deactivating is the reversible alternative.
- Departments are per site. They apply to the site you are working in, and codes are unique within that site.
Departments are generally available; there is no beta or preview restriction on this capability.
Related guidance
Review an employee record
Open an employee's record to review their employment details, training compliance, absence balances, and weekly production from one tabbed page.
Manage job titles
Create, edit, reorder, and delete the standard job titles your site uses to classify employees for people records and training requirements.