Report a safety incident
Capture a workplace safety incident through the four-step report wizard and submit it for approval so your team has a documented record and follow-up actions.
A safety incident is any unplanned event on your shop floor that harmed someone, could have harmed someone (a near miss), or damaged equipment. Reporting an incident in Bulk creates a permanent, numbered record of what happened, gathers evidence and witnesses, and sends the record for review so nothing is lost or forgotten.
You report an incident through a guided four-step wizard. You can capture just the basic facts in a minute, or take your time to add photos, name witnesses, work through the root cause, and list corrective actions. When you submit, Bulk assigns the incident a number, marks it Awaiting Approval, and turns any actions you listed into tasks for your team to follow up.
Use this whenever something goes wrong that affects safety — an injury, a near miss, a spill, or damage to a machine — so there is a formal record a supervisor can review and act on.
Before you start
You need the Create incidents permission (safety.create_incident) to start and submit an incident report. By default this permission is granted to the Super user, Entity admin, Manager, and Safety roles, so supervisors and safety-focused staff can report incidents. If you open the Safety area but cannot start a report, ask an administrator to confirm your role includes it.
Reporting works against the site you are currently signed in to. In Bulk a site (also called an entity) is one physical location, such as a single plant. The incident, its draft, and its number all belong to that site.
Where to find it
Open the Safety area in the left navigation and choose Incidents. This opens the Incident Reporting page, which lists every incident already recorded for the current site.
Select New Report in the top right to begin. Bulk takes you to the Safety Incident Drafts page, where you can continue an in-progress draft or select Start New Draft to open a fresh report.
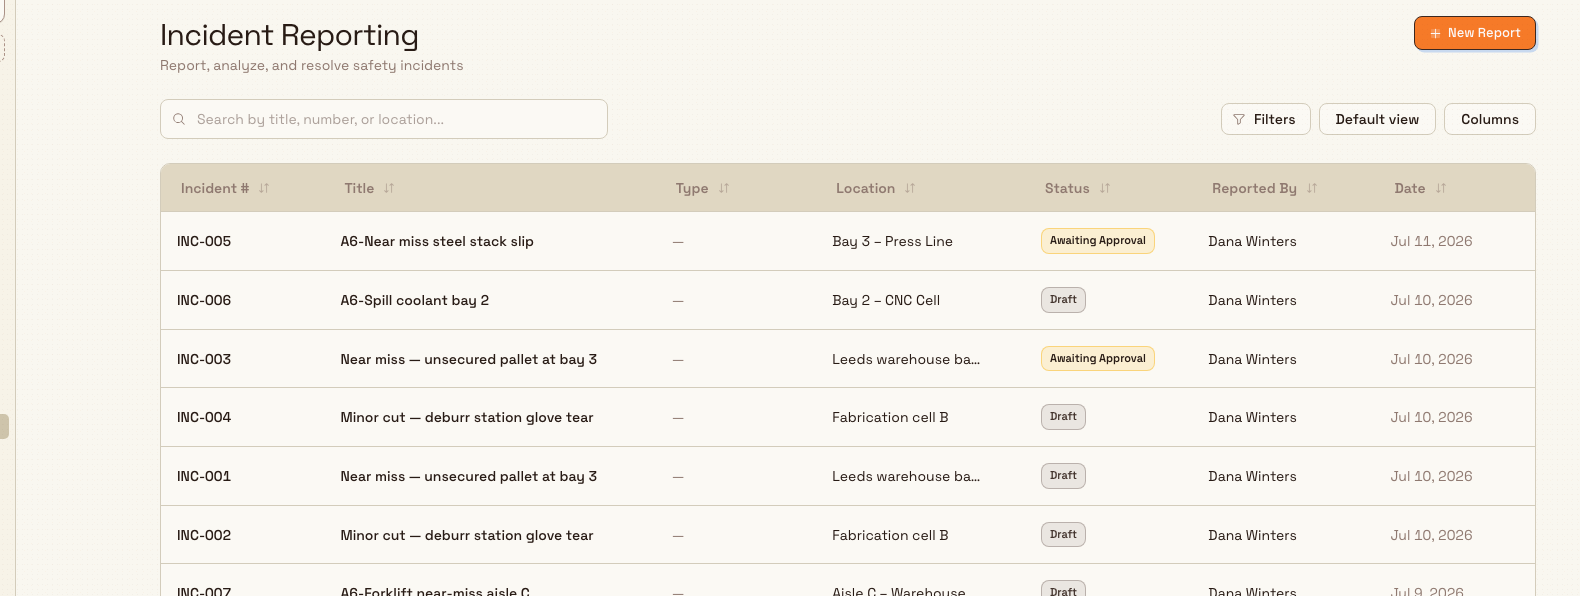
safety.report-incident-01
Step through the wizard
The report wizard has four steps, shown as Basic Info, Evidence, Root Cause, and Actions across the top. A live preview of the incident appears on the right as you type. Only the first step is required — you can move through the rest and submit with them left blank.
At the bottom of each step, Next saves your progress and advances. Bulk confirms each save with a Draft saved message, so a half-finished report is never lost. Back returns to the previous step, and Cancel leaves the wizard.
Step 1 — Basic Info
This is the only required step. It captures what happened and where. The step is split into three sections:
- Incident Details — enter an Incident Title (a short summary) and a Description (what happened, in detail). Both are required.
- When & Where — pick the Date the incident occurred and enter a Location. Both are required. The date picker will not let you choose a day in the future.
- Classification — optionally choose a Department and an Incident Type (for example a near miss, an injury, or equipment damage). If no types are listed yet, an administrator can add them in Safety settings; departments come from the People area.
You cannot continue past this step until the title, description, date, and location are all filled in.
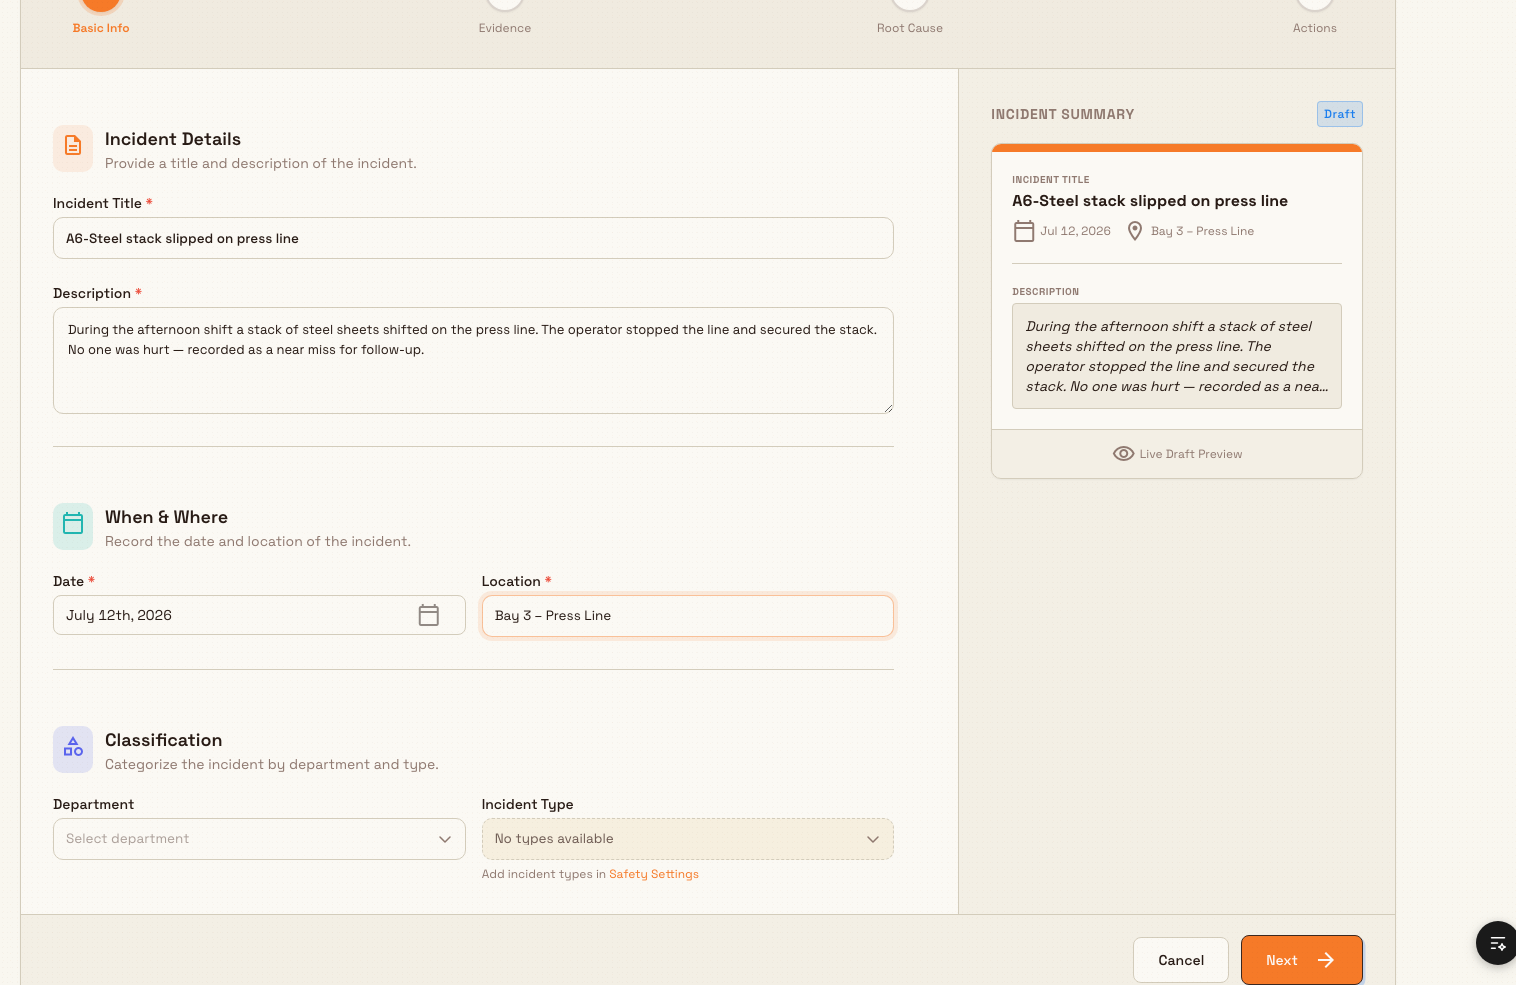
safety.report-incident-02
Step 2 — Evidence (optional)
Add supporting material under Evidence & Attachments by uploading photos, videos, or documents related to the incident. Under Witnesses, select any users who saw the incident or can give a statement. You can skip this step and add evidence later.
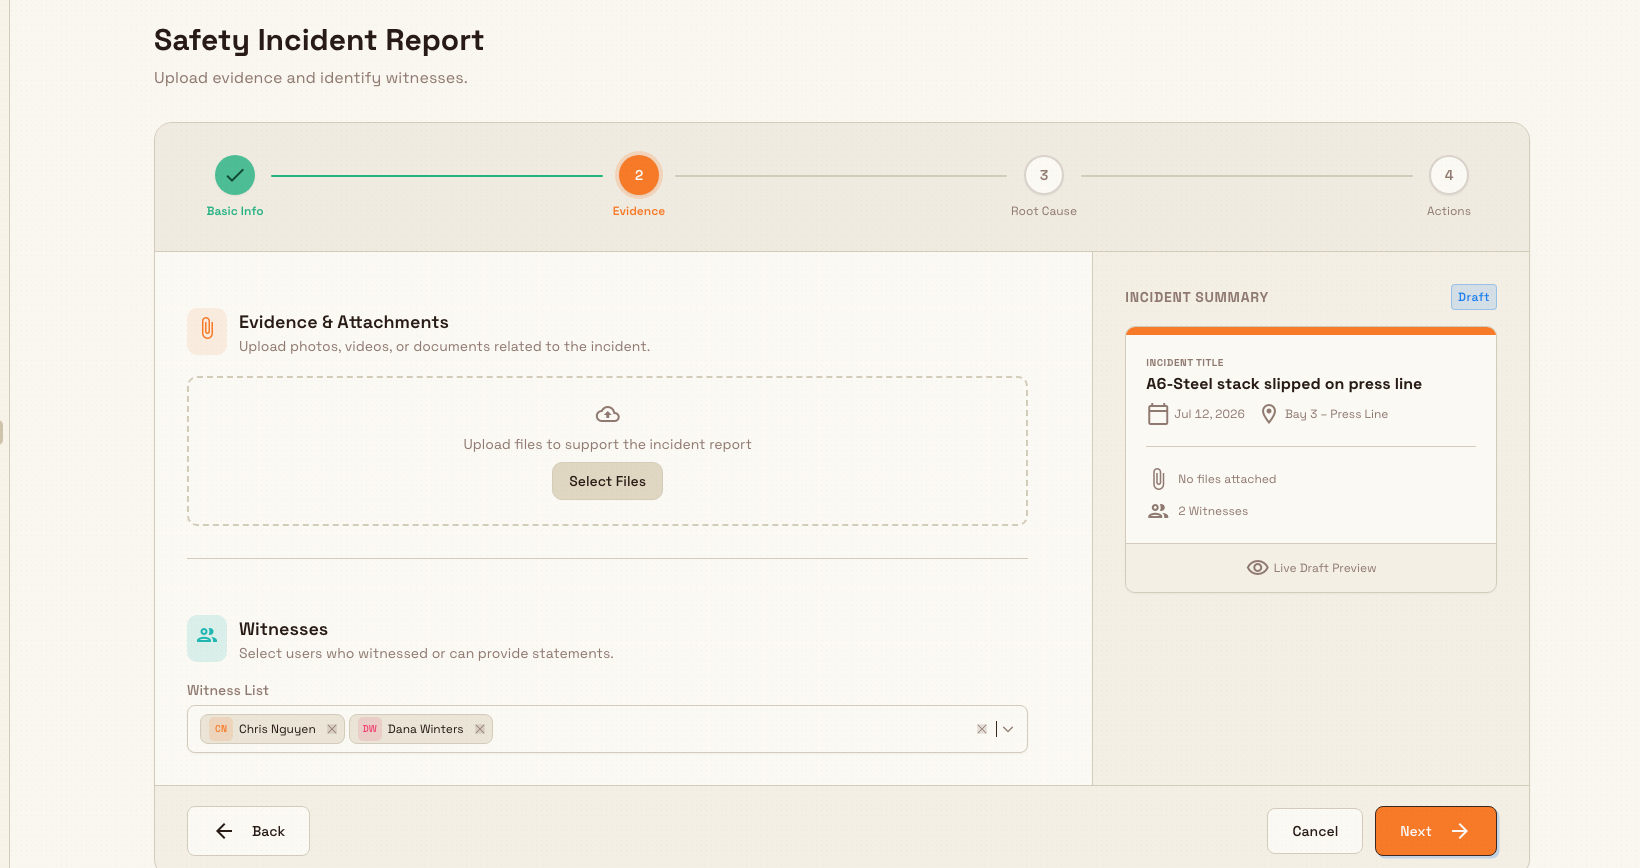
safety.report-incident-03
Step 3 — Root Cause (optional)
Work through why the incident happened. You can write a Problem Statement, build a Fishbone Analysis (a diagram that sorts possible causes into categories such as people, equipment, and environment), record a Five Why Analysis (asking "why" repeatedly to reach the underlying cause), and summarise the Root Cause. Deeper investigation usually happens after the incident is submitted — see the related guidance below.
Step 4 — Actions (optional)
List the follow-up work. Record Lessons Learned, then add action items under Immediate Actions, Preventive Measures, and System Changes. Each action item you add here becomes a task for your team when you submit.
Submit the report
On the final step, select Submit Report. Bulk then:
- Creates a permanent incident with its own number in the form
INC-001, counting up per site. - Sets the incident status to Awaiting Approval and opens a pending approval for a reviewer.
- Attaches your uploaded evidence and adds the witnesses you named.
- Turns every action item from Step 4 into a task in your site's Safety project, so the work is tracked to completion.
After you submit, Bulk opens the new incident's detail page, where you can see its number, status, and everything you recorded.
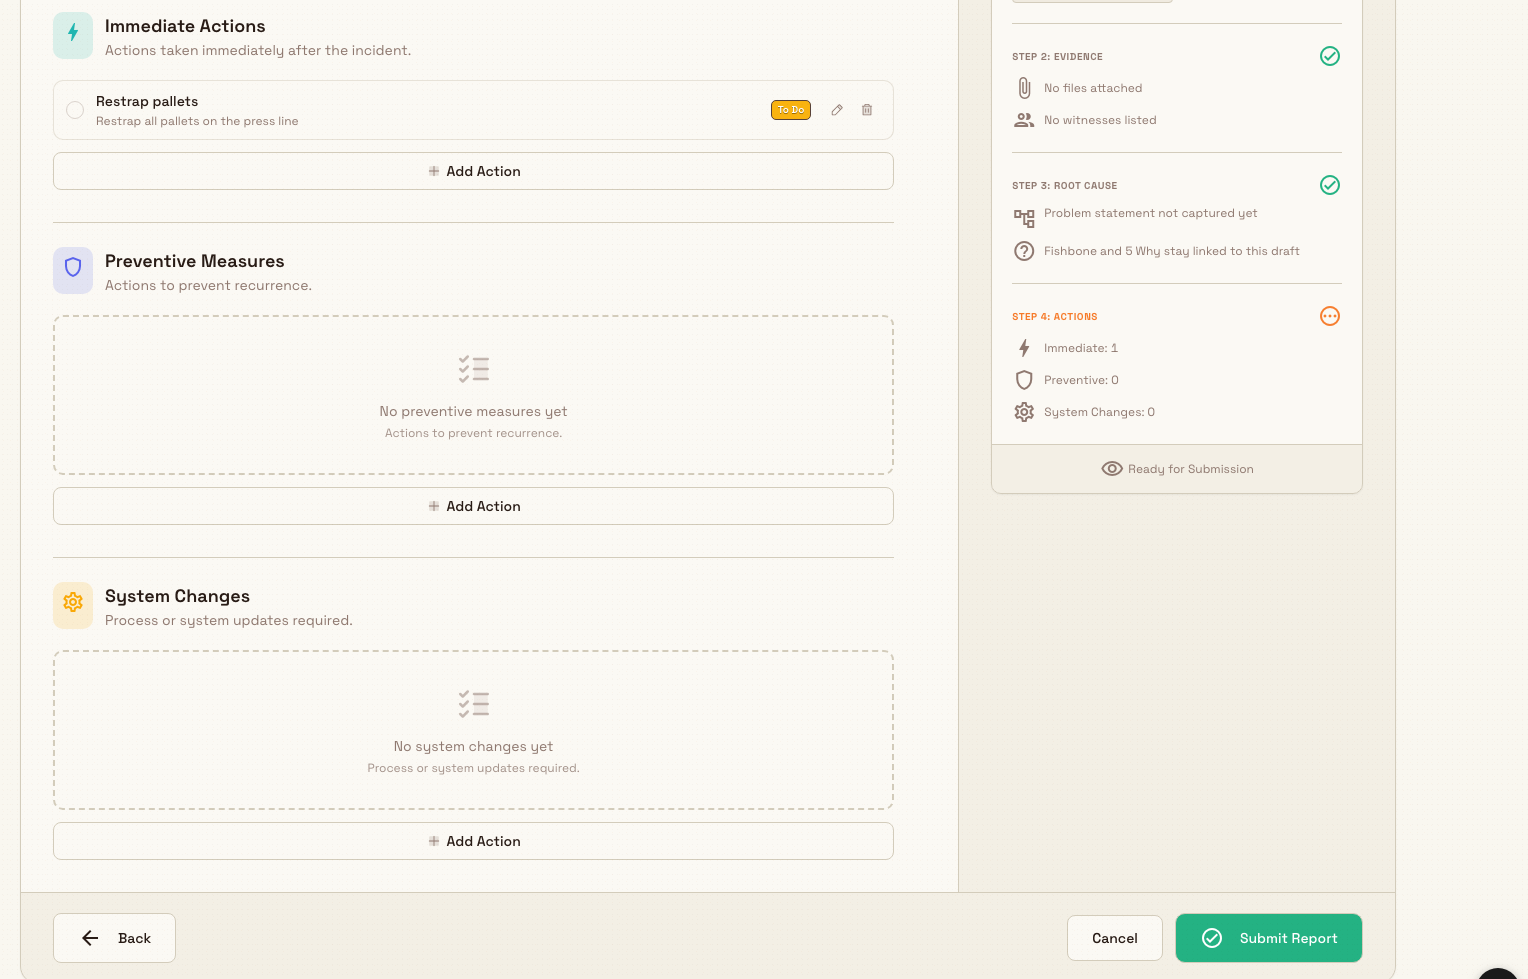
safety.report-incident-04
You can report first and investigate later
Because only Basic Info is required, you can log an incident the moment it happens with just a title, description, date, and location, then submit. The root-cause analysis and corrective actions can be added during the review and investigation stages that follow.
Save and resume a draft
You do not have to finish in one sitting. Every time you select Next, the wizard saves your progress as a draft. Open Safety > Incidents > New Report again to return to the Safety Incident Drafts page. Drafts you started appear under My Drafts, and in-progress drafts from teammates at the same site appear under Team Drafts. Each draft shows which step it reached — for example Step 1 Basic Info or Step 3 Root Cause — so you can pick up where you left off.
Deleting a draft is permanent
Selecting Delete Draft removes that draft and any files uploaded to it. This cannot be undone. Only submit or delete a draft you are sure about — a submitted incident becomes a permanent record and is no longer a draft.
Example: a near miss at Leeds Fabrication Plant
During the afternoon shift at Granite Peak Manufacturing's Leeds Fabrication Plant, a stack of steel sheets slips on the press line but is caught before it falls. No one is hurt, but it could have injured the operator.
The shift supervisor opens Safety > Incidents, selects New Report, then Start New Draft. On Basic Info they enter the title Steel stack slipped on press line, describe what happened, set the Date to today, and enter the Location Bay 3 – Press Line. They choose the Incident Type Near miss. The Next button lights up and a Draft saved message appears.
They move to Evidence, upload a phone photo of the unsecured stack, and add the operator as a Witness. Because they want the record filed quickly, they click Next through Root Cause, and on Actions they add one immediate action, Restrap all pallets on the press line. They select Submit Report.
Bulk creates incident INC-014, marks it Awaiting Approval, and creates a task from the immediate action in the Safety project. The supervisor lands on INC-014's detail page and can hand it to a safety reviewer.
What to expect after submitting
- The incident is Awaiting Approval until a reviewer with approval rights approves, refuses, or closes it.
- Its number, such as INC-014, is fixed and unique within the site.
- Action items from Step 4 appear as tasks so follow-up is tracked, not just recorded.
- The finished report is a permanent record; it is no longer editable as a draft.
This capability is generally available; no part of the reporting wizard is in preview.
Troubleshooting
- The Next button stays disabled on Basic Info. One of the four required fields is empty. Confirm the Incident Title, Description, Date, and Location are all filled in.
- The date you need is greyed out. The date picker blocks future dates. An incident can only be dated today or earlier.
- The Incident Type or Department list is empty. No types or departments exist for the site yet. An administrator can add incident types in Safety settings, and departments are managed in the People area; both are optional, so you can still submit without them.
- You cannot find your unfinished report. It is saved as a draft. Reopen it from Safety > Incidents > New Report, under My Drafts.
Related guidance
- Investigate a safety incident — work through root cause and corrective actions after an incident is submitted.
- Approve a safety incident — how a reviewer approves, refuses, or closes an incident that is Awaiting Approval.
- Review the safety overview — the wider view of safety activity across your site.
- Safety — the rest of the Safety area.
Review a risk assessment
Schedule, complete, and cancel periodic reviews of an active risk assessment, recording whether it is still up to date or needs a new revision.
Investigate a safety incident
Establish why a safety incident happened using fishbone and five-why analysis, then track the corrective actions it produces to completion on the incident's Investigation and Actions tabs.