Resolve a quality problem
Take a quality problem from first report to closure in Bulk: capture the defect, investigate the root cause, decide a disposition, then close the issue.
Last updated
When something is wrong with the product, a batch of parts out of tolerance, a scratched finish, the wrong material, you need one place to record it, work out why it happened, decide what to do with the affected material, and prove it was dealt with. In Bulk that place is the Quality module, and the record you work with is a quality issue: the everyday record of a single defect or problem, from the moment it is found to the moment it is closed.
This page is the end-to-end map of that workflow. It explains how a quality issue moves through its life, which control does each job, and where the affected material and any corrective action fit in. Each stage links to a focused task guide, so use this page to see the whole path and jump into the detailed steps when you need them.
Reach for this workflow whenever a problem needs to be tracked to a resolution rather than fixed on the spot, because material has to be dispositioned, because a customer or standard needs a record, or because you want to stop the same defect coming back.
Before you begin
- Access to the Quality module. The Quality module only appears in the left sidebar under MODULES if your role grants it. Bulk ships a dedicated Quality role for people who work in this area full time; administrator roles (Super user and Entity admin) include it too. If Quality is missing from your sidebar, that is a role matter, ask your organization's administrator. See Understand access and visible navigation.
- The right plant. A quality issue belongs to the single plant (also called a site or entity) you have open. Work in the plant where the problem occurred, and switch plants from the plant switcher at the top of the sidebar if your work moves between sites. See Switch operational context.
- Permissions for each step. Within Quality, individual actions are gated separately. Viewing and editing an issue, dispositioning affected material, and closing an issue each require their own permission, so what you can do on an issue depends on your role. The Quality and administrator roles carry all of these by default.
How a quality issue moves through its life
Every quality issue has a status that shows where it is in the workflow. There are four, and Bulk only lets an issue move between them along a fixed path:
- Open, a new issue starts here. The problem is recorded but not yet resolved.
- In Review, an optional working state while you investigate.
- Resolved, a disposition has been decided and the affected material has a plan. An issue can only reach this state once you have set a disposition.
- Closed, the issue is finished and filed. An issue can only be closed once it is resolved, and only by someone with permission to close.
Two rules are worth remembering because Bulk enforces them: you cannot resolve an issue until you have set a disposition, and you cannot close an issue until it is resolved. You can also reopen a resolved or closed issue back to Open if something was missed.
The rest of this page walks the workflow in the order you will usually do it.
1. Capture the problem
Open Quality from the sidebar and go to Issues, then select New Issue (you can also use the New menu on the Quality Home page and choose New Issue). Bulk opens a scrolling Create Quality Issue form:
- Source and Details: choose where the problem came from, then enter a short title and useful description.
- Severity and Impact: choose the severity, quality category and affected quantity.
- Affected Items and Evidence: identify related work when relevant and attach supporting photos or files.
Select Create issue. Bulk assigns the issue a number of the form QI-2026-0042 and opens it at status Open. For the full field-by-field walkthrough, see Create a quality issue.
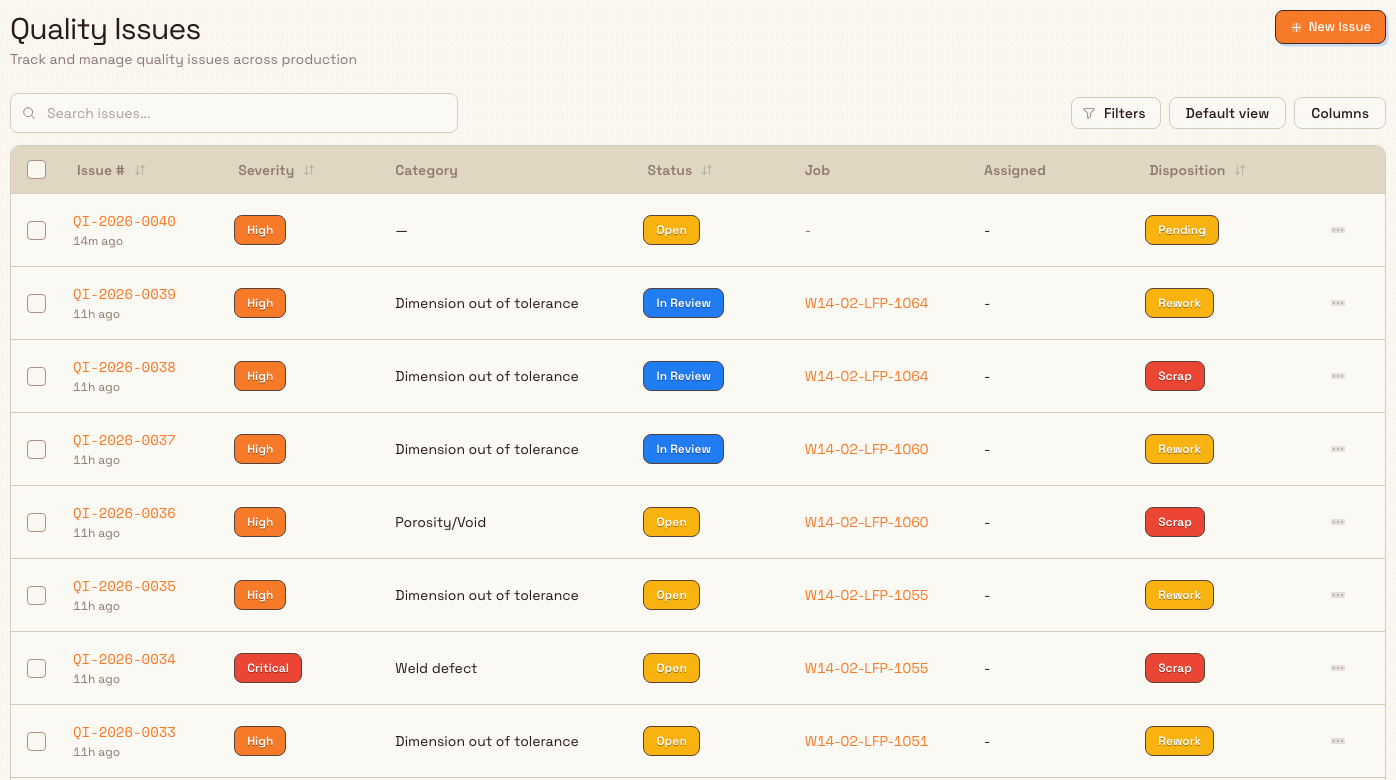
2. Triage and assign
New issues land on the Issues list. Use the Status column and the current table filters to find Open, In Review, Resolved and Closed work. Search by issue number and use Custom View and Columns to arrange the information you need. Open any row to work the issue.
- Keep responsibility clear. Record investigation notes and follow-up work against the issue, using linked corrective-action records when appropriate.
- Mark it as being worked. To move an issue into In Review, select it in the list and choose Change Status, then pick In Review. Change Status only offers the moves that are valid for the issue right now, so you will not see options the workflow does not allow.
3. Investigate
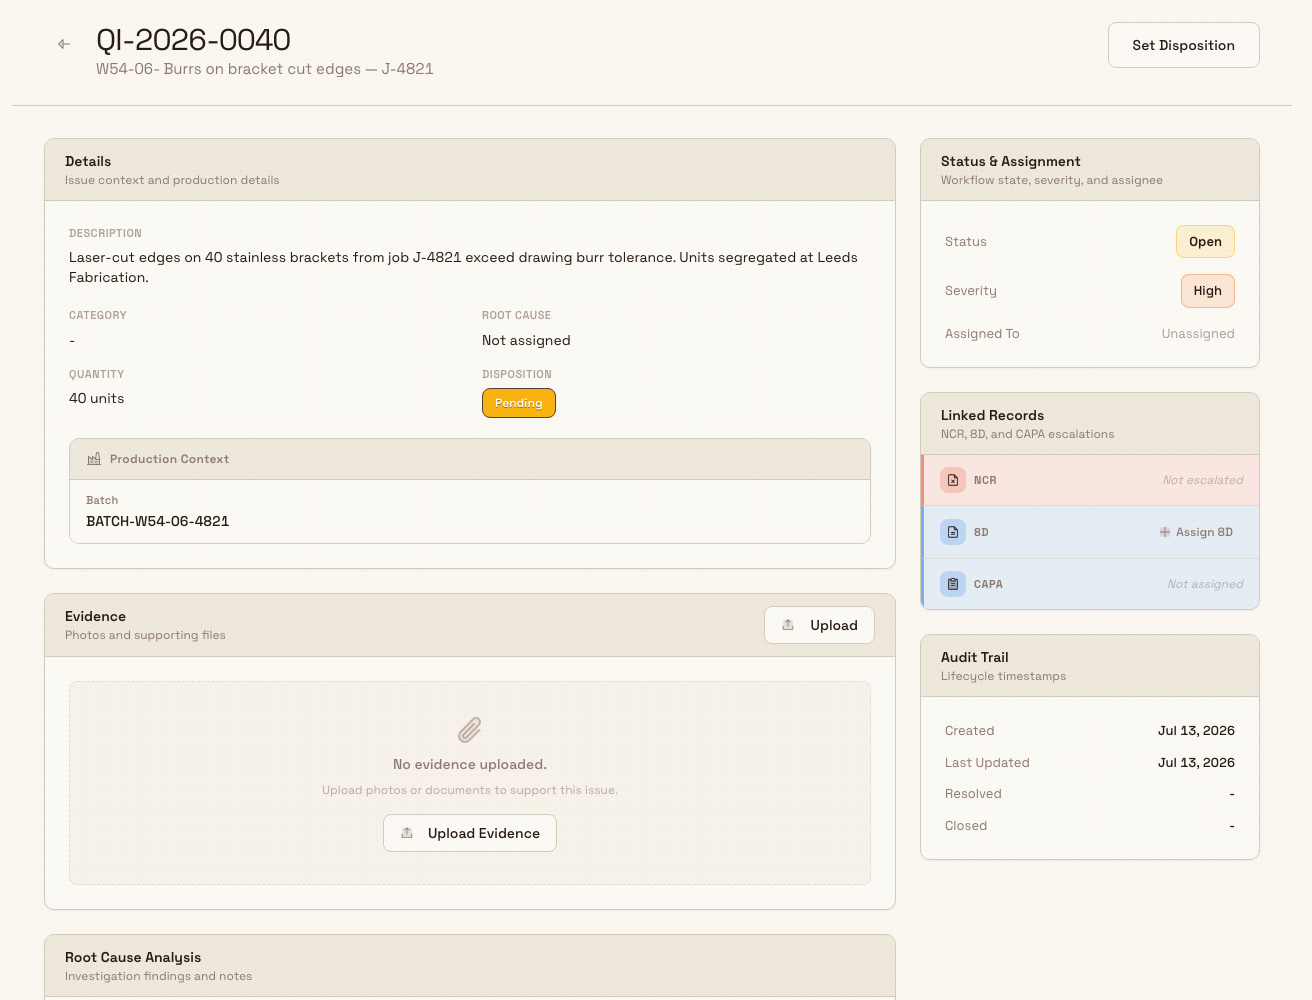
Open the issue to reach its detail page, the workspace for everything about that problem. The page has three tabs:
- Details shows the description, category, saved root cause, quantity, disposition, status and severity. It also contains the Audit Trail and Linked Records for NCR, 8D and CAPA.
- Investigation holds Evidence and Root Cause Analysis. Select Upload Evidence for supporting files. Choose a root cause from your plant's catalog, add investigation notes, then select Save Root Cause. Your administrator maintains the catalog under Settings → Quality → Root Causes.
- Activity holds comments and the activity timeline.
Recording a root cause is what turns a logged defect into something you can prevent. For the detailed investigation and review steps, see Review and close a quality issue.
4. Contain and escalate when the problem is bigger
Not every issue stops at a single record. Bulk gives you linked record types for containment and formal follow-up, with NCR, 8D and CAPA context shown on the issue's Linked Records card:
- Hold, quarantine the suspect material so it cannot move forward in production until someone reviews and releases it. See Put work on quality hold and Release a quality hold.
- NCR (non-conformance report), the formal record that material or a process did not meet its specification, often shared with a customer or supplier. See Create an NCR.
- CAPA (corrective and preventive action), a tracked plan that fixes the root cause and stops the problem recurring. See Create and manage a CAPA.
- 8D report, works a serious problem through the structured eight-discipline method used with customers and suppliers. From the Linked Records card you can select Assign 8D to link an existing 8D report to the issue. See Create and manage an 8D report.
An issue can be worked through an 8D report or a CAPA, but not both at once, linking one shows the other as managed through it. When an issue is linked to an 8D report, its root cause is defined in the report's D4 discipline and flows back to the issue automatically, so the Root Cause Analysis card becomes read-only on the issue.
Choose the right follow-up record
Use the linked task guide for each escalation. The issue's Linked Records section shows the relationship; available actions depend on your permissions and the record state.
5. Decide a disposition and resolve
Disposition is the decision about what happens to the affected material. It is also the gate to resolving the issue: setting a disposition moves the issue to Resolved in one step.
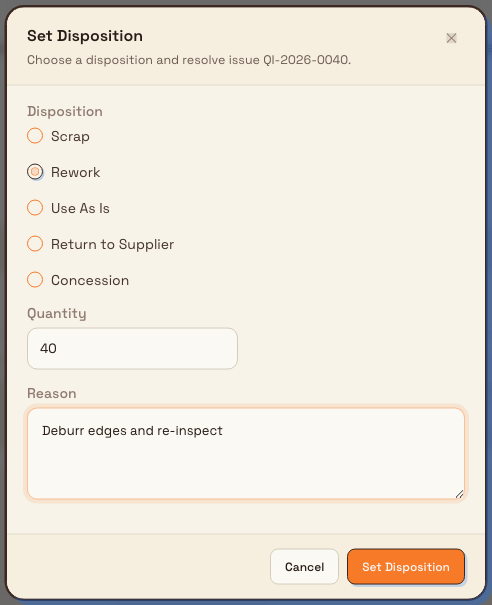
On the issue detail page, select Set Disposition. In the dialog, choose one option, enter the Quantity it applies to, and give a Reason:
- Scrap, the material cannot be used and is written off.
- Rework, the material can be corrected and re-checked.
- Use As Is, the material is acceptable despite the deviation.
- Return to Supplier, the material goes back to whoever supplied it.
- Concession, the material is accepted by agreement, typically with a customer sign-off.
Confirm with Set Disposition. Bulk records the decision and moves the issue to Resolved, stamping who resolved it and when in the audit trail. To disposition and close several matching issues together, select same-status rows on the Issues list and choose Disposition & Close from the bulk action bar. That combined action applies one disposition and reason, resolves any unresolved issue, and closes the group in one confirmation.
6. Close the issue
Once an issue is Resolved and the work is genuinely done, rework verified, material dispositioned, any corrective action in hand, select Close Issue on the detail page. Bulk moves the issue to Closed and records who closed it. The Close Issue button only appears when the issue is resolved and you have permission to close, so if you do not see it, check those two things first. For the closure checklist, see Review and close a quality issue.
If a closed or resolved issue turns out to need more work, select it in the Issues list and use Change Status → Open to reopen it.
Example: housing flange alignment at Gotham
Bruce Wayne records QI-2026-0012, Housing flange alignment, at Gotham Applied Sciences. The fictional standalone issue describes eight housing samples that sit high against the reference fixture. It has High severity and the Dimensional Error category.
In Investigation, Bruce saves Fixturing with notes to inspect locator pins against the master fixture and recheck all eight samples. Details then shows that saved root cause beside Open status and Pending disposition.
The disposition draft selects Rework, quantity 8, with the reason to correct fixture alignment and recheck the housings before release. The pictured draft was canceled, so this example remains Open with its investigation history intact. In your real workflow, save the decision after review, verify the work and close the resolved issue when it is finished.
Expected result
When the workflow is complete you have a single quality issue that tells the full story: what the problem was, how many units it affected, why it happened, what was decided for the material, any hold or corrective action it triggered, and who resolved and closed it. Its status reads Closed, and the defect is reflected in the Quality module's dashboards, the defect Pareto and first-pass-yield trend on Quality → Home, so recurring problems become visible over time.
Feature state and limits
- Issues are generally available. The core resolve workflow, creating, investigating, dispositioning, resolving, and closing quality issues, is a standard, supported part of Bulk.
- Escalation actions depend on the record. Use the focused NCR, CAPA, hold and 8D guides for setup and state requirements.
- Actions depend on your permissions. Dispositioning and closing are gated separately from viewing and editing. If a control is missing, it is almost always a permissions matter rather than a fault.
- The path between statuses is fixed. Bulk only allows valid moves: a disposition is required before an issue can be resolved, and an issue must be resolved before it can be closed. This is deliberate, it keeps the record trustworthy.
If something does not work
- You cannot resolve the issue. Bulk blocks the move with Set a disposition before resolving this issue. Set a disposition first, that is what resolves it. Use Set Disposition on the detail page.
- The Close Issue button is missing, or closing is refused. An issue must be Resolved before it can be closed, and closing needs the close permission. Check the status first, then your permissions with your administrator.
- You cannot move an issue to In Review from its detail page. The In Review and reopen moves are made from the Issues list: select the issue and use Change Status. The detail page's header actions are Set Disposition and Close Issue.
- The Root Cause Analysis card is read-only. The issue is linked to an 8D report, so its root cause is defined in the report's D4 discipline and syncs back automatically. Edit it there, or unlink the 8D.
- A quality record is missing from your sidebar. NCRs, CAPAs, Holds, and 8D Reports are separate areas gated by their own permissions. Ask your administrator if you expect one and cannot see it.
Related guidance
Quality and compliance
Find, fix, and prevent quality and safety problems and run scheduled compliance audits with the Quality, Safety, and Audits modules, with task guides.
Manage safety risk
Run the safety-risk cycle in Bulk: score hazards on the risk matrix, control them with approved measures, investigate incidents, and run pre-use checks.