Manage production modes and items
Define your organization's operational production modes and the tracking buttons operators press to record good output, defects, and inspections on the shop floor.
Production modes and production items are two related pieces of master data that shape how work is counted on the shop floor. A production mode is a named operational mode for your plant — a reusable label such as STANDARD or RUSH that describes a way of running production. A production item is a tracking button an operator presses to record output: each button counts a good unit, a defect, or a quality inspection when it is tapped on the operator screen.
You manage both from the Master Data area of Settings, on their own pages. Set them up when you are configuring a new site, when you want operators to record a new kind of outcome (for example a specific scrap reason), or when you need to reorganize the buttons operators see. This guide covers both pages, how they relate, and the current limits of that relationship.
Before you start
Both pages live under Settings. To open them, go to Settings, open the Master Data group, and select Production Modes or Production Items.
You need permission for each area:
- Production modes —
production_modes.viewto see the list;production_modes.create,production_modes.update, andproduction_modes.deleteto add, edit, reorder, archive, and restore modes. - Production items —
production_items.viewto see the list;production_items.create,production_items.update, andproduction_items.deleteto add, edit, duplicate, reorder, archive, and restore items.
The built-in Super user, Entity admin, Manager, and Master data roles hold the full create, update, and delete permissions for both areas. The Tablet user role can view both but not change them. If the Add button or the row actions are missing, ask an administrator to adjust your role.
One difference matters for where your changes apply:
- Production modes are tenant-wide by default. A mode you add is shared across every site (entity) in your organization, unless you scope it to a single site with the Visibility field.
- Production items belong to one site. The Production Items page always shows the items for the site (entity) you are currently working in, and a new item is created for that site only. Switch sites first if you are configuring a different plant.
A production mode is not the same as a production item
Modes and items are managed separately and answer different questions. A mode names how a run is operated; an item is a button an operator taps to record a result. You can run a whole plant with production items and never define a custom mode.
Production modes
What the Production Modes page shows
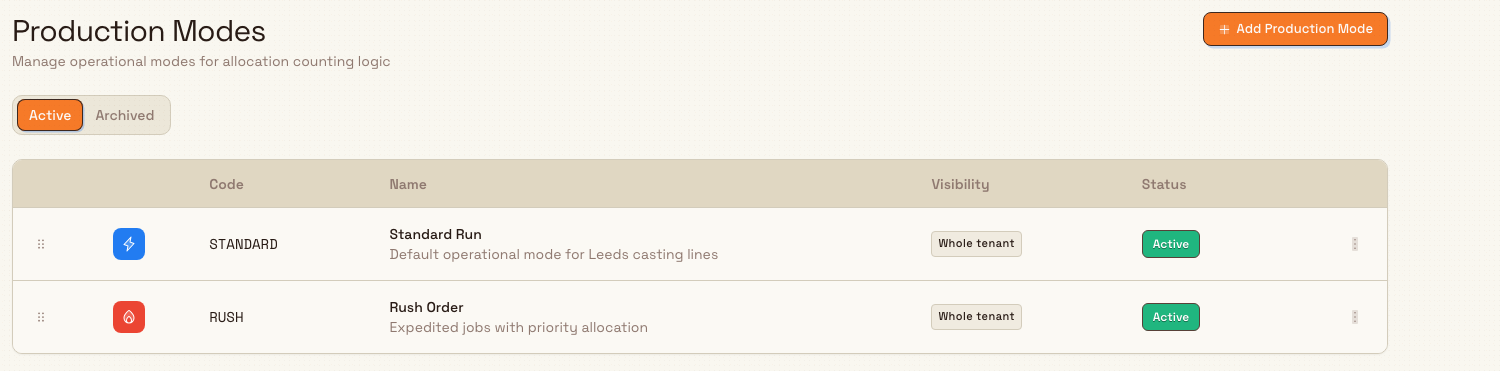
The Production Modes page is titled Production Modes with the description "Manage operational modes for allocation counting logic". It has two tabs:
- Active — the modes currently in use. The Add Production Mode button appears here.
- Archived — modes you have archived, which you can restore.
Each row shows a colored icon, the Code (a short uppercase identifier), the Name and optional description, a Visibility badge, and a Status badge (Active or Inactive). On the Archived tab the status badge reads Archived and the row notes the date it was archived.
administration.master-data.production-modes-items-01
Add a production mode
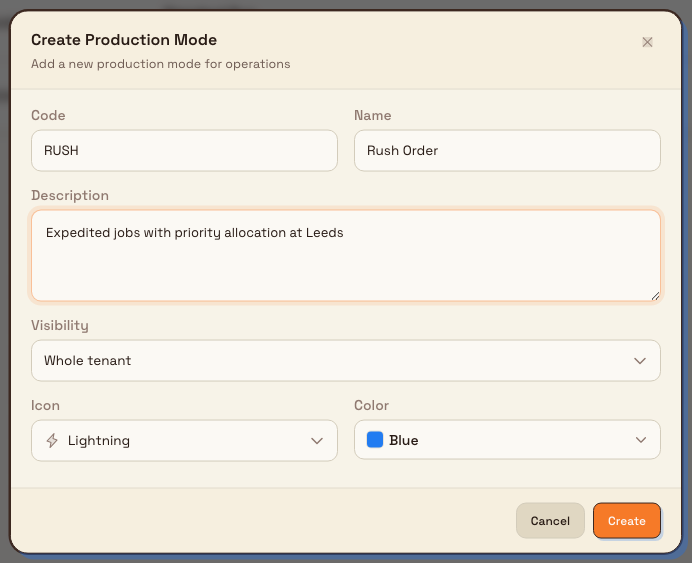
- On the Active tab, select Add Production Mode. The Create Production Mode dialog opens with the subtitle "Add a new production mode for operations".
- Fill in the fields:
- Code — a short identifier, up to 20 characters, such as
STANDARD. Bulk stores the code in uppercase. The code must be unique within its visibility scope. - Name — the readable name, up to 100 characters, such as
Standard Run. - Description — an optional note, up to 500 characters.
- Visibility — Whole tenant (the default, meaning every site) or a specific site from the list.
- Icon — one of ten preset icons shown with a live preview.
- Color — a color swatch used for the mode's icon tile.
- Code — a short identifier, up to 20 characters, such as
- Select Create.
The new mode appears at the bottom of the Active list. If you chose a site in the Visibility field, the mode's Visibility badge shows that site's name instead of "Whole tenant".
administration.master-data.production-modes-items-02
Edit, reorder, archive, and restore
- Edit — open the row's actions menu (the three-dots button) and select Edit. The Edit Production Mode dialog opens; change the fields you need and select Save Changes.
- Reorder — on the Active tab, drag a row by its handle to change the order modes are listed in. Reordering is turned off on the Archived tab.
- Archive — open the row's actions menu and select Archive. A confirmation dialog names the mode and explains it will move to the Archived tab and can be restored later. Archiving is a soft action: the mode is hidden and marked inactive, not permanently removed.
- Restore — on the Archived tab, open the row's actions menu and select Restore to make the mode active again.
Production items
What the Production Items page shows
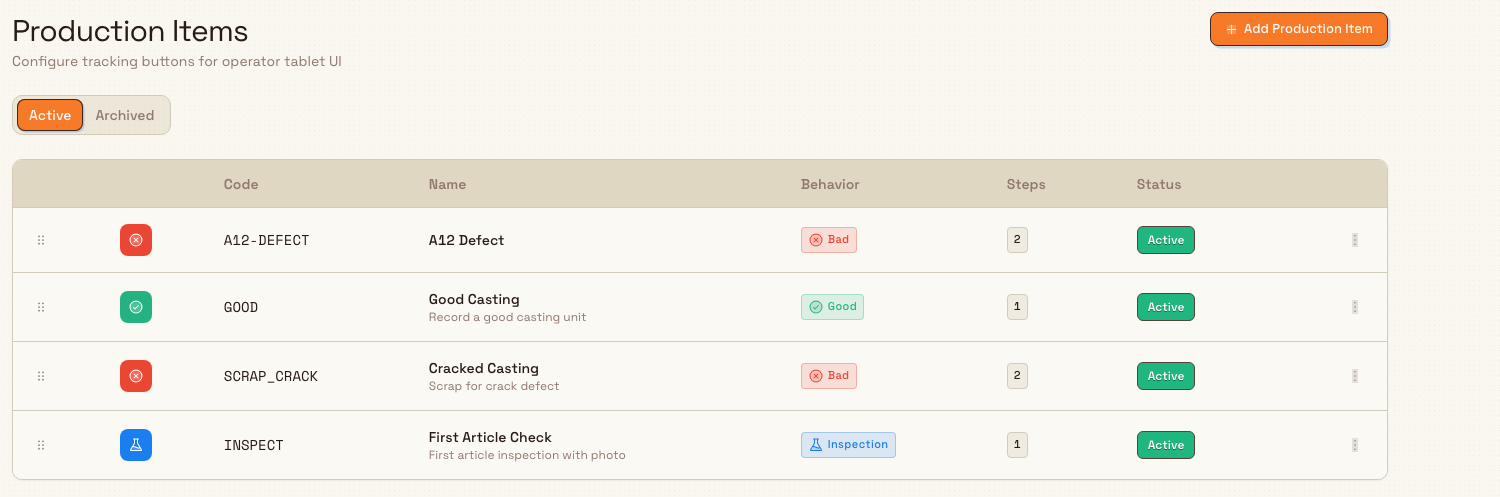
The Production Items page is titled Production Items with the description "Configure tracking buttons for operator tablet UI". Like modes, it has an Active tab (where the Add Production Item button lives) and an Archived tab.
Each row shows a colored icon, the Code, the Name and optional description, a Behavior badge, a Steps count (how many workflow steps the button runs), and a Status badge.
administration.master-data.production-modes-items-03
Behavior types
Every production item has a behavior type that decides how pressing the button affects production counts:
- Good — adds to the production count ("+1 Production Count").
- Bad — adds to the defect count ("+1 Defect Count").
- Inspection — records an inspection with no count impact ("No count impact").
Choose the behavior that matches what the operator is recording. A "Good Unit" button is Good; a scrap or reject button is Bad; a "First Article Check" button is Inspection.
Add a production item
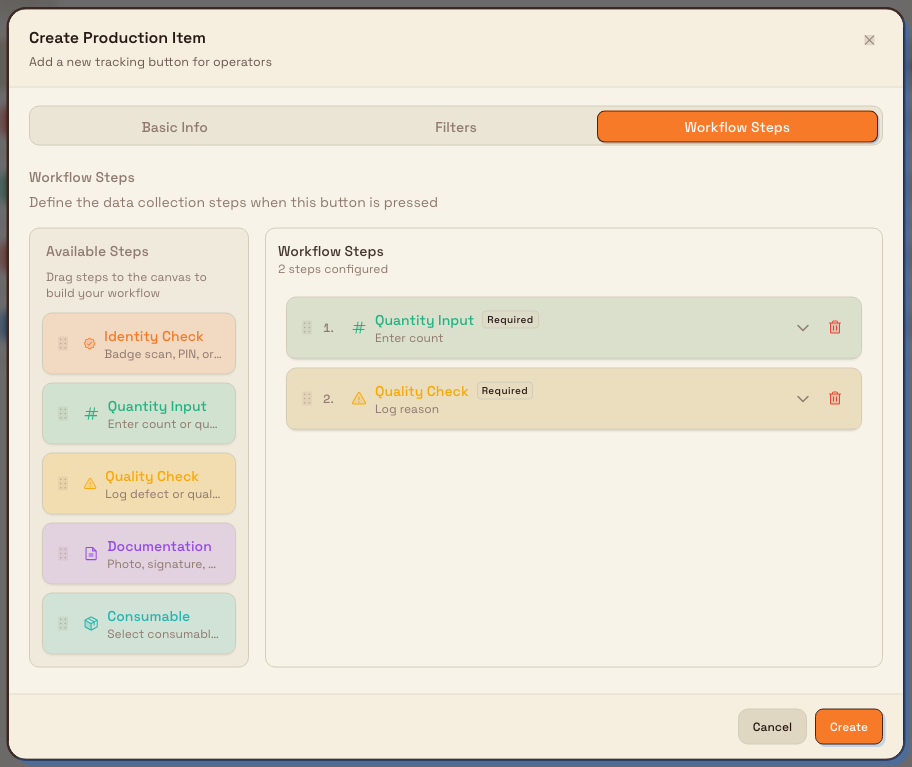
- On the Active tab, select Add Production Item. The Create Production Item dialog opens with the subtitle "Add a new tracking button for operators". The dialog is organized into three tabs: Basic Info, Filters, and Workflow Steps.
- On Basic Info, set:
- Code — up to 20 characters, letters, numbers, dashes, and underscores only (for example
SCRAP_CRACK). Bulk stores it in uppercase. The code must be unique within the site. - Name — the button label operators see, such as
Cracked Casting. - Behavior Type — Good, Bad, or Inspection, described above. The field notes that it "Determines how this button affects production counts".
- Icon, Color, and Unit — the button's appearance and the unit of measure it counts in. If you leave the unit blank, Bulk uses the
eachunit. - Description — an optional note.
- Code — up to 20 characters, letters, numbers, dashes, and underscores only (for example
- On Filters, optionally set a Routing Filter so the button only appears for jobs that match a chosen routing. Leave it on All routings to show the button everywhere.
- On Workflow Steps, build the data-collection steps the button runs (see below).
- Select Create.
Workflow steps
Workflow steps are the prompts an operator completes when they press the button. On the Workflow Steps tab you drag step types from the toolbox onto the canvas; the empty canvas reads "Drag steps here to build your workflow" and "Steps will execute in order from top to bottom". Each step can be marked required and configured individually.
Five step types are available:
- Identity Check — a badge scan, PIN, or serial entry to capture who or what is involved.
- Quantity Input — enter a count or quantity.
- Quality Check — log a defect or quality reason.
- Documentation — capture a photo, signature, or note.
- Consumable — select a consumable that was used.
A button can have zero steps (a single tap records the count) or several steps in sequence.
administration.master-data.production-modes-items-04
Duplicate, archive, and restore
- Duplicate — open the row's actions menu and select Duplicate. The Duplicate Production Item dialog pre-fills a New Code (the original code followed by
_COPY) and an optional New Name. This copies the item's behavior, unit, and workflow steps into a new button, which is faster than rebuilding a similar item from scratch. - Edit — open the actions menu and select Edit to change any field in the Edit Production Item dialog, then select Save Changes.
- Reorder — drag rows on the Active tab to set the order buttons appear in. Reordering is off on the Archived tab.
- Archive and Restore — archive from the actions menu to move an item to the Archived tab; restore it from there. As with modes, archiving is reversible, not a permanent delete.
Example: Granite Peak Manufacturing
Granite Peak Manufacturing runs the Leeds Fabrication Plant, where operators cast and finish steel brackets. Dana Winters, the plant administrator, is setting up how output is tracked.
First she defines operational modes. She opens Settings, then Master Data, then Production Modes, and selects Add Production Mode. She creates a STANDARD mode named Standard Run, left on Whole tenant so every Granite Peak site can use it, and a RUSH mode named Rush Order for expedited jobs. Both appear on the Active tab with a "Whole tenant" visibility badge.
Next she configures the buttons operators will press. On Production Items she adds three items for the Leeds site:
GOOD, namedGood Casting, behavior Good, counted ineach, with a single Quantity Input step.SCRAP_CRACK, namedCracked Casting, behavior Bad, with a Quantity Input step followed by a Quality Check step so operators log the crack reason.INSPECT, namedFirst Article Check, behavior Inspection, with a Documentation step for a photo.
She drags GOOD to the top of the list so it is the first button operators see, then leaves the Routing Filter on All routings for each. When a rush job later needs a different scrap button, she uses Duplicate on SCRAP_CRACK to start from a copy rather than rebuild it.
Expected result
Each production mode you create appears immediately on the Active tab with its code, visibility, and an Active status. Each production item appears on its site's Active tab with its behavior badge and step count, in the order you arranged. From there, the production items are the buttons your operators press to record good output, defects, and inspections during production, and their behavior type feeds the matching production or defect counts.
Feature state and limits
Managing production modes and production items is a generally available feature. Keep these behaviors in mind:
- Modes are tenant-wide; items are per site. A mode is shared across sites unless you scope its Visibility to one site. Items always belong to the site you are working in.
- Codes must be unique within scope. A mode's code must be unique within its visibility scope; an item's code must be unique within its site. Item codes accept only letters, numbers, dashes, and underscores.
- Mode-based filtering of items is not yet available. The create dialog's Filters tab explains that filtering tracking buttons by production mode is planned but not active today. Currently every production item appears for all production modes, and there is no field in the interface for assigning modes to an item. You can still filter an item by routing.
- Archiving is reversible. Archived modes and items move to the Archived tab and can be restored; they are not permanently deleted from this page.
- Operator counting logic uses a standard default. Each mode carries an internal allocation setting that is fixed to the standard behavior; the interface does not currently expose alternative allocation logic.
Troubleshooting
- "A production mode with the code ... already exists in this visibility scope" — another mode already uses that code in an overlapping scope (a tenant-wide mode overlaps every site). Choose a different code, or edit the existing mode instead.
- "A production item with code ... already exists in this facility" — an item with that code already exists for the current site. Pick a different code, or edit the existing item. Remember codes are compared in uppercase.
- "Cannot change visibility while production items in other facilities still use this production mode" — you tried to scope a tenant-wide mode to one site while items at other sites reference it. Remove or repoint those references first, then change the visibility.
- The Add button or row actions are missing — your role lacks the create, update, or delete permission for that area. Ask an administrator to grant the relevant
production_modes.*orproduction_items.*permissions, or assign a role such as Master data. - You do not see an item you created — production items are per site. Confirm you are working in the site where you created the item; switching sites shows a different item list.
Related
- Master data — the full set of master-data configuration pages.
- Manage routings — the routings a production item's Routing Filter can point to.
- Manage resources — the workstations and resources where operators record production.
- Manage units — the units of measure a production item counts in.
- Roles and permissions — how to grant the permissions this page requires.
Configure naming conventions
Set per-site number formats for inbound documents, items, production orders, jobs, invoices, and credit notes from reorderable segments, and learn when a format locks.
Manage resources
Create, edit, duplicate, and archive the resources — the named capabilities, machines, and workstations — that become the steps of your production routings.