Manage routings
Create, version, publish, and retire routings — the ordered workflow a job follows on the floor — and set the approval policy each one uses.
A routing is the ordered workflow a job follows on the production floor: the sequence of steps from start to finish, together with any branches, loops, and checks along the way. Each routing is versioned — you edit a working draft, compile it into runnable steps, and publish it as the single live version that new jobs run. Earlier versions are kept as history, and jobs already in progress keep the exact routing they started with.
Manage routings when you are setting up how a type of work is made, when the floor steps change and you need a new version, or when you want to require sign-off before that work can begin. Routings are defined here in master data and then assigned directly on inbound items and jobs — not via the process. A process never carries or implies a routing.
Before you start
The Routings page lives in master-data settings. To open it, go to Settings, open the Master Data group, and select Routings. The page address ends in /settings/master-data/routings.
You need permission to work with routings:
- View the list requires the
routings.viewpermission. - Add, edit, publish, duplicate, disable, enable, and delete routings require the
routings.create,routings.update, androutings.deletepermissions. - Viewing the routing editor's Jobs tab requires
production_jobs.view. - Using Update to live revision requires
production_jobs.updateas well as routing access.
These management permissions are granted by the built-in Super user, Entity admin, Manager, and Master data roles. The Tablet user and Invoicing roles can view routings but not change them. If the Add Routing button or the per-routing actions are missing, ask an administrator to adjust your role.
Routings are per site. A routing belongs to the entity (site) you are working in, so each site keeps its own routings and versions. Switch site first if you need to manage another plant's routings.
Set the invoice timing first
Before you can create the first routing for a site, that site's production invoice timing must be configured. If it is not, saving a new routing returns the error "Configure production invoice timing before creating routings for this entity." Set the timing on the entity's invoicing profile, then return here. Once any routing exists for the site, the timing is locked so it stays consistent with the routings that depend on it.
administration.master-data.routings-01
What the Routings page shows
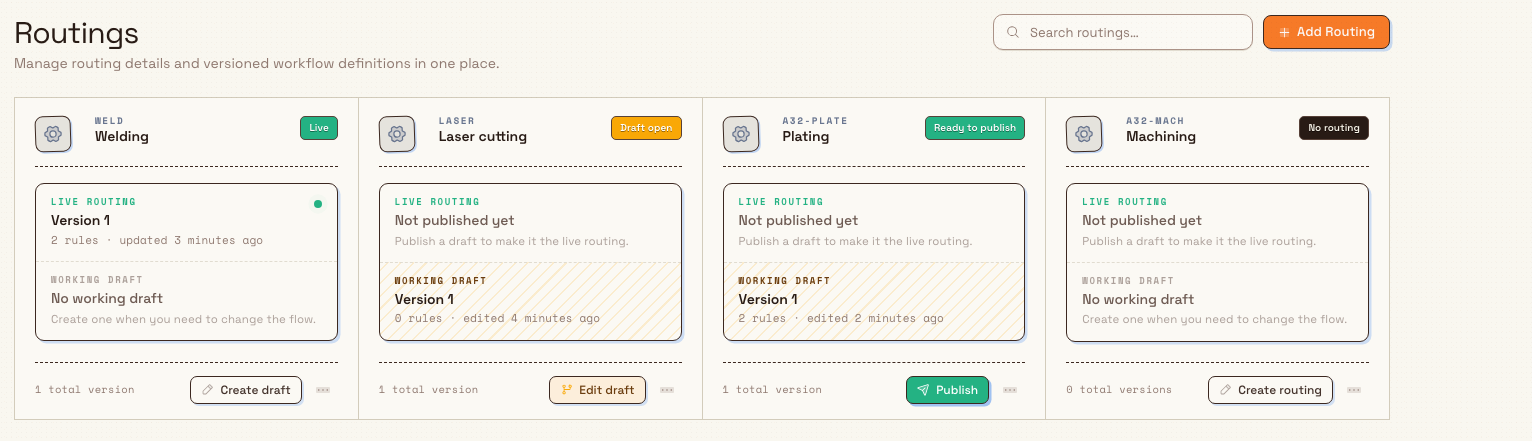
Each routing is a tile in a grid. A tile shows:
- The routing icon, its short code (for example
TENS), and its name. - A status badge for where the routing is right now: Live, Ready to publish, Draft open, Publish blocked, No routing, or Disabled.
- A Live routing row — the version new jobs currently run, or "Not published yet" when nothing has been published.
- A Working draft row — the version you are editing, or "No working draft" when there is no draft open.
- A footer with the total version count and the main action for that tile.
Use the Search routings… box in the header to filter the list by name or code as you type. Filtering happens on the server, so the tiles shown are exactly the matches.
If the site has no routings yet, the page shows a Create your first routing starting point with an Add Routing button.
The version lifecycle
Every routing moves its versions through the same states. Understanding them makes the tile badges and buttons predictable:
- Draft — an editable working version. You lay out the steps but they are not yet runnable.
- Compiled — the draft has been turned into runnable steps (Bulk calls this compiling). A compiled draft is ready to become live.
- Live (Active) — the single published version that new jobs run. There is at most one live version per routing.
- Archived — a retired version kept for history. Disabling a routing archives its versions.
A routing therefore has two working slots at once: the live routing that jobs use today, and an optional working draft you are preparing to replace it with. Publishing a compiled draft makes it the new live version; the previous live version becomes history.
Add a routing
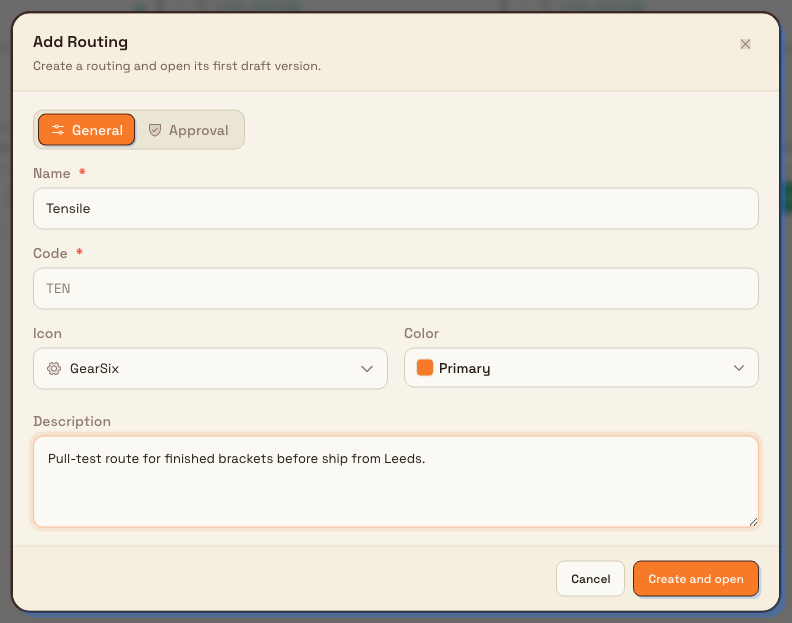
- Select Add Routing. The Add Routing dialog opens with two tabs, General and Approval.
- On the General tab, fill in the details:
- Name — the readable name, up to 100 characters (for example
Tensile). - Code — a short unique code, up to 20 characters, using letters, numbers, dashes, and underscores. When you are adding a routing the code is generated from the name for you and shown read-only.
- Icon — an icon for the tile, chosen from the list.
- Color — an accent color for the tile.
- Description — optional notes for this routing.
- Name — the readable name, up to 100 characters (for example
- Open the Approval tab if this work needs sign-off before it can start (see the next section). You can leave approval off and add it later.
- Select Create and open.
Bulk creates the routing together with its first draft version and opens the routing editor so you can build the steps. A confirmation reads "Routing created".
Require approval (optional)
On the Approval tab, turn on Requires approval to say that "Work on this routing must be approved before it can start production." Three more choices appear:
- Approvers — the people who can sign it off. Select at least one.
- How must they approve? — choose Any one of them (a single approver is enough), In order (approvers sign off one after another in the order you list them), or Everyone (all approvers must sign off, in any order). With In order, you can reorder the approver list.
- When changes are requested — choose Start over on resubmit (approvals given so far are cleared) or Keep approvals already given.
Approval policy is saved together with the routing details in one step, so a change either applies fully or not at all.
Approval changes are checked during inbound submission
Large inbound documents submit in the background, even if the planner closes the browser. Bulk checks every routing's approval policy again before it publishes the approval requests. If you change a policy while a submission is being prepared, that submission stops safely and asks the planner to retry; it does not publish a mixture of old and new approval rules.
administration.master-data.routings-02
Build and publish a version
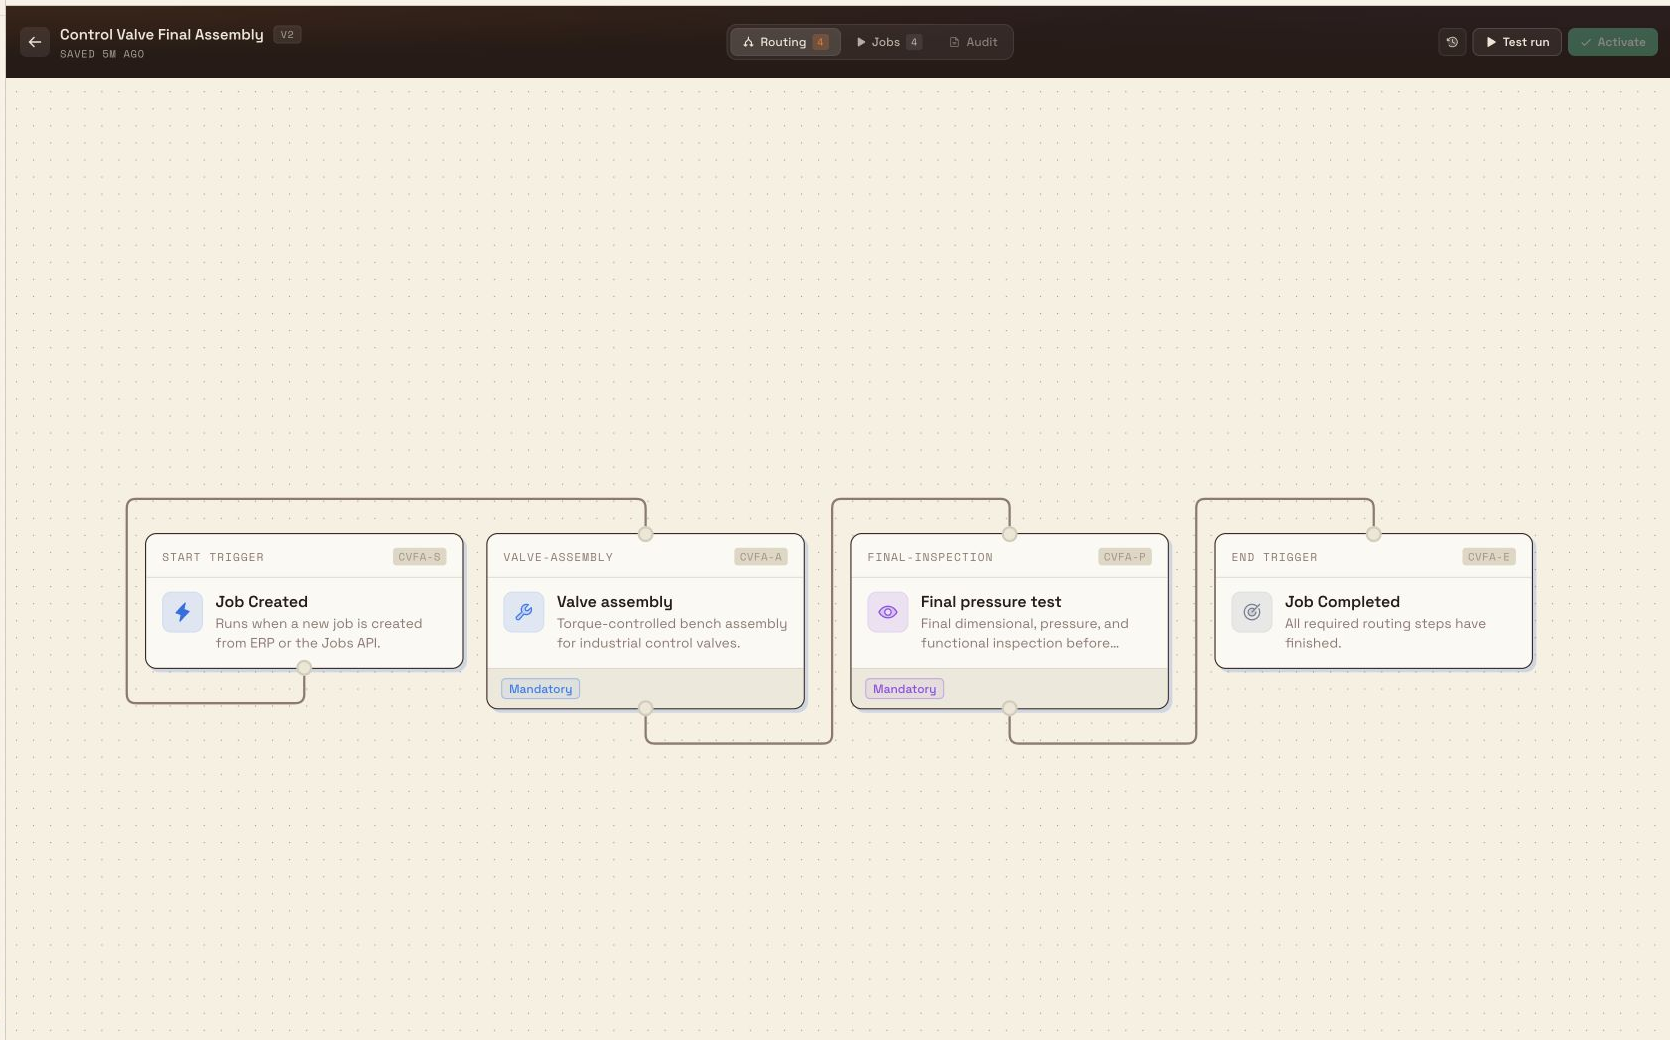
Opening a routing takes you to the routing editor, where you lay the steps out on a canvas and connect them into the flow a job will follow. The editor header has Routing, Jobs, and Audit tabs. Routing and Jobs are available; Audit is visible but disabled.
- Build or change the flow on the Routing canvas.
- Select Save & Compile to save your work and turn the flow into runnable steps. If the flow has problems, compiling reports the errors so you can fix them.
- Once the version is compiled and saved, select Activate to make it the live version.
When you use a Conditional split, connect every named branch, Else, and the red Error / Review outlet. A valid false result continues to the next branch and then Else; a formula or data evaluation failure takes only the Error / Review path. When you use a Repeat group, set Maximum passes (including the first pass) and connect both Complete and the red Exception / Review outlet. A satisfied exit condition takes Complete; reaching the pass limit or failing to evaluate the exit condition takes Exception / Review.
After a successful compile, the results dialog shows a Flow map. Its colored path labels distinguish normal branches, Else, review paths, repeat members, and shared downstream work. Step order, operation, resource, duration, requirements, modes, items, and dependencies stay visible so you can check the runnable result before activation.
administration.master-data.routings-03
Review paths are required
Save & Compile stays blocked until every Conditional split has one Error / Review connection and every Repeat group has one Exception / Review connection. The affected node is highlighted with the exact connection to add.
You can also publish from the Routings list. When a tile shows the Ready to publish badge, a Publish button appears on it; selecting it makes the compiled draft live in one step, with the confirmation "Routing published and activated". Both paths reach the same result: the compiled draft becomes the single live version new jobs run.
A dry-run test is planned, not yet available
The editor shows a Test run button for trying a routing against a sample job before publishing. That dry-run is not available yet — selecting it only tells you so. Until it ships, verify a routing by publishing it and running a real job through it, or by reviewing the compiled steps.
Manage an existing routing
Each tile has a main action plus a menu (the three-dots button) with the rest. Which options appear depends on the routing's state and your permissions.
- Continue / open the draft — the tile's main button opens the working draft in the editor. Its label follows the state: Create routing (no version yet), Create draft (a live version exists but no draft), or Edit draft and Continue draft (a draft is open).
- Publish — shown on the tile when a compiled draft is Ready to publish; makes that draft live.
- Edit details — reopens the details dialog (titled Edit Routing) to change the name, code, icon, color, description, or approval policy. This changes the routing's details across production and settings; it does not change the step flow.
- Duplicate — copies the routing into a brand-new routing with a draft copy of its working, live, or latest version. Useful as a starting point for a similar workflow.
- View history — opens the version history, listing every version with its status badge (Active, Compiled, Draft, or Archived).
- Disable — retires the routing (see below).
- Enable — brings a disabled routing back (see below).
- Delete — permanently removes a routing that has nothing depending on it (see below).
Disable a routing
Disabling is how you retire a routing that is in use. Select Disable from the tile menu and confirm. The dialog explains that this "archives all versions for this routing" and that "Existing jobs keep their saved routing snapshot" — so work already on the floor is never disrupted. A disabled routing shows the Disabled badge and offers new jobs nothing until you enable it again. The confirmation reports how many versions were archived.
Enable a routing
Select Enable on a disabled routing to bring it back. Because disabling archived its versions, an enabled routing has no live version yet: the dialog notes that "Previous versions remain archived, so create a new version before using it for new jobs." After enabling, open the routing, build or copy a version, and publish it.
Delete a routing
Delete appears only when a routing has no versions and nothing else depends on it — in practice, after you have disabled it (which archives its versions) and no inbound items or jobs still reference it. Select Delete, then confirm in the Delete Routing dialog, which warns that the action "cannot be undone".
Deleting a routing is permanent
There is no restore button for a deleted routing. If a routing might be needed again, disable it instead — disabling keeps every version as history and lets you enable the routing later. Only delete a routing you are certain you will never need. Bulk blocks deletion while versions or live work still depend on the routing, and tells you to disable it or reassign that work first.
Example: a tensile-test routing at Granite Peak Manufacturing
Granite Peak Manufacturing runs the Leeds Fabrication Plant, where finished brackets are pull-tested before they ship. Dana Winters sets up a routing for that test.
She opens Settings, then Master Data, then Routings, and selects Add Routing. On the General tab she enters the name Tensile; Bulk fills the code as TENS. She picks a gauge icon and a color, and adds a short description. Because pull-test results must be signed off before the batch is released, she opens the Approval tab, turns on Requires approval, adds the quality lead as the approver, and leaves How must they approve? on Any one of them. She selects Create and open.
In the editor she lays out the steps — load the sample, run the test, record the result, check it against the limit — then selects Save & Compile. With the version compiled, she selects Activate, and the tile now shows Live. Months later, when the test limit changes, she opens the routing, which offers Create draft; she edits the new draft, compiles it, and publishes it. The updated version becomes live, the old one moves to history, and any brackets already mid-test keep the routing they started on.
Update existing jobs to a new live revision
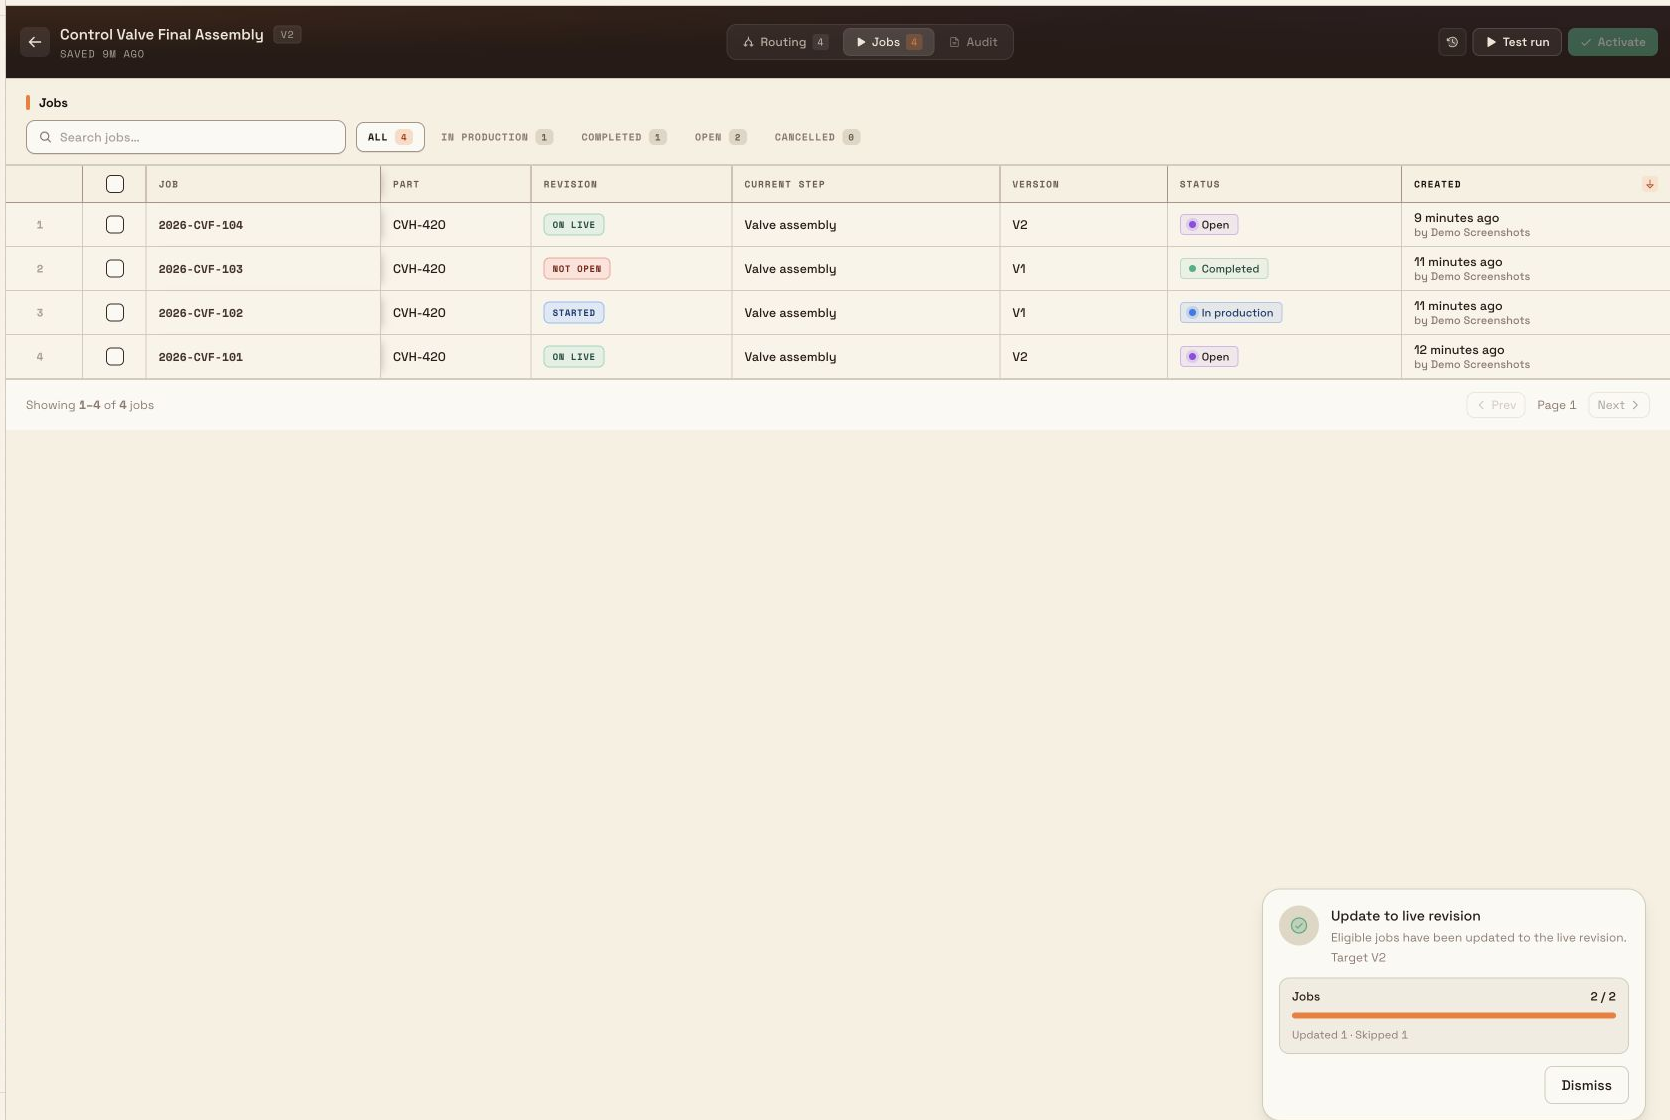
After you publish a new live version, jobs that have not started work can be moved onto that revision from the routing editor Jobs tab. The list shows 25 jobs per page. Status filters apply to the complete routing family, while Search jobs… filters only the page currently loaded. It matches the job number, part number, current step name, and routing version on that page. Browse to another page to search other rows.
- Open the routing and select the Jobs tab.
- Select the jobs to update. Selection remains when you move between pages. To update every eligible job in the current status filter, clear search, select every row on the page, then choose Select all N eligible when Bulk offers it.
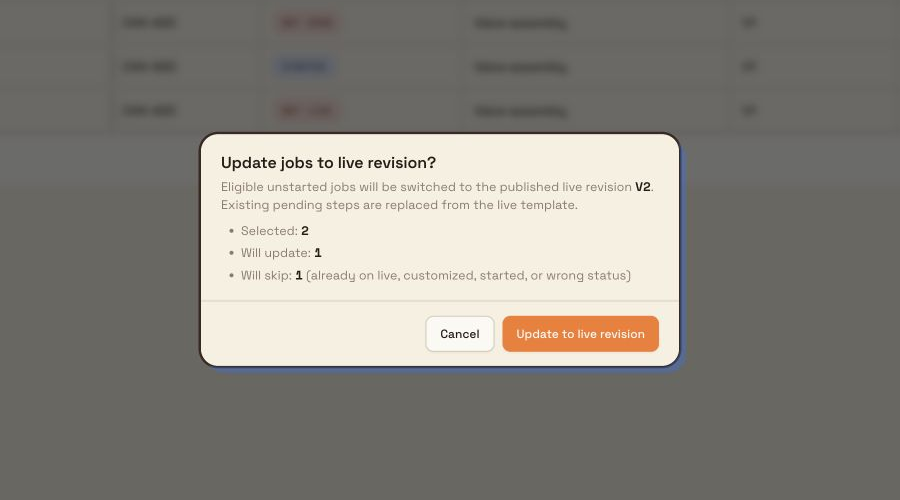
- Choose Update to live revision. The confirmation shows the selected, eligible, and skipped counts for an explicit selection. For Select all N eligible, it confirms the current-filter scan.
- Confirm the update. Bulk queues the work and shows a progress panel with updated, skipped, and failed counts. The panel stays visible when you switch between Routing and Jobs. You can cancel while it is running and dismiss it after it finishes.
administration.master-data.routings-04
Bulk only updates jobs whose status is Open or In production, whose routing has not been customized, whose steps have not started or recorded activity, and which are not already on the live revision. For each eligible job, Bulk replaces its pending steps from the published live routing template; this is more than changing the revision label. Bulk checks the rules again while the background update runs, so a job that changes after confirmation is skipped safely. Jobs already mid-run keep the revision they started on.
administration.master-data.routings-05
Expected result
A published routing shows the Live badge on its tile, and its Live routing row names the active version. From that point, new jobs of that type run the live version's steps, and — if you set approval — the work waits for sign-off before it can start production. Drafts you are still preparing sit in the Working draft row without affecting live jobs until you publish them. Unstarted jobs can be moved onto a newly published live revision from the editor Jobs tab.
Feature state and limits
Managing routings is a generally available feature. Keep these behaviors in mind:
- Routings are per site (entity); they are not shared across sites.
- A site's production invoice timing must be set before its first routing can be created, and it is then locked.
- A routing can have only one live version at a time. Publishing a draft replaces the previous live version, which is kept as history.
- Jobs already in progress keep the routing snapshot they started with; publishing or disabling a routing does not change work already on the floor.
- A compiled draft can be blocked from publishing while jobs are still running the current live version.
- The editor's Jobs tab is available for reviewing jobs and moving eligible work to the live revision. Audit is visible but not available yet.
- The editor's Test run dry-run is not available yet.
Troubleshooting
- "Configure production invoice timing before creating routings for this entity." — the site has no invoice timing set. Configure it on the entity's invoicing profile, then create the routing.
- The tile shows "Publish blocked". — the compiled draft cannot go live yet. The working-draft row explains why. Common reasons are that the version is not compiled ("Routing must be compiled before publishing"), it has no steps ("Routing has no compiled rules"), or jobs are still running the current live version ("... job(s) are currently using the active routing"). Compile the draft, add steps, or wait for those jobs to finish, then publish.
- The Delete option is missing. — the routing still has versions or is assigned to inbound items or jobs. Disable the routing (which archives its versions) and reassign that work; Delete becomes available once nothing depends on it. The failed delete message names what is still in the way.
- Search finds no job even though the routing has it. — Search jobs filters only the current 25-row page. Use Prev or Next, then search that page, or use a status filter to narrow the complete routing family first.
- Some selected jobs were skipped. — Bulk rechecks eligibility before changing each job. A job is skipped if it is already on live, customized, started, no longer Open or In production, or otherwise no longer eligible.
- A routing shows "Disabled" and offers nothing to new jobs. — it was disabled and its versions archived. Enable it, then create and publish a new version before new jobs can use it.
- The Add Routing button or the tile actions are missing. — you have view-only access. Ask an administrator for a role that grants the routing management permissions.
Related
- Master data — the full set of master-data pages that feed production.
- Manage processes — work instructions selected independently of the routing on an item or job.
- Manage resources — the resources routing steps run on.
- Manage production modes and items — the items whose work follows a routing.
- Roles and permissions — grant the routing permissions to a role.
- Entity invoicing profile — set the production invoice timing a site needs before its first routing.
- Edit a job's routing — adjust the routing on a single job on the floor.
Manage parts
Create, find, edit, and remove the parts — the products and components made at a site — that production jobs, datasheets, and reports reference in Bulk.
Manage processes
Create, revise, approve, and organise versioned manufacturing process instructions in catalogues so planners always pick the correct controlled work method.