Manage forms
Create and maintain form templates for inbound documents, production orders, inbound items, and production jobs — sections, fields, categories, and the form builder.
A form is a reusable template of sections and fields that people fill in on inbound work and production work. You design the template once in master data; operators and planners then complete it on the records you attach it to. Forms are the place to standardize material certificates, purchase-order details, goods receipts, and similar structured data instead of leaving free text on every order.
Manage forms when you are setting up a site, when a document type needs new fields, or when you want one template to follow work from inbound through production. Forms are per site (entity): each plant keeps its own templates and field library.
Forms is in beta
In the Settings sidebar, Forms shows a Beta badge. The area is available and works for day-to-day setup, but layout, options, and wording can still change. Prefer Archive over permanent delete while you settle your templates, and treat starter templates as editable starting points rather than fixed standards.
Before you start
Open Settings, expand the Master Data group, and select Forms. The page address ends in /settings/master-data/forms. Opening a form takes you to the builder at /settings/master-data/forms/<form-id>.
You need permission to work with forms:
- View the list and open the builder requires
forms.view. - Create forms, import templates, duplicate, and manage categories requires
forms.create(and related create paths). - Edit forms, sections, fields, archive/restore, and reorder requires
forms.update. - Delete an empty form (no placed fields) requires
forms.delete.
These management permissions are granted by the built-in Super user, Entity admin, Manager, and Master data roles. If New form or the card actions are missing, ask an administrator to adjust your role.
Switch to the correct site before you start. Forms, categories, and the field library belong to the entity you are working in; they are not shared across plants.
What the Forms page shows
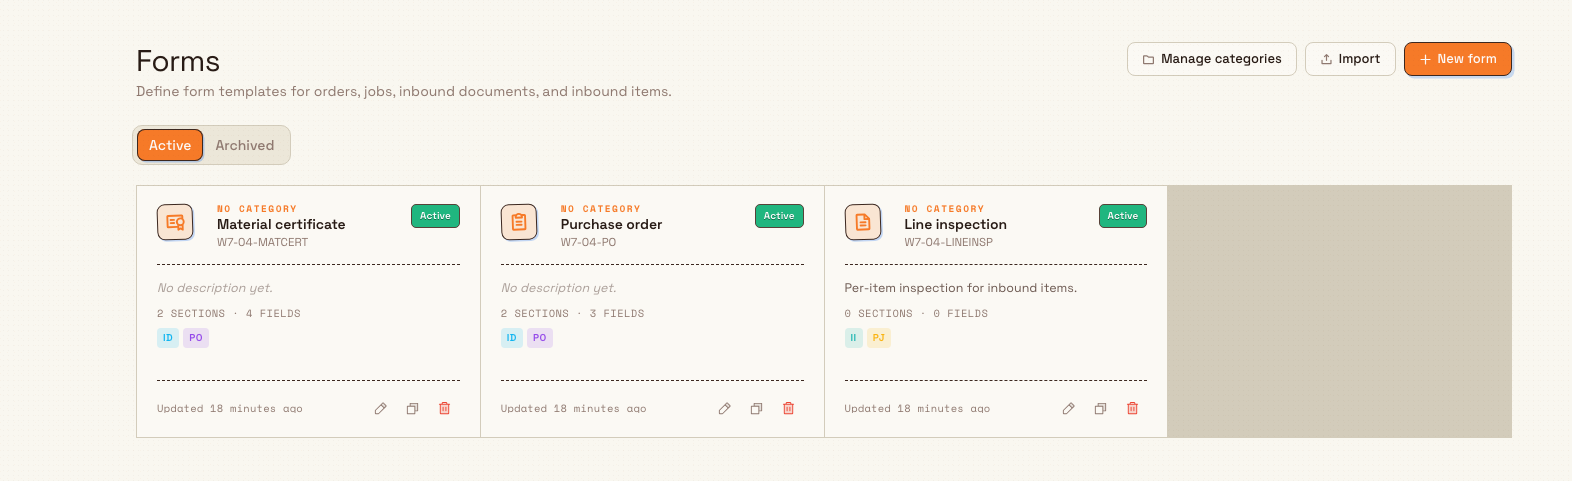
The page header is titled Forms, with the description: “Define form templates for orders, jobs, inbound documents, and inbound items.” Header actions are:
- Manage categories — open the categories dialog.
- Import — bring in a form from JSON or clone an existing form.
- New form — create a blank form and open the builder.
Below the header, Active and Archived tabs filter the list. Active forms are available to attach and fill; archived forms stay in the Archived tab until you restore them.
Each form is a card in a grid. A card shows:
- Category eyebrow (or “No category”), the form name, and its short code.
- An Active or Archived status badge.
- An optional description, or “No description yet.”
- Section and field counts (for example
2 sections · 4 fields). - Scope badges for where the form applies: Inbound Documents, Production Orders, Inbound Items, and/or Production Jobs.
- Updated relative time, plus icon actions to Edit, Duplicate, and Archive (or Restore when archived).
Select a card to open that form in the builder. If the site has no active forms yet, the page shows a first-form empty state with Create form, Import JSON, and starter templates (see Start from a template).
administration.master-data.forms-01
Choose the form flow
When you create or edit a form, the Flow tab sets where the filled form is available. There are two options:
| Flow | Label in the UI | What it means |
|---|---|---|
| Document + order (default) | Inbound documents + production orders | “One filled form follows from the inbound document to its production order.” Scope badges: Inbound Documents and Production Orders. |
| Item + job | Inbound items + production jobs | “One filled form follows from each inbound item to its production job.” Scope badges: Inbound Items and Production Jobs. |
Pick the flow that matches how work moves at your plant. You can change it later under Edit form → Flow, unless active filled forms already use a target you try to remove — Bulk then blocks the change with an error such as “Cannot remove production orders because active documents already use this form there.”
Create a form
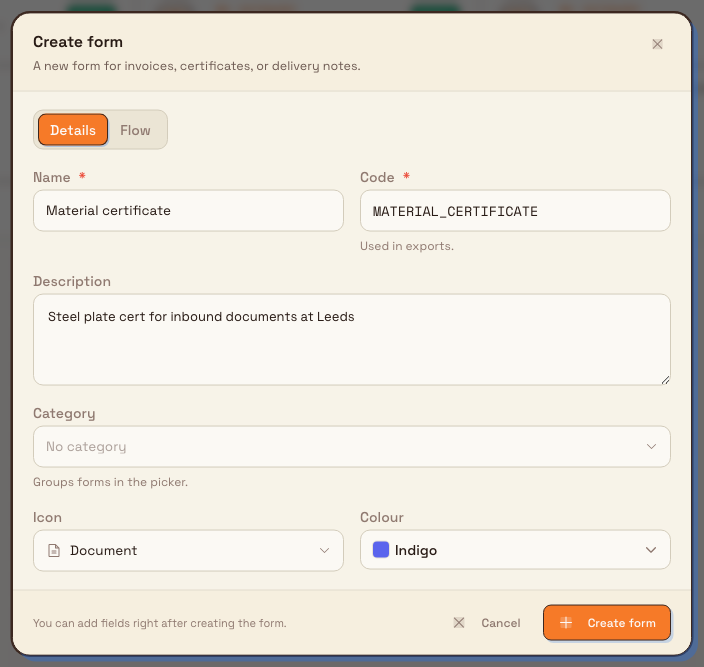
- Select New form (or Create form on the empty state). The Create form dialog opens.
- On the Details tab, fill in:
- Name (required) — for example
Material certificate. - Code (required) — a short uppercase code used in exports. Bulk generates it from the name (letters, numbers, underscores, up to 24 characters). You can edit it before save. Codes must be unique on the site; a clash shows “A form with this code already exists.”
- Description — optional purpose text.
- Category — optional group for pickers (“Groups forms in the picker.”).
- Icon and Colour — appearance on cards and chips.
- Name (required) — for example
- Open the Flow tab and choose Inbound documents + production orders or Inbound items + production jobs (see above). Default is documents + orders.
- Select Create form.
Bulk creates the form, seeds a first section named Details, shows “Form created”, and opens the form builder so you can add fields. The footer note on the dialog is: “You can add fields right after creating the form.”
administration.master-data.forms-02
Start from a template
When there are no active forms, the empty state offers Or start from a template. One click creates a form with a starter set of sections and fields and opens the builder. Built-in starters include:
- Invoice — Supplier, Invoice #, Due date, Total.
- Purchase order — PO number, Supplier, Delivery.
- Material cert — Part #, Heat #, Date, Inspector.
- Goods receipt — Delivery date, Carrier, Received by.
Toast on success: “Created <starter name>”. You can also apply a starter later from the builder empty state (“Let’s set up <form name>” → Or start from a template), which confirms how many sections and fields will be added before applying.
Starters are editable after creation — rename fields, change data types (by adding the right type), and adjust flow like any other form.
Build sections and fields
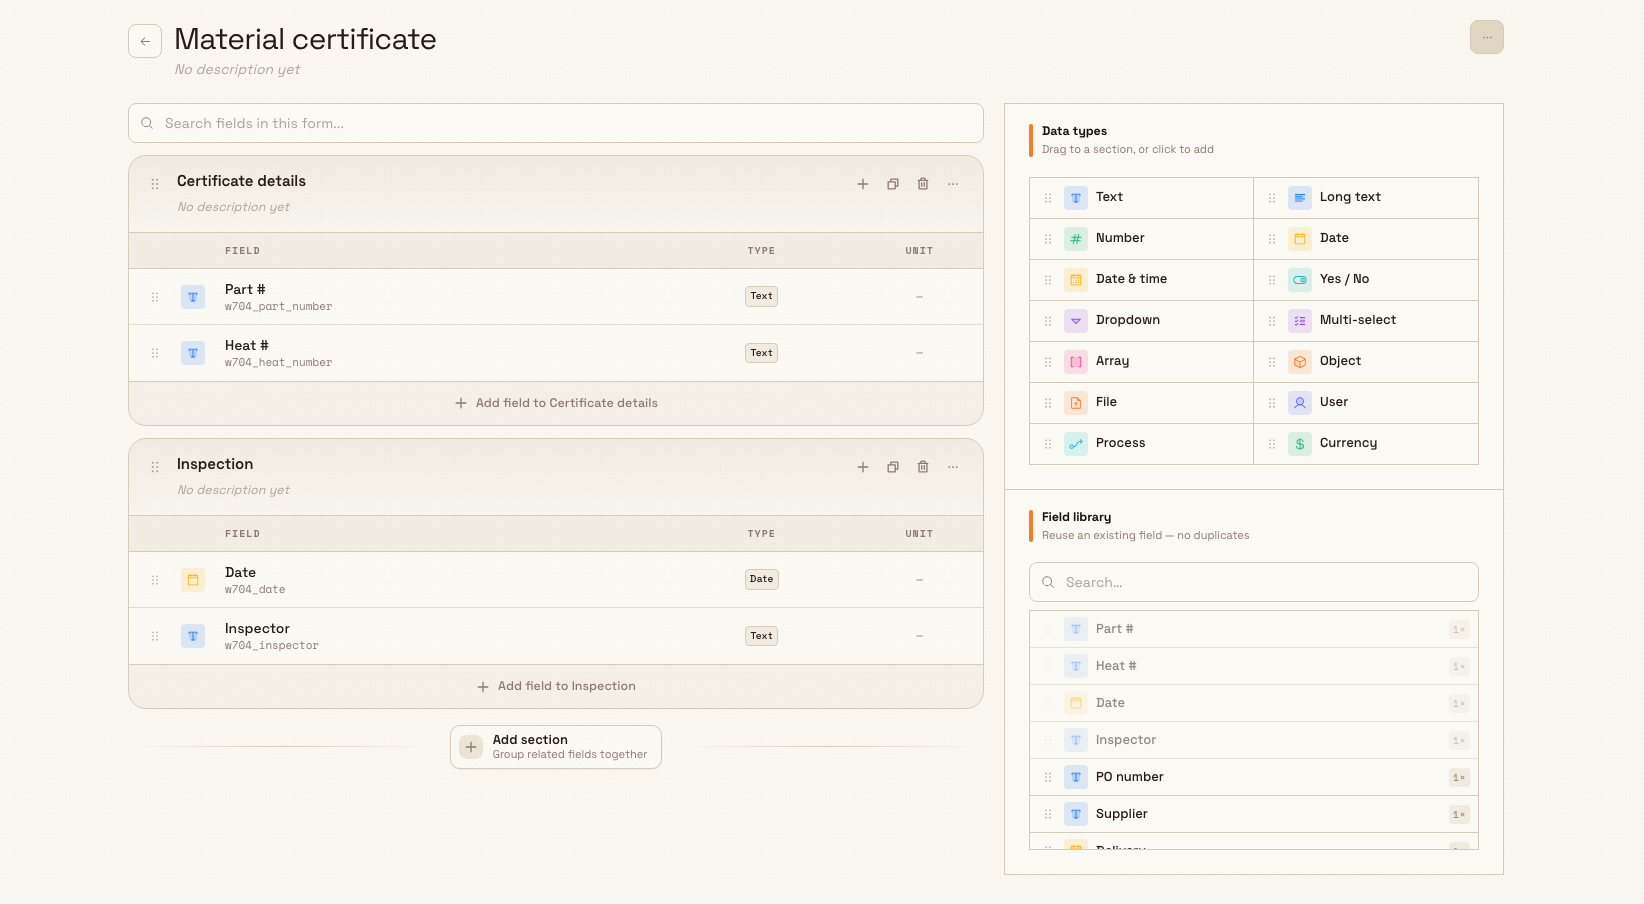
The form builder is where you define what people fill in. The canvas shows sections (groups of fields). The right-hand panel is either the field palette (when nothing is selected) or the field inspector (when a field is selected).
Sections
- A new form starts with one section named Details.
- Use Add section to add another section (new sections are named New section until you rename them).
- Double-click a section title to rename it; double-click the description line to edit help text.
- Section toolbar: Add field, Duplicate section, Delete section.
- Drag sections to reorder them.
- Deleting a section removes its placements from this form but keeps the underlying field definitions in the field library.
Add fields
From the right-hand Data types palette (“Drag to a section, or click to add”), drag a type onto a section or click it to add to the first section. Available input types and their UI labels:
| Type key | Label shown |
|---|---|
| string | Text |
| longtext | Long text |
| number | Number |
| date | Date |
| datetime | Date & time |
| boolean | Yes / No |
| select | Dropdown |
| multi | Multi-select |
| array | Array |
| object | Object |
| file | File |
| user | User |
| processes | Process |
| currency | Currency |
New fields are labeled New field 1, New field 2, and so on until you rename them. You can also use Add field on a section card.
Field library
Below data types, Field library lists reusable fields across forms on this site (“Reuse an existing field — no duplicates”). Search by label or key. Click or drag a library field into a section to place it without creating a second definition. Unused library fields can be deleted from the library when they are not placed on any form.
Field inspector
Select a placed field to open the inspector. Changes auto-save (status shows Auto-saves / Saving… / Saved). Tabs:
- Basic — Display label, Field key (auto from label; lowercase, no spaces), and Description help text.
- Type — shows the fixed input type for this field and type-specific options (for example dropdown choices, number min/max, date defaults).
- Rules — Required (“Docs can't be created without a value.”), Editable after create (“Users can change the value later.”), and conditional visibility rules relative to other fields on the same form.
For a Process field, the Type tab also sets its Process catalogue. Choose All catalogues or Specific catalogue; the specific picker includes Uncatalogued and disables catalogues that are being deleted. The input offers active Approved processes in that scope and saves a revision snapshot. A value already stored on a filled form remains visible if that revision is later made inactive or loses approval.
Remove from section unplaces the field from this section without deleting the library definition.
Use Search fields in this form… above the canvas when a form has many fields.
Required inbound item forms lock during submission
When an inbound document is submitted, Bulk checks each required item form again before including that item. Once checked, the filled form is temporarily locked while the background submission finishes. If a required value changed just before the lock, the submission stops so the planner can correct it and retry instead of creating work from incomplete information.
administration.master-data.forms-03
Manage an existing form
From the list
On each card:
- Open (click the card) — open the builder.
- Edit (pencil) — Edit form dialog: change name, description, category, icon, colour, and flow. The code is fixed after creation (“Fixed after creation.”). Saves with “Form updated”.
- Duplicate — Duplicate form dialog; default name is
\<name\> (copy). Optionally Copy sections & fields. Opens the new form in the builder; toast “Type duplicated”. - Archive / Restore — moves the form between the Active and Archived tabs; toasts “Form archived” or “Form restored”.
From the builder menu
The more-actions menu on the form header includes:
- Edit type — same as Edit form.
- Duplicate.
- Import fields… — pull fields into this form from another source.
- Export as JSON — export the template as JSON or CSV for backup or import elsewhere.
- Archive type / Unarchive type.
- Delete type — enabled only when the form has no placed fields (
can_delete). Backend error if fields remain: “Cannot delete a form that still has fields. Archive it instead.” Confirming delete warns that filled forms already created from this template keep their saved data; toast “Form deleted”.
Prefer Archive for templates that have been used in production. Deletion is for empty or unused shells only.
Manage categories
Select Manage categories to open Manage form categories (“Create categories, then assign forms to them.”). You can:
- Add a category with Name, optional description, and Colour, then Add (toast “Category created”).
- Edit or reorder existing categories.
- Delete a category only when no forms still use it; otherwise Bulk returns “Move forms out of this category before deleting it.”
Assign a category on create or edit so forms group cleanly in pickers.
Import and export
- Import (list or empty state) opens Import form: paste or upload a JSON export, or Clone from form an existing template on this site. Success for JSON import: “Imported <name>”; the builder opens for the new form.
- Export as JSON in the builder serializes the form for download or clipboard copy (JSON or CSV). Use export + import to copy a template between sites or environments, or keep a backup of a settled design.
Example: material certificate at Leeds
Granite Peak Manufacturing’s Leeds Fabrication Plant needs a standard certificate when steel plate arrives.
Dana Winters opens Settings → Master Data → Forms (Beta). She selects New form, names it Material certificate, leaves the auto code, picks a quality category, and keeps the default flow Inbound documents + production orders so the filled cert follows from the inbound document onto the production order. She selects Create form.
In the builder she renames the Details section to Certificate details, adds Text fields for Part # and Heat #, a Date field, and a User field for the inspector. She marks Part # and Heat # as Required. After a week of use she archives an experimental draft form from the list (toast “Form archived”) so only the live certificate remains on the Active tab.
Expected result
- Active forms appear as cards on the Active tab with the correct name, code, counts, and scope badges.
- Opening a form shows sections and fields in the builder; new data types appear as placed fields and in the field library for reuse.
- Archived forms move to the Archived tab and can be restored.
- Templates you design here become the forms people fill on inbound documents/items and production orders/jobs for that site.
Feature state and limits
Forms master data is available in product navigation and permissions, and is labeled Beta in the Settings sidebar. Keep these behaviors in mind:
- Forms, categories, and the field library are per site, not organization-wide.
- A form’s code is unique per site and is fixed in the edit dialog after creation (you can still set it freely when creating or duplicating).
- Delete type is only available when the form has no placed fields; use Archive for templates that still have structure or history.
- Changing Flow cannot drop a target that still has active filled form instances linked there.
- Field input type is fixed after the field is created; to change type, remove the field and add a new one of the desired type.
- The separate Inbound forms route redirects to this same Forms page; there is not a second master-data list for inbound-only templates.
Troubleshooting
- Permission error or the Forms area is missing. You need
forms.view(and create/update/delete for changes). Ask an administrator for Master data, Entity admin, Manager, or Super user. - “A form with this code already exists.” Choose another code or archive/delete the conflicting form on this site.
- Delete type is disabled or “Cannot delete a form that still has fields. Archive it instead.” Remove all field placements (or archive the form). Empty shells can be deleted permanently.
- Cannot change flow / remove a scope. Active filled forms still use that target. Retire those instances or keep the target until work is finished.
- “Move forms out of this category before deleting it.” Reassign or clear the category on every form that uses it, then delete the category.
- “Create a section first” when adding a field. Add a section (or use a form that still has its Details section), then drag or click a data type.
- A form created at another plant does not appear here. Forms are per site. Switch entity or recreate/import the template on this plant.
Related
- Master data — all master-data areas, including Forms and Datasheets (also Beta).
- Manage custom fields and dates — related extra fields used outside form templates.
- Manage datasheets — spreadsheet-style templates for production orders (also Beta).
- Configure inbound forms — inbound-side configuration that uses these templates.
- Roles and permissions — grant
forms.view/forms.create/forms.update/forms.delete. - Manage entities — sites that own per-entity forms.
Manage custom fields and dates
Define extra fields and milestone dates for inbound work, production, and master data so operators capture the details your site needs on every record.
Manage datasheets
Create, build, publish, and archive spreadsheet-style datasheet templates with formulas, validation, and version history for production records.