Manage assets and layouts
Set up the equipment on your shop floor in Bulk — asset types, asset lines, individual assets, multi-stations, and sensors — and design the operator screen layouts each asset type uses.
The Assets page is where you describe the physical equipment on your shop floor to Bulk. In a Manufacturing Execution System (MES), an asset is a machine or workstation that operators clock into to do work — a laser cutter, a packing bench, or an inspection station. This page lets you create those assets, classify them, group them, and — for each kind of equipment — design the exact screen layout operators see while they work.
Everything on this page lives at one site (in Bulk, a site is called an entity). The assets, asset types, and layouts you configure here apply to the entity you are currently working in, not the whole organization.
Use this page when you are setting up a new plant, adding a machine, changing how an operator's screen is arranged, or connecting a shop-floor sensor to a machine.
Before you start
The Assets page lives in settings. To open it, go to Settings, open the Master Data group, and select Assets. The page opens at /settings/master-data/assets.
You need permission to view and to change asset data:
- Viewing asset types, asset lines, and assets requires the
asset_types.viewandassets.viewpermissions. Seeing the Sensors tab additionally requiresasset_sensors.view. - Adding, editing, duplicating, and deleting require the matching
create,update, anddeletepermissions (asset_types.*,assets.*, andasset_sensors.*). - Editing the layouts and behaviour of an asset type requires
asset_type_layouts.*,asset_type_home_layouts.*, andasset_type_load_job_configs.*.
Full management of assets and layouts is granted by the built-in Super user, Entity admin, Manager, and Master data roles. Some roles, such as Tablet user and Invoicing, get read-only access. If the Add button is missing or disabled, ask an administrator to adjust your role.
administration.master-data.assets-layouts-01
What you can manage here
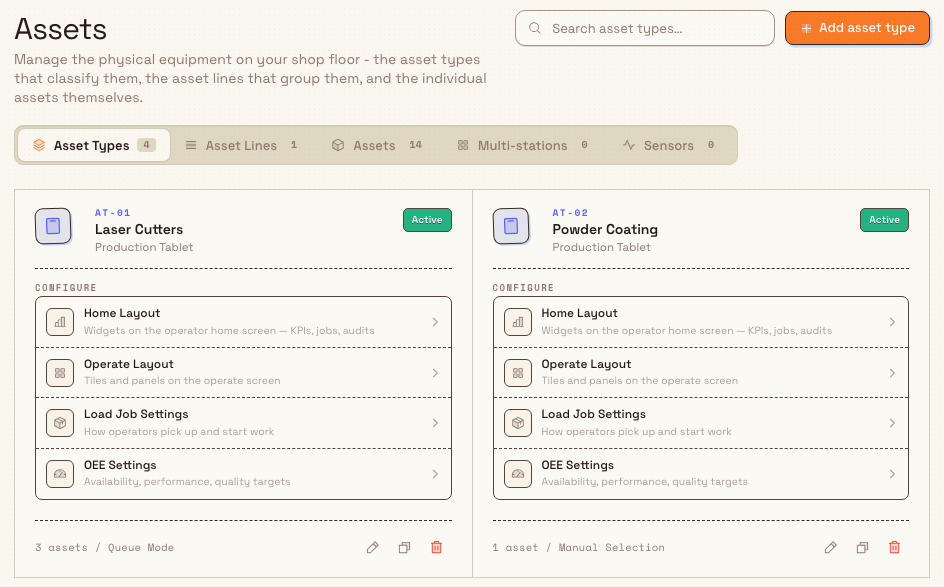
The page is organised into five tabs. Each tab shows a live count and its own Add button. Search is available on the list and card views; the Asset Lines tab uses a visual board instead.
- Asset Types — the kinds of equipment on your floor, such as Laser Cutters or Packing Benches. An asset type decides how every asset of that kind behaves: which operator screens appear, how jobs are picked up, and how the layouts are arranged. Every asset belongs to exactly one asset type.
- Asset Lines — a way to bundle related assets so they appear as one group on the operator's selection screen and roll up together in reporting. For example, all four cutting bays can share one "Cutting" line. Assets can belong to a line, but do not have to.
- Assets — the individual physical units operators clock into. Each asset has a unique Code, a Name, an asset type, and, optionally, an asset line.
- Multi-stations — a way to combine several physical assets onto a single operator screen without creating a separate asset or code. Use this when one operator works several bays at once.
- Sensors — a link between a shop-floor reading (such as on/off, temperature, or vibration) and an asset, so live status and numeric values can be shown against that machine.
Each tab uses the view that best fits its data: cards for asset types, a drag-and-drop board for asset lines, and searchable lists for individual assets and multi-stations. Use an item's menu or action buttons to edit, duplicate, or delete it. On the Assets tab, Add many opens a spreadsheet-style grid for creating several assets together.
Arrange asset lines and assets
The Asset Lines tab shows each line as a group containing its assigned assets. Use this board to control how lines and assets are presented to operators.
- Drag the handle beside an asset-line name to move the whole line before or after another line. Bulk saves the order immediately.
- Drag an asset within a line to change its position, or drag it to another line to reassign it. Assets that do not belong to a line appear in Unassigned.
- Open the production Select Asset screen to check the result. Its line sections and line filter follow the line order saved here, and assets within each section follow the asset order from this board.
This order is shared master data, not a personal view. A change affects everyone using the desktop production Select Asset page at this site. It does not rearrange the Home or Operate layouts, which are configured separately for each asset type.
You need assets.update permission to save line order, asset order, or an asset's move to another line.

administration.master-data.assets-layouts-06
Add an asset type
- On the Asset Types tab, select Add asset type. The Create Asset Type dialog opens.
- Fill in the fields:
- Name — the readable name, up to 100 characters (for example
Laser Cutters). - Workstation Type — the operator experience for this equipment. The choices are Production Tablet (standard production with jobs, batches, and timers), Fulfillment Workstation (order fulfilment with order navigation and no timers), Invoicing Workstation (order invoicing with a pricing editor and no timers), and Peaking Station (scan an order, then book jobs in or out on a single recording bench). You cannot change the workstation type after the asset type is created.
- Loading Type — how work reaches the asset: Manual Selection (the operator browses and picks jobs) or Queue Mode (jobs appear in a sorted queue by priority or due date). A third option, Planned, is shown but disabled because it is not yet available.
- Allowed Resources — which resources this asset type can handle. A resource is a category of work, such as cutting or coating; see the linked Resources guide. At least one resource is required.
- Description — optional notes.
- Name — the readable name, up to 100 characters (for example
- Select Create.
Workstation type and loading type are fixed after creation
The Workstation Type and Loading Type fields are locked once an asset type exists — the dialog shows them as read-only when you edit. Choose them carefully, or duplicate the asset type to start from a copy with different settings.
Edit an asset type's behaviour
Selecting Edit on an asset-type card opens the Edit Asset Type dialog, which has three tabs:
- General — the name, allowed resources, and description (workstation and loading types are read-only here).
- Operational — labour assumptions used by capacity planning. Setup needs a person and Running needs operator coverage are switches; Assets one person can run sets how many machines one operator can cover (Bulk shows the resulting Person load per asset below). A Revenue attribution switch decides whether runtime on this asset type is counted when attributing job value in analytics.
- Workstation logout — controls what happens when a production screen is left inactive. Turn on Enable inactivity logout, then set the inactivity timeout and warning countdown. Choose Stop eligible state to end timers and downtime that can be stopped safely, or Keep all state running when production must continue after logout. Protected downtime reasons remain active in either mode.
Add an asset
- On the Assets tab, select Add asset. (This button is disabled until at least one asset type exists.)
- Fill in Code (a short unique identifier such as
LC-01), Name, Asset Type, an optional Asset Line, and an optional Description. - Select Create.
The Code must be unique within the entity. To add several assets quickly, use Add many and paste rows into the grid.
Add many assets from a spreadsheet
Use Add many when you already have an equipment list in Excel, Google Sheets, or another spreadsheet. You need assets.create permission.
- On the Assets tab, select Add many. A full-screen grid opens with five empty rows.
- Prepare one asset per row in this column order, select the first Code cell, and paste the data rows without column headings:
| Column | Required | Accepted value |
|---|---|---|
| Code | Yes | A site-unique code, up to 20 characters, using letters, numbers, hyphens, or underscores. Bulk saves letters in uppercase. |
| Name | Yes | The asset name, up to 100 characters. |
| Asset type | Yes | The name of an existing asset type at this site. Matching is not case-sensitive. |
| Asset line | No | The name of an existing asset line. Leave blank for an unassigned asset. Matching is not case-sensitive. |
| Description | No | Optional notes, up to 500 characters. |
The grid adds enough rows for the pasted block. You can also type into cells, choose asset types and lines from searchable lists, add a blank row, or remove a row.

administration.master-data.assets-layouts-05
- Check the row status:
- Ready means the row has passed the grid's checks and will be submitted for final validation.
- Not ready means a required value is missing or invalid. Select the status to see what needs fixing. Unknown asset-type or asset-line names and codes repeated within the pasted grid are highlighted.
- Check the footer, which shows how many rows are ready and how many need fixing. Blank rows are ignored. You can create at most 200 ready assets at a time; reduce the grid if the button shows Max 200 assets.
- Select Create N assets. Only ready rows are submitted. Rows that are not ready stay in the grid for correction.
Bulk creates every valid row it can. If some rows fail a final check — for example, because a code is already used by an existing asset or contains unsupported characters — successful rows disappear from the grid and failed rows remain with their error. Fix the remaining rows and select Create again. Do not paste the whole original block again: the successful assets already exist and would be reported as duplicate codes.
Design an asset type's layouts
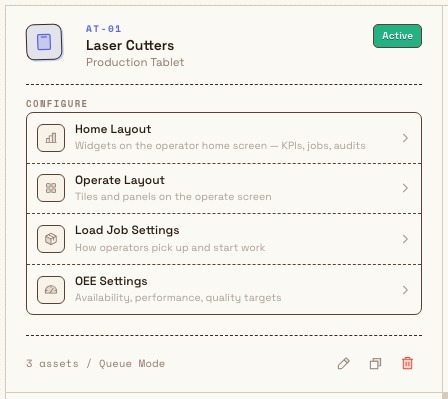
The "layouts" half of this page is reached from each asset-type card. Every card has a Configure list that opens the editors that shape what operators of that equipment see and do. A layout here is the arrangement of on-screen tiles — Bulk calls them widgets — that operators interact with during production.
administration.master-data.assets-layouts-02
The Configure list offers up to four surfaces:
- Home Layout — the widgets on the operator home screen, such as KPIs, jobs, and audits. This is the screen an operator sees before they start a job.
- Operate Layout — the tiles and panels on the operate screen, which the operator uses while a job is running.
- Load Job Settings — how operators pick up and start work on this equipment.
- OEE Settings — the availability, performance, and quality targets used to score this equipment. (OEE, or Overall Equipment Effectiveness, is a standard measure of how productively a machine runs.)
Which surfaces appear depends on the workstation type. A Peaking Station shows only Operate Layout and Load Job Settings. A Multi-station hides Home Layout, because it opens its own board instead of the operator home screen.
Edit the operate layout
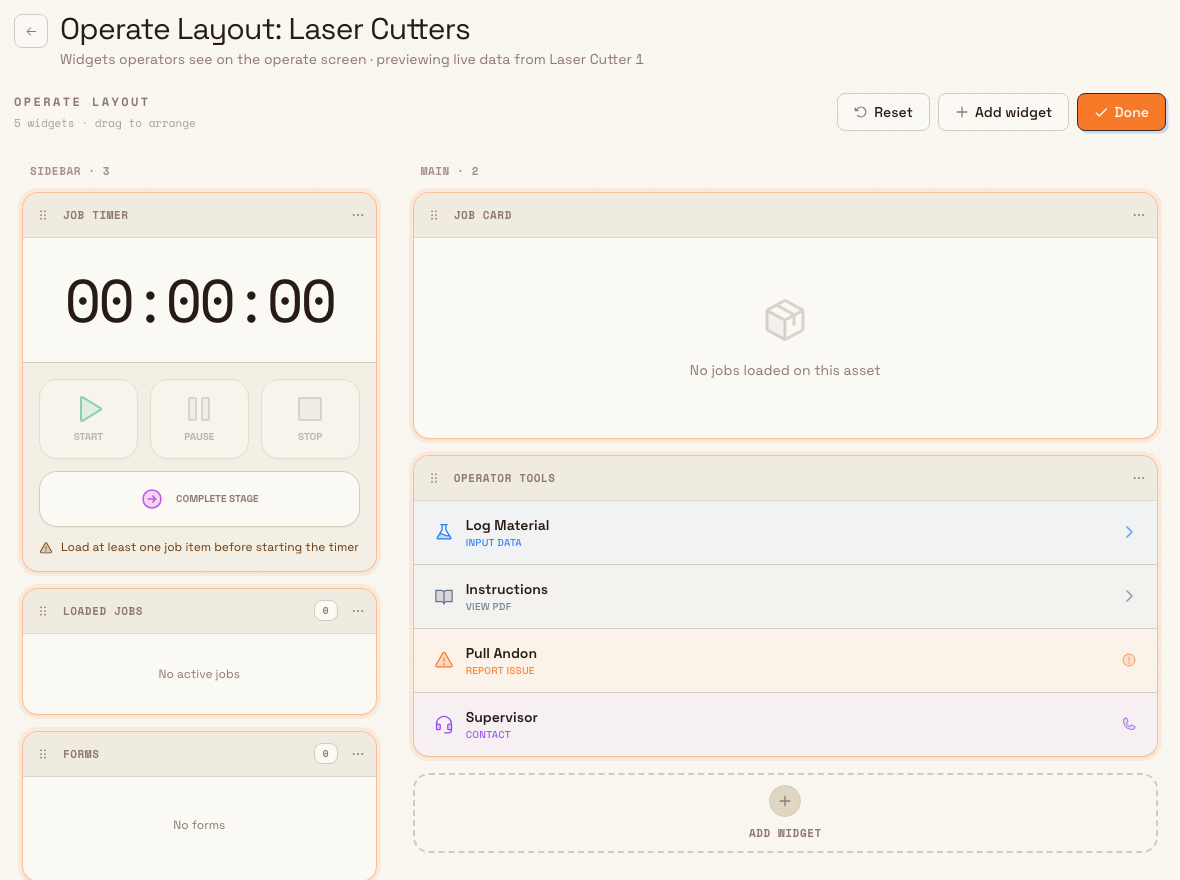
Selecting Operate Layout opens the layout editor for that asset type. The editor is a live draft of the operator's operate screen, split into a sidebar zone and a main zone.
- From an asset-type card's Configure list, select Operate Layout. The editor opens, titled
Operate Layout:followed by the asset type name. If at least one asset of the type exists, the editor previews live data from the first asset. - Use the toolbar to shape the board:
- Add widget — add a tile to a zone. The available widgets depend on the workstation type.
- Reset — restore the default widget arrangement for this workstation type. The reset is only applied when you press Done.
- Done — save the layout and return to the Assets page.
- If you leave with unsaved changes, Bulk asks whether to discard them.
When you save, Bulk confirms with "The layout applies to every asset of this type." A layout is defined once per asset type and shared by every asset of that type — you do not arrange screens machine by machine.
For a production tablet, Add widget can include an Attachments widget. It shows files from loaded jobs, their orders, and their source inbound documents. To show process instruction PDFs, add Options List and keep its Instructions tool enabled.
The Timer widget can use a current-time Start/Stop mode or an adjustable mode. Adjustable mode can allow earlier starts, earlier stops, or both. If starts are adjustable, set Max hours before now from 1 to 72.
administration.master-data.assets-layouts-03
Edit the Home layout
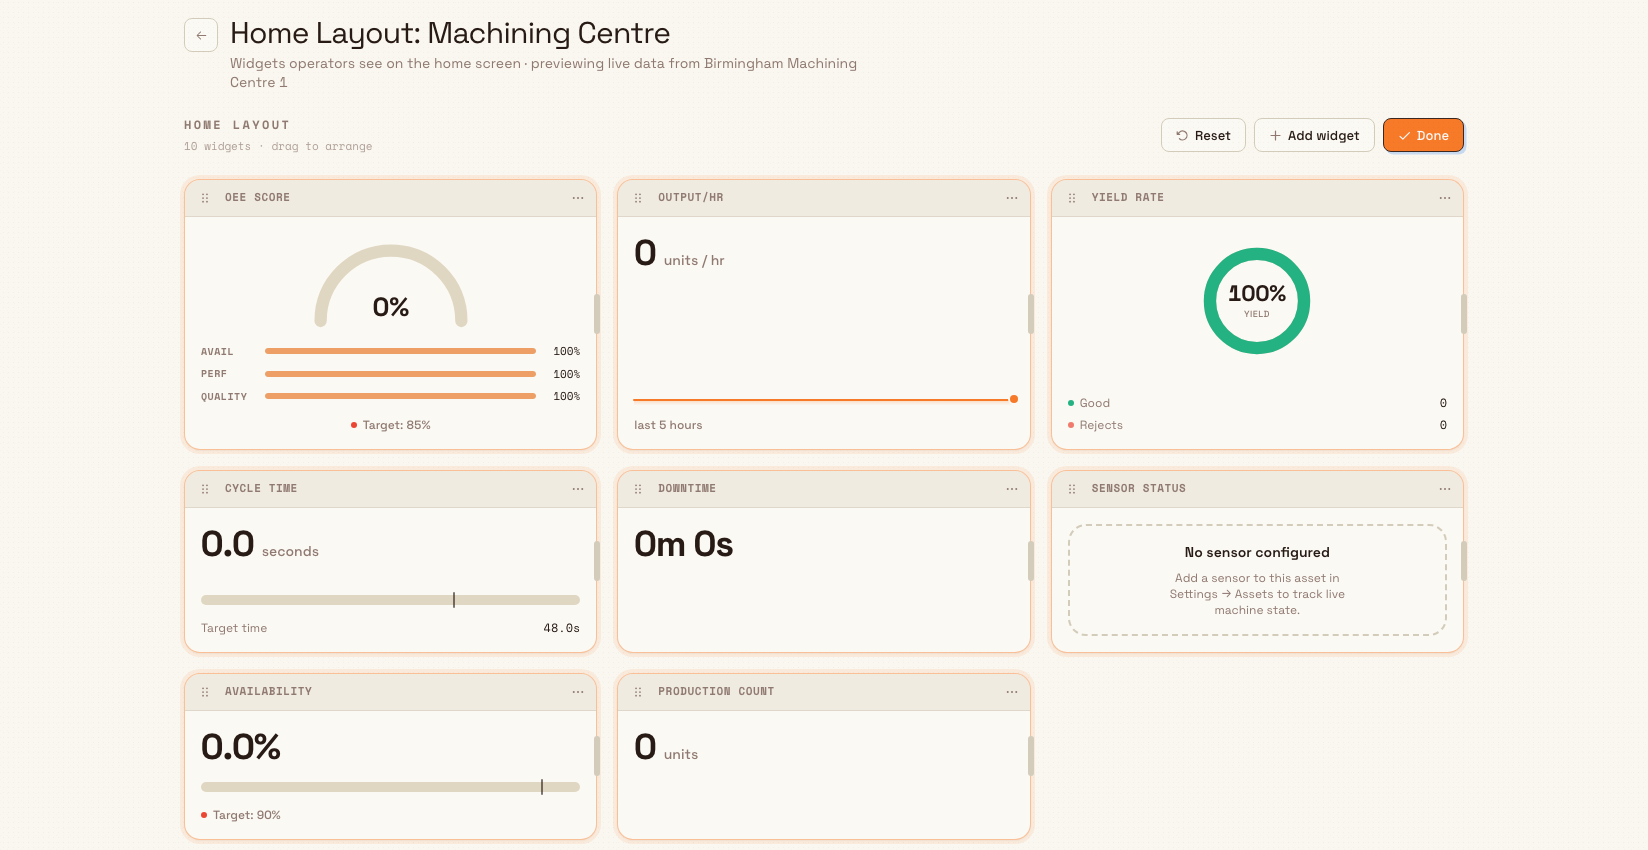
Home Layout controls the board an operator sees immediately after opening a workstation. It is separate from the Operate layout used while work is running.
- On the asset-type card, select Home Layout.
- Select Add widget to add jobs or orders, Asset Readiness, Downtime, or a KPI supported by that workstation type.
- Drag widgets to reorder them. Resize a widget from its menu, or configure the fields and values offered by that widget.
- Use Reset if you want the default arrangement. After you confirm, Bulk applies the reset immediately and keeps the editor open.
- Select Done to save and return to Assets.
administration.master-data.assets-layouts-04
The editor previews live data from the first asset of the type. The preview is not interactive, so selecting a job or action there does not change production. At least one asset of the type must exist before the editor can open.
There is no separate publish step. Done saves the layout and makes it the operator Home for every asset of that type. If you leave with unsaved changes, Bulk asks whether to keep editing or discard them.
If you only reset the layout, Done returns to Assets because the reset is already saved. Use Done to save any other draft changes.
The Home layout is fixed for operators. They can use actions inside its jobs, readiness, and downtime widgets, but they cannot rearrange the board. When OEE tracking is off, Downtime stays visible in the editor with an explanation and is hidden from operators.
Load Job Settings and OEE Settings open focused configuration pages rather than a widget board.
Example: setting up the Leeds Fabrication Plant
Granite Peak Manufacturing runs the Leeds Fabrication Plant, where sheet steel is cut, folded, and powder-coated. Dana Winters, the plant administrator, opens Settings, then Master Data, then Assets to set up the floor.
On the Asset Types tab she selects Add asset type and creates Laser Cutters with the Production Tablet workstation type and Queue Mode loading, allowing the "Cutting" resource. She creates a second type, Powder Coating, the same way with the "Coating" resource.
Next she groups the machines. On the Asset Lines tab she adds a line named Cutting Bays. Then on the Assets tab she adds LC-01 (name "Laser Cutter 1"), LC-02, and LC-03, each with the Laser Cutters asset type and the Cutting Bays line.
Dana next opens Home Layout. She places Asset Readiness first, then Jobs, Downtime, and the KPIs the shift uses. She selects Done, so the same Home board appears on all three cutters.
For the Operate screen, Dana arranges a Timer in the sidebar and adds the Job
Card, Attachments, and Options List to the main area. Finally, on the
Operational tab she sets Assets one person can run to 3.
Expected result
After you save, each item appears immediately in its tab with an Active status pill and the correct count in the tab strip. New assets become selectable on the operator's asset selection screen, grouped under their asset line. Layout changes take effect for every asset of the type the next time an operator opens that screen. Sensors begin accepting events for the asset once created and enabled.
Feature state and limits
Managing assets and layouts is a generally available feature. Keep these behaviours in mind:
- Assets, asset types, and layouts are scoped to a single entity (site). They do not carry across to other sites in your organization.
- An asset type's Workstation Type and Loading Type cannot be changed after creation. Duplicate the type to start from a copy.
- The Planned loading type is shown but not yet available for selection.
- An asset's Code must be unique within the entity, and an asset type's Name must be unique within the entity.
- Add many accepts at most 200 ready assets in one create action. Invalid rows do not stop valid rows from being created.
- A layout is defined per asset type and shared by every asset of that type; there is no per-asset layout.
- A Home layout needs at least one asset of the type so Bulk has live data to preview. Create the first asset before opening the editor.
- Duplicating an asset type copies its layout, stats cards, load-job settings, OEE settings, auto-logout settings, and audit assignments, but not the assets assigned to it. Duplicating an asset copies its configuration but not runtime state such as active jobs or the current operator.
Troubleshooting
- "Cannot delete asset type: N assets are still assigned to it." — an asset type can only be deleted once no assets use it. On the Assets tab, reassign those assets to another type (or delete them), then delete the asset type. The delete dialog warns of this before you confirm.
- Deleting an asset line fails while assets are assigned — the Delete Asset Line dialog states it "will fail if assets are still assigned to this line." Move those assets to another line (or to no line) first.
- A code or name is rejected as already existing — asset codes and asset-type names must be unique within the site. For an asset line, the message reads similar to
An asset line named "..." already exists in this facility. Choose a different value, or edit the existing record instead. - Some rows were created and others stayed in Add many. — this is expected when the final validation finds a problem in only part of the batch. Correct the rows that remain and create them again; rows that disappeared were already created.
- The Add asset button is disabled — every asset needs an asset type. Create an asset type first, then return to the Assets tab. The same applies to sensors: create an asset before adding a sensor.
- You cannot change the workstation or loading type when editing — these fields are locked after creation by design. Duplicate the asset type and set the values you want on the copy.
- Home Layout says no assets exist for this type — create an asset with this asset type, then open Home Layout again.
- A Home widget is missing for operators — check that it was saved with Done. The Downtime widget is intentionally hidden when OEE tracking is off.
Deleting removes the item and its configuration
Deleting an asset, asset type, asset line, multi-station, or sensor cannot be undone from this page. Deleting an asset type also removes its saved layouts and settings. If you only want to take equipment out of use temporarily, edit it and set it inactive instead of deleting it.
Related
- Master data — the full set of master-data setup pages for your site.
- Manage resources — the resources an asset type is allowed to handle.
- Configure naming conventions — control how codes and numbers are generated.
- Configure the asset board — the live board that reads from these assets.
- Configure downtime reasons — the reasons used with OEE tracking on assets.
- Select an asset or workstation — how operators choose an asset you set up here.
- Work across multiple stations — how a multi-station appears to operators.
- Review OEE assets — where asset performance is reported.
Manage pricing
Build reusable rate templates, keep a shared service catalogue, ingest per-customer agreements from pricelists, and register the accounting codes your invoices are matched by — all from one Pricing page.
Manage parts
Create, find, edit, and remove the parts — the products and components made at a site — that production jobs, datasheets, and reports reference in Bulk.