Manage displays
Pair shop-floor screens to Bulk and choose exactly which board or dashboard each display shows, then monitor and manage the whole fleet from one page.
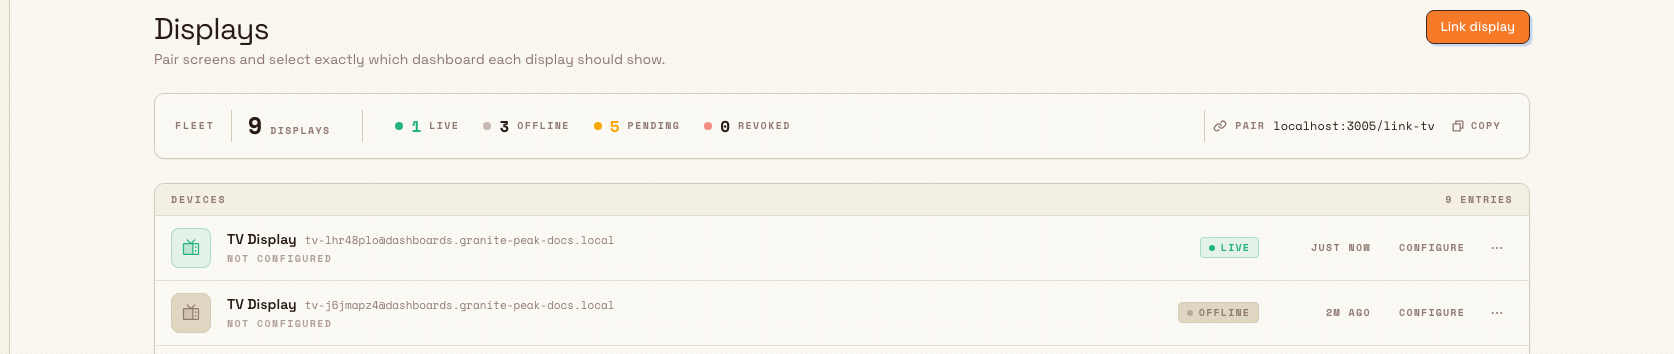
A display is a physical screen — a wall-mounted TV, a floor monitor, or a tablet — that shows one Bulk board or dashboard full-screen, without anyone having to sign in each morning. The Displays page is where you pair those screens to your workspace, point each one at a specific board or dashboard, and keep an eye on which screens are online.
Use Displays when you want live shop-floor visibility: an asset board above a production line, a Teamboard in the team room, or an OEE dashboard in the supervisor's office. OEE stands for Overall Equipment Effectiveness, a standard measure of how productive a machine or line is. Once a screen is paired and configured, it signs itself in as a dedicated read-only user and opens straight to the board you chose.
You reach the page from Settings > Organization > Displays. In the navigation it carries a Beta label.
administration.organization.displays-01
Before you start
You need the right permission, and one setup detail, before a display will pair.
- View displays requires the View dashboard devices permission
(
settings_dashboards.view) — this lets you see registered screens. - Pair and manage displays requires the Manage dashboard devices
permission (
settings_dashboards.manage) — this lets you link, rename, reconfigure, revoke, and delete screens. Without it, the Link display button and the per-row actions are hidden. - Both permissions are held by owner and administrator roles. In a standard workspace the built-in Super user and Entity admin roles include them.
- Select the entity (site) you are configuring for before you open the
configure dialog. The list of boards and dashboards you can point a screen at
is specific to the selected site. If no site is selected, Bulk shows the
message
Select an entity before configuring displays. - The board or dashboard you want to show must already exist for that site. A screen can target an Asset Board, a Teamboard, an OEE Assets dashboard, or an OEE People dashboard.
If you do not have view permission, the page shows an Access required message instead of the fleet.
Pair a screen
Pairing links a physical screen to your workspace. It takes two devices: the screen itself, and the computer where you are signed in to Bulk.
- On the screen, open the setup link. It is your workspace address
followed by
/link-tv— for examplegranite-peak.trybulk.app/link-tv. The exact link is shown on the Displays page next to Pair, with a Copy button so you can send it to the screen. - The screen shows a Display pairing page with a Pairing Code of six characters and an Expires in countdown. Keep that screen open.
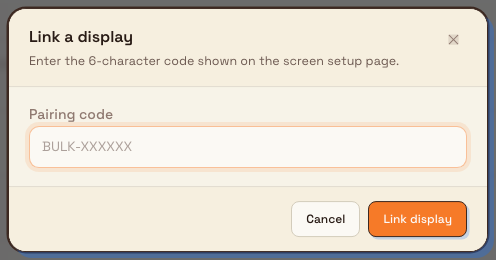
- On your computer, go to Settings > Organization > Displays and select Link display.
- Enter the six-character code from the screen into the Pairing code field, then select Link display again.
- Bulk confirms with a Display linked message and creates a dedicated dashboard user for that screen. The screen signs itself in automatically and opens the board you have assigned.
The pairing code is short-lived — it expires after roughly five minutes. If it runs out before you enter it, the screen requests a fresh code on its own, so just read the new code and try again.
administration.organization.displays-02
Configure what a display shows
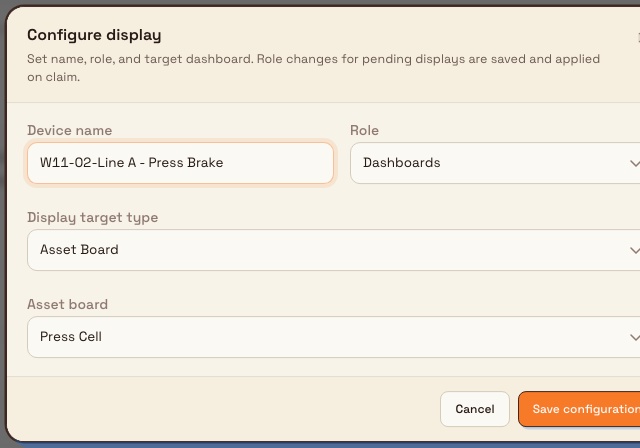
A paired screen shows nothing useful until you point it at a board. Open a screen's Configure action to set three things.
- Device name — a label you recognise, such as
Line A - Press BrakeorTeam Room TV. - Role — the read-only role the screen's dashboard user runs as. This controls what the display is allowed to see. Choose a view-only role; the built-in Dashboards role, which grants view access to boards, analytics, and Teamboards, is a good fit.
- Display target type and its target — pick one of Asset Board, Teamboard, OEE Assets, or OEE People, then choose the specific board or dashboard from the list. The list only shows targets that belong to the selected site.
Select Save configuration to apply it. Bulk checks that you have selected a site, a role, and a target for the chosen type; if something is missing it tells you which field to complete. A configured screen updates to show the new target within a few seconds. You can reconfigure a screen at any time, and you can even set the role on a screen that is still Pending — the change is saved and applied the moment the screen is claimed.
If a screen is linked but has no target yet, the screen itself shows Waiting for an admin to assign a dashboard route until you configure it here.
administration.organization.displays-03
Read the fleet at a glance
The strip at the top of the page summarises every screen in the workspace: a total count, then a breakdown of Live, Offline, Pending, and Revoked. Each screen in the list below shows its state as a coloured chip.
- Live — the screen has checked in within the last minute and is showing its board.
- Offline — the screen is linked but has not checked in recently, so it may be powered off or disconnected.
- Pending — a code has been requested for the screen but it has not been linked yet.
- Revoked — the screen has been signed out and must be paired again before it can be used.
Each row also shows the screen's target (for example Asset Board / Leeds Line A, or Not configured), its dashboard user email, and when it was last
seen.
Retire a display
Two actions on each row's menu remove a screen. They behave differently, so choose the right one.
- Revoke display signs the screen out and deletes its dashboard user, but keeps the record in your list marked Revoked. Use this to take a screen offline temporarily; you pair it again later.
- Delete permanently removes the record entirely and deletes the dashboard user. The screen must go through pairing from scratch before it can be used again.
Both actions sign the screen out immediately
Revoke and delete both delete the display's dashboard user and drop the screen back to the pairing page. Delete also removes the record, so its name, configured board, and history are gone and cannot be recovered — you would set the screen up as if it were new. Revoke first if you only need the screen off temporarily.
Granite Peak Manufacturing example
Dana Winters, an administrator at Granite Peak Manufacturing, wants live boards on the floor at the Leeds Fabrication Plant.
- Dana confirms the Leeds Fabrication Plant site is selected, then opens Settings > Organization > Displays and copies the Pair link.
- A supervisor opens that link on the wall-mounted TV above the press-brake line. The TV shows a six-character pairing code.
- Dana selects Link display, types the code, and confirms. The TV signs itself in.
- Dana selects Configure on the new row, names it
Line A - Press Brake, sets the Role to the read-only Dashboards role, sets Display target type to Asset Board, and picks the Leeds Line A asset board. - Within seconds the TV switches from the waiting screen to the live asset board. Back on the Displays page, the row turns Live.
A week later a second screen goes into the team room and Dana points it at the Leeds Fabrication Teamboard the same way. When the press-brake TV is taken down for maintenance, Dana selects Revoke display to sign it out, then pairs it again once it is back on the wall.
Feature state and limits
Displays is functional and available, and appears under a Beta label in the navigation while the experience is still being refined. As you plan a rollout, keep these verified points in mind.
- A screen shows Live only while it keeps checking in; the status flips to Offline about a minute after a screen stops responding (for example when it loses power or network).
- A pairing code is valid for roughly five minutes. After that the screen must present a new code before it can be linked.
- Each display targets exactly one board or dashboard at a time. To show a different board, reconfigure the screen; to show several boards you need several screens.
- Available targets are limited to Asset Board, Teamboard, OEE Assets, and OEE People, and only those that exist for the selected site.
Troubleshooting
- The Link display button is missing. You have view access but not the Manage dashboard devices permission. Ask an owner or administrator to grant it, or to pair the screen for you.
- Bulk says to select an entity before configuring. No site is selected. Choose the site the screen belongs to, then open Configure again.
- The code did not work. Codes expire after about five minutes and are six characters. Read the fresh code the screen shows and enter it again. If the screen says the device was not found, let it request a new code and retry.
- The screen says it is waiting for a dashboard route. The screen is linked but has no target. Open Configure and set a display target type and board.
- A screen shows Offline. It has not checked in recently. Confirm the screen is powered on, connected to the network, and still on the dashboard page.
Related guidance
- Organization settings — the rest of the settings that apply across your workspace.
- Manage roles and permissions — set up the read-only role a display should run as.
- Use the asset board and Configure the asset board — build the asset boards a display can show.
- Teamboards — create the Teamboards a display can show.
- Configure OEE dashboards, Review OEE assets, and Review OEE people — the OEE dashboards a display can show.
- Open a dashboard — view any of these boards from your own account.
Manage currencies
Set your organization's global display currency and maintain dated conversion rates between the currencies you trade in.
Manage workflow automation
Build, publish, and monitor no-code automations from Organization settings so Bulk reacts automatically to shop-floor changes and overdue work.